A Detailed Guide to Chili Pepper Planting Techniques and Management Methods
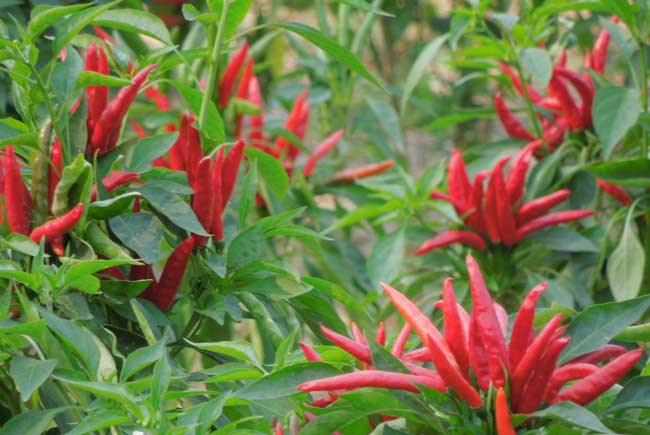
Chili pepper is an annual or sometimes short-lived perennial herbaceous plant of the genus Capsicum in the nightshade family. Its fruit is usually conical or oblong, green when unripe and turning bright red, green or purple when mature, with red being the most common. The fruit has a spicy taste because the skin contains capsaicin, which can stimulate appetite, making it one of the most common vegetables or seasonings in daily life. Below, the editor will introduce chili pepper planting techniques for everyone!
Chili Pepper Growth Habits
The chili pepper's growth begins with the germination stage. After sprouting and sowing, seedlings generally emerge in about 5-8 days, the first true leaf appears in about 15 days, and the seedling stage lasts until flower buds become visible. The flowering stage runs from the first flower cluster to the setting of the first fruit. The fruiting stage runs from fruit set to uprooting. The suitable temperature for chili pepper is between 15-34 degrees. The suitable temperature for seed germination is 25-30 degrees; germination takes 5-7 days, and seeds will not germinate below 15 degrees or above 35 degrees.
Chili pepper requires a relatively high temperature during the seedling stage, ideally 25-30 degrees during the day and 15-18 degrees at night. Seedlings are not tolerant of low temperatures, so attention must be paid to cold protection. If chili pepper is exposed to 35 degrees, it will cause flower and fruit drop.
Chili pepper has strict requirements for water conditions; it tolerates neither drought nor waterlogging. It prefers relatively dry, fresh air conditions.
Chili Pepper Planting Techniques
1. Cultivation Conditions
The temperature requirements of chili pepper fall between those of tomato and eggplant. The suitable temperature for seed germination is 23-30°C; below 15°C, germination cannot occur. Chili pepper seedlings require a relatively high temperature; when the temperature is low, growth is slow. During the early flowering and fruiting stage, the suitable daytime temperature is 20-25°C and nighttime is 15-20°C. During the fruiting stage, excessively high soil temperature, especially direct strong sunlight on the ground, is detrimental to root growth and easily causes viral disease and sunscald.
2. Land Preparation and Base Fertilizer
Chili pepper is intolerant of continuous cropping and cannot be continuously cropped with plants of the same family such as eggplant, tomato, potato or tobacco. The plot for cultivating chili pepper should have good drainage, convenient irrigation and drainage, and require deep plowing. It is best to carry out winter plowing and leave the soil fallow to freeze, so as to improve the soil and eliminate overwintering pests and pathogen spores.
Before transplanting, prepare the land again, keeping the surface soil in relatively large clods to allow aeration and good drainage, which has a good effect on preventing flower drop, fruit drop and leaf drop. Changsha vegetable growers' requirements for chili pepper plots are "deep furrows, high beds, breaking the hardpan, level soil, large clods, and smooth water flow." Bed width is generally 1.3-1.7 m (including furrows), with 2-3 rows planted. There are also wide beds of 2.3-2.7 m with transverse planting on the bed. While making the beds, apply 50-80 loads of decomposed barnyard manure, 15 kg of superphosphate and 25 kg of plant ash per mu as base fertilizer.
3. Sowing and Seedling Raising
① Seedbed selection: The seedbed should be chosen on a plot facing south with its back to the north, high, dry and well-drained, with a convenient water source, and where no nightshade family crops have been planted.
② Seedbed preparation: The seedbed is best deeply dug and the soil heated in the dog days of summer, with a layer of human and livestock manure splashed on top; after drying in the sun, cover with plastic film to prevent loss of fertilizer nutrients when it rains.
③ Sowing: Before sowing, water the bed soil thoroughly and break it up fine and level it. The seedbed width is generally 1.5-1.7 m. Generally, seeds are not soaked for sprouting. Early-maturing varieties are generally sown in January, and late-maturing varieties generally in February-March. Planting one mu requires 75-120 g of seed. After sowing, cover the seeds with fine soil mixed with old bran ash or coal ash, about 2 cm thick, just enough to cover the seeds. Then water; after the water is absorbed, cover with plastic film. Finally, use thin bamboo poles or bamboo strips to form small arched frames about 0.5 m high, cover with plastic film on top, and press the north side of the film down with soil to help resist wind. It is best to press both sides with bricks so the film can be lifted at any time for ventilation.
④ Seedbed management: After sowing and before emergence, generally no management is needed. Once emergence begins, immediately remove the plastic film, otherwise leggy seedlings will form. After emergence, uncover the film at 9 a.m. on sunny days and cover it again at 4 p.m. On cloudy and rainy days, ventilate as much as possible. If the bed soil turns white and the seedlings wilt, watering is needed; watering must be done between 9 a.m. and 1-2 p.m. Two hours after watering, check again; if any area is still dry, supplement with water so the seedlings grow uniformly. Do not water on cloudy, rainy or freezing days; otherwise, excessive humidity will lower the bed temperature and easily cause disease. In snowy weather, add grass mats, cover another layer of plastic film over the grass mats, and install electric lights inside the bed to help protect against cold and preserve seedlings.
⑤ Seedling transplanting: To make the seedlings sturdy with well-developed roots, when two true leaves appear, transplant once, with a plant spacing of 6-10 cm and row spacing of 12-15 cm, watering while transplanting to prevent wilting. The preparation, requirements and management of the transplant bed are similar to those of the sowing bed.
4. Transplanting Methods
Transplanting chili pepper is best done when the soil temperature is above 15°C. Transplanting too early, because of low soil temperature, results in slow growth and flower drop, failing to achieve early maturity. For transplanting distance, early-maturing varieties have a row spacing of 40-50 cm and plant spacing of 26-33 cm, with 1-2 plants per hole; late-maturing varieties have a row spacing of 66-73 cm and plant spacing of 50-60 cm, with 1 plant per hole. Choose a sunny afternoon for transplanting; on the morning of the same day, water the seedbed to make it easier to pull up the seedlings.
5. Field Management
① Cultivation and weeding: After transplanting and survival, carry out one shallow cultivation in time. When the plants begin to grow, carry out one focused cultivation. Before the plants close their canopy, cultivate once more. Cultivation should be combined with weeding and hilling.
② Fertilizer and water management: After transplanting, take advantage of sunny days to apply a seedling-promoting fertilizer; each application should not be too large or too concentrated, otherwise it easily causes excessive vegetative growth and delays flowering and fruiting. After the first and second layers of fruit have set, apply more fertilizer to promote fruit enlargement. After the fruit begins to be harvested, the soil must have sufficient fertilizer and water for the plants to grow and fruit normally. If heavy rain follows shortly after watering before the soil has dried, leaf drop and plant death will be quite common, especially during the period from the first fu to the beginning of autumn. Therefore, when irrigating, the irrigation time must be determined according to the weather forecast. The irrigation depth should not exceed three-quarters of the furrow, and it should be done at night or early morning, with rapid irrigation and rapid drainage.
③ Harvesting and seed saving: For fresh eating, most are harvested as green fruit, though red fruit can also be harvested. For dried chili peppers, red ripe fruit must be harvested. Harvest in a timely manner, otherwise it affects plant growth and fruiting.
For seed saving, use the method of combining plant selection with fruit selection during harvest, that is, select standard plants in the field according to variety characteristics and tag them as seed-saving plants. Harvest the first layer of fruit early for market, and keep the 2nd-4th layers of fruit as seed fruit. When harvesting the seed fruit after they turn red and ripe, further select fruit with the characteristics of this variety. Spread the harvested seed fruit in a cool place to after-ripen for 5-7 days, then cut open to take out the seeds, dry them and store.
Chili Pepper Planting Management
Chili pepper likes warmth, water and fertilizer, but high temperatures easily cause disease, waterlogging easily kills the plants, and too much fertilizer easily burns the roots. Different stages throughout the growth period have different management requirements. After transplanting and before harvest, promote roots and seedlings; from the beginning of harvest to the full fruiting stage, promote seedlings and push fruit; after entering the high-temperature season, protect roots and seedlings to prevent decline and death; in the late fruiting stage, continue to strengthen management to increase yield and income.
1. Management Before Harvest
During this period, soil temperature is low and roots are weak, so there should be more promotion and less control. That is, water lightly, apply topdressing early, cultivate frequently, and subject seedlings to mild temporary wilting. Water lightly for the seedling recovery water, and a small amount of manure water can be applied along with it. After watering, cultivate in time to increase temperature and preserve moisture, promoting root development. The temporary wilting period should not be too long, about 10 days or so; light watering and light wilting can be used to regulate the relationship between roots and seedlings. After the temporary wilting period ends, water and apply topdressing in time to increase early yield. Topdressing should be mainly nitrogen fertilizer, combined with some phosphorus and potassium fertilizer, to promote sturdy seedlings and prevent flower drop, and promptly remove the side branches on the main stem below the first flower.
2. Management from the Beginning of Harvest to the Full Fruiting Stage
At this stage, the temperature gradually rises, rainfall gradually increases, and pests and diseases occur one after another. This is the key period determining yield. To prevent premature aging, harvest the first fruit early, water in time, and keep the soil moist regularly, promoting seedlings and pushing fruit, striving to close the rows in the high-temperature season. Once in the full fruiting stage, before closing the rows, hill soil to protect roots and apply topdressing together with hilling.
3. Management in the High-Temperature Season and Afterward
The hot, rainy season easily induces viral disease, with severe flower and fruit drop and sometimes massive leaf drop. Therefore, in hot, dry years, irrigation must be done at the beginning of the drought period rather than at the end, always keeping the soil moist to suppress the occurrence and development of viral disease. After rain, apply a small amount of chemical fertilizer to protect the seedlings, and also irrigate in time to prevent drought after the rainy season from forming a peak of viral disease. In the high-temperature season, irrigate in the morning and evening. During the full flowering stage, spray 800-1000 times diluted chlormequat 3-4 times, which has a good effect on preserving flowers and increasing yield.
4. Management in the Late Fruit-Shrinking Stage
After the hot, rainy season, when the temperature turns cooler, the green pepper plants resume normal growth. Management must be strengthened to promote the formation of a second full fruiting stage and increase late yield. Water in time, and apply quick-acting fertilizer together with watering to supplement the soil nutrients that are lacking.
Key Management Points
1. Spring chili pepper seedlings are about 110 days old, and some can reach more than 150 days. In northern regions, they can usually only be transplanted in mid-April or late May. Chili pepper itself has high and stable yield, but yield reductions in some places are caused by variety degeneration, poor disease resistance and severe disease. The planting plot should be chosen as spring white land where no solanaceous vegetables, cucumber or yellow tobacco have been planted in recent years. A plot that has just harvested overwintering spinach is also not good. About 7 days before transplanting, apply 5000 kg of farmyard manure, 75 kg of superphosphate and 30 kg of ammonium bicarbonate per mu as base fertilizer, open furrows at 70 cm row spacing, level, form ridges, cover with film and wait for transplanting. Transplanting can be done at 30 cm plant spacing, with seedlings in two adjacent rows staggered, one plant per hole. 2500-3000 holes per 667 sq m.
2. From transplanting to the fruiting stage is the early stage of chili pepper field management; management should promote roots, seedlings and plant development. Pay attention to watering and cultivation during this period. 15 days after transplanting, apply 10 kg of phosphate fertilizer and 5 kg of urea, and combine with cultivation and hilling to a height of 10-13 cm to protect roots and prevent lodging. After entering the full fruiting stage, the focus of management is to strengthen seedlings and promote fruit. Remove the first fruit in time to prevent fruit drop from causing a decline in growth. Combine watering and fertilization, applying 20 kg of phosphate fertilizer and 5 kg of urea per 667 sq m, and hill the roots again. Pay attention to drainage and waterlogging prevention. Combine with spraying foliar fertilizer and hormones to supplement nutrients and prevent viruses.
3. Chili pepper is sensitive to various herbicides during its growth period, especially 2,4-D emulsifiable concentrate; improper pesticide spraying can cause serious phytotoxicity to chili pepper.
Chili Pepper Disease Control
1. Bacterial Wilt
[Disease characteristics] When a plant becomes diseased, the top leaves of the affected plant wilt during the day and recover on cloudy days or in the morning and evening. After 2-3 days, the leaves remain green but the whole plant wilts. When the diseased stem is cut open, the vascular bundles are brown; when the cut is immersed in water, a white cloudy bacterial fluid flows out from the cut.
[Occurrence pattern] Chili pepper bacterial wilt is a bacterial disease. It occurs severely when the soil temperature reaches 20°C-25°C, the air temperature reaches 30°C-37°C, and the soil moisture content is above 25%. When heavy rain suddenly clears, the temperature rises rapidly, humidity is high and transpiration is large, the pathogen is highly active, diseased plants increase, and damage is severe. The pathogen develops best at a soil pH of 6.6.
[Control methods] ① Select disease-resistant varieties. ② Adjust soil pH; apply 50-100 kg of lime per mu. ③ Practice crop rotation to prevent continuous or repeated cropping. ④ Inspect in time; when diseased plants are found, immediately pull them out and burn them, and scatter lime powder in the holes. In the early stage of disease, 100-200 PPM agricultural streptomycin or one packet of kasugamycin can be diluted in 150 jin of water to drench the soil, with continuous control 3 times; root drenching every 10-15 days, for 2-3 consecutive times.
2. Phytophthora Blight
[Disease characteristics] The disease can occur throughout the entire growth cycle. When seedlings are infected, it mostly occurs at the stem base; at the seedling stage, the stem base becomes dark green, water-soaked, soft-rotted or damping-off occurs, namely seedling damping-off. In some cases the stem base turns dark brown and the seedling withers and dies. When leaves are infected, the lesions are round or nearly round, 2-3 cm in diameter, with yellow-green edges and a dark brown center. When fruit is infected, it starts at the calyx; initially a dark green water-soaked spot appears, rapidly turning brown and soft-rotted. Under high humidity, a white mold layer grows on the surface, namely the pathogen's sporangiophores and sporangia. After drying, dark brown streaks form, and the branches and leaves above the diseased area quickly wilt.
[Occurrence pattern] The pathogen overwinters in the soil or diseased tissue as mycelium and oospores. Oospores spread by rain and irrigation water splashing. The optimum temperature for pathogen development is 23°C-31°C; high temperature and high humidity favor the occurrence of the pathogen.
[Control methods] ① If chili pepper phytophthora blight is soil-borne, pesticide root drenching must be used for control. ② The key control time is mid-to-late June, during the full flowering and fruiting stage of chili pepper, generally within 1-2 days after the first watering for root drenching. ③ Effective pesticides are 25% metalaxyl or 58% metalaxyl mancozeb, used as a 500-fold solution for root drenching; 0.3-0.4 jin per hole gives the best effect.
3. Powdery Mildew
[Disease characteristics] Chili pepper powdery mildew is caused by the fungus Leveillula taurica of the Ascomycota subphylum. Leaves, both old and tender, can be infected. In the field it mainly spreads through airflow. Under slightly dry conditions, the disease is prone to epidemic. On the upper surface of diseased leaves, small chlorotic yellow spots first appear, then expand into chlorotic yellow mottling with indistinct edges. On the underside of the diseased area, a white powdery substance is produced. In severe cases, lesions are densely distributed, causing the entire leaf to turn yellow and fall off in large numbers, forming bare stems, seriously affecting yield and quality.
[Control methods] ① When planting, choose varieties with relatively good disease resistance and dress seeds with New High Lipid Film (which can repel underground pests and diseases, isolate virus infection, not affect germination and imbibition, strengthen respiration intensity, and increase seed germination rate). ② Before planting, deeply plow the soil and spray 800-fold diluted New High Lipid Film to sterilize and disinfect, preserve heat and moisture. ③ At each growth stage of chili pepper, spray Chili Pepper Stem Strengthener in a timely manner to enhance internal nutrient transport and improve the chili pepper's resistance to external pathogens. ④ In the early stage of disease, spray 1000-fold diluted Duoyangqing plus 3000-fold diluted DuPont Fuxing and add New High Lipid Film; the effect is especially good.