A Detailed Guide to Purple Sweet Potato Planting Techniques and Management Methods
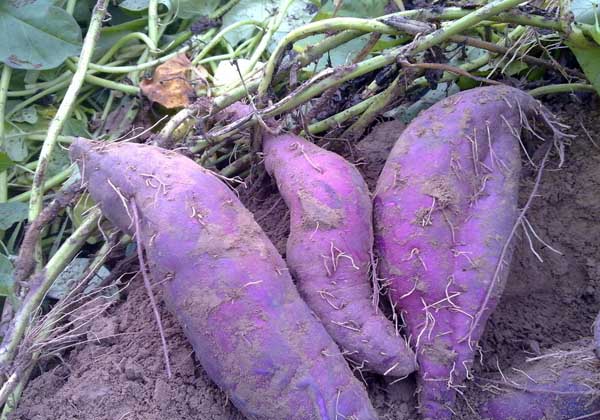
Purple sweet potato prefers a warm climate. The suitable growth temperature for stems and leaves is 18-25°C, and growth stops when the temperature falls below 15°C. The optimal soil temperature for tuberous root growth is 22-24°C, and enlargement stops when the soil temperature drops below 20°C. Purple sweet potato is a short-day crop and requires abundant, intense sunlight. During the growth period of purple sweet potato, the suitable soil moisture is 60%-80% of the maximum field water-holding capacity.
Variety Selection
Purple sweet potatoes can be divided by use into fresh-eating types and processing types. When selecting varieties, choose specifically according to the cultivation purpose. For fresh-eating types, choose varieties with good taste, moderate pigment content, good disease resistance, and attractive root shape. For processing types, choose varieties with high pigment content, good disease resistance, and high dry matter rate.
Seedling Raising Techniques
Raising seedlings early and growing enough strong seedlings to form early and robust adventitious roots is the foundation for fast seedling survival, early and abundant tuber formation, and high yield. To prevent diseases such as purple sweet potato black spot, strict screening must be carried out before raising seedlings. Choose tuberous roots without wounds or disease spots as seed tubers. They can be soaked for about 5 minutes in a 1000-fold solution of 70% thiophanate-methyl at a temperature of 51-54°C, or in a 500-fold solution of 25% carbendazim.
1. Preparing the Seedbed
Seedlings are generally raised on sunny days in mid-to-late March. Choose a seedbed that is sheltered from wind and faces the sun, on high and dry terrain, with good soil permeability, rich in organic matter, and easy to manage, using sandy soil or sandy loam. The seedbed should be 1.2 m wide and 20-30 cm deep, with length depending on the garden plot. Apply 10-15 loads of decomposed human and animal manure per mu, and after the soil has absorbed it thoroughly and dried, arrange the seed potatoes.
2. Arranging the Seed Potatoes
When the temperature reaches about 15°C, place the purple sweet potato seed tubers on the seedbed. Generally, about 18 kg of seed tubers are used per square meter, with the back facing up, the head slightly higher, and the tail touching the soil, all oriented in the same head-to-tail direction. Then apply 10-15 loads of decomposed livestock manure per mu, evenly covering the seed potatoes. Cover with 1.5-2 cm of fine soil, then cover with plastic film and firm the edges with fine soil.
3. Seedbed Management
Seedbed management mainly focuses on measures such as heat preservation, moisture retention, and ventilation, with temperature being the key factor. Before seedlings emerge, cover with straw curtains at night to maintain a bed temperature of 25-35°C. After seedlings emerge, control the temperature at 20-25°C and prevent high-temperature damage to seedlings. If the temperature inside the film exceeds 30°C, ventilate and dissipate heat promptly to prevent seedling scorching. When a cold wave arrives, do a good job of heat preservation. Before the seed potatoes sprout, generally do not water, to facilitate high-temperature sprouting, disease prevention, and seedling emergence. If the seedbed is too dry, use a sprayer to spray clean water on the seedbed. After seedlings emerge, pay attention to seedbed moisture. When the seedbed turns white, water promptly, moistening the bed soil and applying diluted human and animal manure to promote seedling growth. After the seed potatoes germinate, fertilization should begin. At the first "red bud" stage, diluted human and animal manure is generally preferred. When seedlings reach 10-13 cm in height, a second topdressing can be carried out using human and animal manure or urea. After each fertilization, splash clean water to wash the seedlings and prevent fertilizer from adhering to the seedlings and causing seedling scorching. Hilling can be done in 2-3 rounds. When seedlings are about 10 cm tall, the first hilling can be carried out, and the second hilling one week later, with a total of 3-5 cm of soil added. For hilling, it is best to use fertile, loose, fine soil mixed with burnt mud ash or decomposed compost, evenly sprinkled into the seedbed. Hilling can be combined with applying liquid fertilizer, doing the hilling first and then fertilizing, so that the soil and seedling base are closely combined, facilitating early and abundant new root development.
Land Preparation and Ridging
1. Soil Treatment
Purple sweet potato has wide adaptability to soil. To achieve high yield, it is generally advisable to choose loose, fertile sandy soil with relatively high organic matter. Because purple sweet potato tuberous roots have strong elongation ability, and tuberous root enlargement requires deep, loose soil, to obtain high yield, deep plowing and harrowing should be carried out after the spring thaw to conserve moisture. Before transplanting, remove root stubble, break up clods, combine fertilization with insect prevention (soil treatment), and complete ridging in one pass. For every 667 sq m, use 0.25-0.5 kg of 47% chlorpyrifos formulated into a 1000-fold solution, spray it on the ground, and then deep plow to prevent underground pests.
2. Deep Plowing and Ridging
Sweet potato can be cultivated by flat planting or ridge planting, with ridge planting being better. The advantages of ridge planting are: thickening the soil layer, expanding the root activity range, loosening the soil, expanding the contact area between topsoil and air and sunlight, facilitating gas exchange and increasing soil temperature, increasing the diurnal temperature difference, and also facilitating drainage and irrigation. Ridging should be done on sunny days when the soil is moderately dry and wet. Deep furrows and large ridges are preferable, achieving deep plowing, fine soil, and straight ridges to facilitate drainage and irrigation. The ridge surface should be level and smooth to facilitate digging holes and planting seedlings. The size of ridges should be determined according to local conditions such as field type, soil quality, planting season, planting method, growth period, and variety. For clay soil with strong water retention, ridges should be higher and narrower; for sandy soil with poor water retention, ridges should be wider and slightly lower. Ridge formation methods include single ridge with single row (ridge spacing 60-70 cm including furrow, plant spacing 20-25 cm), single ridge with double rows (ridge spacing 120 cm including furrow, plant spacing 25-30 cm), etc.
Plastic Film Mulch Cultivation
1. The yield of purple sweet potato has a very large positive correlation with its growth period. The longer the growth period, the higher the yield. Generally, the field growth period should be more than 170 days. Cultivation methods mainly include conventional cultivation, no-till rice field cultivation, and plastic film mulch cultivation, etc. Timely early transplanting and the use of plastic film mulch cultivation help increase fresh tuber yield and starch content, and improve quality. Determine a reasonable cutting density according to different soil fertility and characteristics. Cutting density is one of the main factors determining the number of tubers per mu. Within a certain range, as density increases, the number of tubers per mu increases, and yield rises accordingly. According to experiments, to achieve a yield of 1500 kg per mu with single fresh tuber weight kept below 200 g, the cutting density should be 4000-5000 plants/mu. Planting methods can use narrow ridge single row, that is, row spacing 50-60 cm and plant spacing 25-30 cm, or double ridge double row, that is, ridge width 1-1.2 m, with 2 rows planted per ridge and plant spacing 30-35 cm. The cutting method should preferably be shallow oblique insertion, resulting in early tuber formation, more tubers, uniform tuber size, high yield, and good marketability.
2. Plastic Film Mulch Cultivation
Using plastic film mulch cultivation has the following advantages:
① Heat preservation and warming: After plastic film mulching of purple sweet potato fields, the soil can better absorb and retain solar radiation energy. The ground warms quickly when exposed to light, and soil heat dissipates slowly, providing a heat preservation effect. According to reports, in sweet potato plastic film mulch cultivation, the accumulated soil temperature over the entire growth period increases by 460°C compared with the control (unmulched). Because of the good heat preservation and warming effect, this lays a good foundation for sweet potato rooting and growth.
② Regulating soil moisture: Due to the barrier of the plastic film, evaporation of soil moisture can be reduced. Especially in areas with severe spring drought, the moisture conservation effect is even more ideal. When the rainy season arrives, mulched plots drain easily and are less prone to waterlogging. In the event of later drought, mulching can also play a role in moisture conservation.
③ Increasing nutrient accumulation: After mulching with plastic film, soil temperature rises and humidity increases, microorganisms become unusually active, promoting the decomposition of organic matter and potential humus, and accelerating the accumulation and transformation of nutrients.
④ Improving soil physical properties: In mulch cultivation, the soil surface is not impacted by rainwater, so the soil remains loose, which is beneficial both to early seedling root growth and to later tuber enlargement.
⑤ Controlling disease and weed damage: Sweet potato nematode disease is a devastating disease in sweet potato production. At present, chemical control results are not ideal, but after mulching, solar radiation energy can be used to increase soil temperature and kill nematodes, with good disease control effect and no environmental pollution. At the same time, the high temperature under the film can scald weeds to death, reducing weeding labor and avoiding competition between weeds and sweet potato for fertilizer, water, and space.
⑥ Promoting the development of sweet potato roots, stems, and leaves: Compared with open-field cultivation, mulched sweet potatoes root 4-6 days earlier, and the root system grows faster. A strong root system can absorb more nutrients from the soil, laying the foundation for robust plant growth and tuber formation and enlargement. Because conditions are suitable under mulch cultivation, growth is vigorous, and the number of branches, number of leaves, stem length, and fresh weight of stems and leaves of sweet potato all increase by more than 50% compared with open-field cultivation.
⑦ Significant yield increase and improved quality: After mulching sweet potato, seedlings grow quickly. Selling cut seedlings of summer sweet potato can recover the cost of the plastic film. The average tuber yield per plant is about 0.7 kg more than the control, total yield increases by 32.6%, and the proportion of large tubers and starch content are also increased. Mulched soil is loose and easy to dig, reducing harvest damage rate and improving harvest quality.
3. Planting Seedlings and Covering with Film
There are two methods of covering with film. One is to cut and plant sweet potato seedlings first and then cover with film. Its advantages are convenient operation, fast speed, and suitability for large-area planting. The method is to first place the seedlings into the holes. Where conditions permit, water each hole, with a large amount of water. After the water seeps in and the soil dries slightly, cover with soil and firm it, keeping the ridge surface level. While the seedlings are still soft, cover with film. This can avoid the phenomenon of seedlings breaking easily when film is applied immediately after planting. After covering with film, use a knife to cut a T-shaped opening directly above the seedling, push the seedling out with a finger, and then seal the opening tightly with wet soil. After mulching, check frequently. If the film is lifted by wind or damaged, cover it with soil and seal it tightly in time. The disadvantage is that after planting it is not easy to maintain the original ridge shape, and the ridge surface needs to be leveled again so the film can be covered tightly. The other method is to cover with film first and then plant seedlings. Its advantages are that ridging and film covering can be done earlier, which helps retain moisture and increase temperature. When cutting seedlings, the higher soil temperature is conducive to seedling recovery and survival. When cutting, there is no need to dig holes. When planting seedlings, draw a soil furrow 5-7 cm long and 5 cm deep on the film-covered ridge surface, insert the sweet potato seedling into the furrow, and complete film puncturing, hole digging, and seedling planting in one step.
4. Fertilization
According to the principle of "organic fertilizer as the main component, chemical fertilizer as a supplement; base fertilizer as the main component, topdressing as a supplement," sweet potato has a long growth period, strong fertilizer absorption capacity, and high fertilizer demand. The demand is greatest for potassium fertilizer, followed by nitrogen fertilizer, and least for phosphorus fertilizer. Statistics on fertilizer application per 500 kg of fresh tuber production: approximately 2.5 kg nitrogen, 2.5 kg phosphorus, and 3.1 kg potassium are required, with an N:P:K ratio of 1:1:2. Fertilization should focus on base fertilizer, which generally accounts for about 70% of total fertilizer application. For a general fresh tuber yield of 2500-3500 kg per mu, apply 1500-2000 kg of organic fertilizer plus 40-50 kg of special compound fertilizer for flue-cured tobacco per mu, or apply 1500-2000 kg of organic fertilizer plus 10-12 kg of urea, 12-15 kg of potassium sulfate, and 20-25 kg of superphosphate per mu. For a yield of 1500-2000 kg per mu, apply 750-1250 kg of organic fertilizer plus 30-40 kg of high-quality potassium sulfate compound fertilizer per mu, or apply 750-1250 kg of organic fertilizer plus 5-8 kg of urea, 10 kg of potassium sulfate, and 15 kg of superphosphate per mu. Base fertilizer should be applied in furrows made by breaking ridges.
Field Management
1. Early-stage Management
The focus is checking seedlings and replanting missing ones, preventing missing plants and broken rows, and promptly replanting with large seedlings and large vines to ensure density. Conduct the first intertillage 10-15 days after cutting, combined with topdressing. In plots with good fertilizer and water conditions and vigorous growth, pinch off the tops of sweet potato seedlings to promote branching at the stem base, thereby favoring more tuber formation and larger tubers. This variety has a high fertilizer requirement. About 30 days after cutting, for plots with relatively poor soil fertility, combine breaking ridges and sun-whitening the soil, and apply 5-7 kg of compound fertilizer per mu.
2. Mid-stage Management
① Pay attention to weeding: In the mid-to-late period, small weed growth is generally inhibited, and the main damage comes from tall weeds, which should be pulled out promptly. Too many weeds not only compete with sweet potato for nutrients, but also shade and affect sweet potato photosynthesis. Ventilation and air permeability between vines become poor, respiration intensifies, nutrient accumulation decreases, and yield is severely reduced. Many weeds also affect harvest mechanization.
② Generally do not turn the vines: Turning vines seriously disrupts the growth order of sweet potato, and vines are easily broken during the turning process, easily causing yield reduction. At the same time, turning vines also consumes a large amount of labor and increases planting costs. Generally, a few vines rooting at the nodes in contact with the ground will not affect yield, and proper vine lifting is sufficient.
③ Properly control growth: In the mid-to-late period, vine growth has already taken shape. If it is too vigorous, it will affect the transfer of nutrients to the underground part, thereby affecting tuberous root yield. At this time it is difficult to control, and spraying regulators such as mepiquat chloride may appropriately control it, but it will not play a fundamental role. The ideal vine structure is that most branches are upright or semi-upright, minimizing the proportion of vines in contact with the ground, increasing canopy height, and ensuring good air permeability, so that 5% of the ground can be seen when observed from above.
④ Reasonable topdressing: If vines grow slowly, more than 10% of the ground can be seen, vines are short, and leaves are small, then 40-60 days before harvest, compound fertilizer can be diluted and poured at the roots. The fertilizer amount per mu is equivalent to 3-5 kg of diammonium phosphate and 2 kg of potassium sulfate. Note that the dilution ratio should be high to prevent root burning. If stems and leaves grow excessively, spray 15% paclobutrazol to control aboveground excessive growth and favor tuber enlargement. Skillfully apply crack fertilizer to promote tuber enlargement. Generally, crack fertilizer is applied when the ridge surface begins to crack, mainly nitrogen and potassium fertilizer, with 5 kg of urea and 10 kg of potassium sulfate per mu. When applying topdressing at different stages, it can be broadcast after rain. The application amount should be based on soil, base fertilizer amount, and stem and leaf growth, applying urea plus potassium fertilizer at the seedling stage, vigorous stem and leaf growth stage, and tuber enlargement stage respectively.
⑤ Pay attention to removing diseased plants: In recent years, sweet potato diseases have spread quickly, causing severe yield reduction. In the mid-stage, pay attention to removing plants with obvious symptoms, such as stem base cracking, plant yellowing, abnormal leaf color, and vine shrinkage, to reduce the risk of disease spread.
3. Late-stage Management
The focus is inspecting seedlings and supplementing foliar topdressing to prevent premature aging. If purple sweet potato encounters continuous rainy weather in the mid-to-late period and aboveground stems and leaves grow excessively, the vine-lifting method should be used. Break off adventitious roots occurring at stem nodes to control aboveground growth and favor tuberous root enlargement. Never use the vine-turning method, which artificially causes unnecessary yield reduction, and appropriately delay harvest.
Pest and Disease Control
1. Sweet potato black spot disease: It causes damage during sweet potato seedling raising, field growth, and storage. Disease spots mostly occur on wounds, appearing black to brown, round or irregular, with the center slightly sunken. Diseased tubers become bitter and inedible. Generally, soak seeds for 10 minutes in a 1000-fold solution of 50% carbendazim wettable powder. A 500-700-fold solution of 50% carbendazim can also be used to soak seedlings for 2-3 minutes, with good results.
2. Soft rot: It mainly occurs on tubers during storage. Soft rot bacteria first invade the interior from wounds and develop, destroying the middle lamella of cells, appearing soft, rotten, and watery, which farmers call "water rot." The affected tuber flesh appears pale yellowish-white and gives off a fragrant alcoholic odor. For control, soak tubers 1-2 times in a 500-700-fold solution of 50%-70% thiophanate-methyl wettable powder, with good results.
3. Sweet potato root rot: Also called sweet potato rotten root disease. Infected roots form dark brown spots and then become black and rotten. Infected leaves appear wilted, yellow, and fall off. Infected tubers form brown to dark brown disease spots and become deformed tubers. For control, spray twice with a 700-1000-fold solution of 50% thiophanate-methyl wettable powder, with good results.
4. Sweet potato weevil: It is one of the important quarantine objects. Adults gnaw on sweet potato young buds, stems and vines, and petiole cortex, and bite the tuberous roots, forming small holes. In severe cases, it affects yield. Control methods: In the early stage, use Nongdile diluted with water to pour on the sweet potato heads, or use a mixed solution of 600-fold trichlorfon plus kungfu to spray the sweet potato. 1. Purple Sweet Potato Varieties
There are dozens of purple sweet potato varieties. Through screening, some are suitable for fresh eating, some for processing, and some for extracting purple pigment. A complete set of cultivation techniques has been summarized for different varieties. In my opinion, farmers planting purple sweet potato should first identify the market and choose the right variety. If it is for food, it must have good appearance, smooth skin, uniform size, and an earlier market time than ordinary varieties, and the weight of purple sweet potato should be appropriately controlled, so that sales will be good. If purple sweet potato is used for extracting purple pigment, then varieties with high purple purity should be planted. For making wine, some older varieties with high yield can be chosen.
Harvest and Storage
For seed purple sweet potato, harvest is required in mid-to-late October. For fresh-eating purple sweet potato, it can be delayed until early November, but it must be completely harvested before frost.
Before storage, clean the potato cellar, remove the surface soil, and disinfect it. Before entering the cellar, dry the purple sweet potato for 1-2 days to heal wounds. During storage, pay attention to ventilation and dehumidification in the early stage, and heat preservation and moisture retention in the later stage.