Detailed Explanation of Key Points for Efficient Morel Cultivation
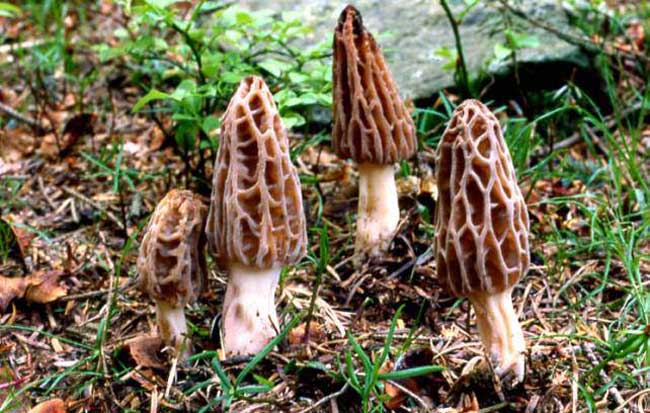
Morel, also known as sheep stomach mushroom, delicious morel, sheep mushroom, and straw-hat bamboo, is a precious edible and medicinal fungus. Morel was discovered in 1818. Its structure is similar to that of cup fungi; the upper part is folded into a network, resembling both a honeycomb and a sheep's stomach, hence the name. Morel yields are especially high within two to three years after a mountain fire, so pickers in North America collect morels based on mountain fires. However, once fires are controlled, its growth in the same area decreases year after year.
Ecological Conditions
1. Temperature and humidity: Morel is a low-temperature, high-humidity fungus. It mostly appears after rain from March to May each spring, and occasionally from August to September in autumn, but in very small numbers. Morel has a long growth period; besides requiring relatively low temperatures, it also needs a large temperature difference, which can stimulate mycelial differentiation. Its mycelial growth temperature is 21-24°C; the primordium formation temperature is 16-21°C; the fruiting body formation and development temperature is 4.4-16°C, with humidity of about 65%-85%. For this reason, cultivation should be scheduled as much as possible from November to December.
2. Sunlight: Weak scattered light is beneficial to the growth and development of morel fruiting bodies, while strong direct light has an adverse effect.
3. Soil: The soil pH requirement is about 6.5-7.5; neutral or slightly alkaline soil is favorable for morel growth. Morel often grows in limestone or chalk soils. It can grow in humus soil, black and yellow loam, and sandy mixed soil.
4. Air: In dark places and under excessively thick fallen leaves, morel rarely occurs, and even when it does, the quality is relatively poor. Sufficient oxygen is essential for the normal growth and development of morel.
Cultivation Techniques
1. Cultivation substrate formulas
① Sawdust 75%, bran 20%, phosphate fertilizer 1%, gypsum 1%, humus soil 3%.
② Cottonseed hulls 75%, bran 20%, gypsum 1%, lime 1%, humus soil 3%.
③ Corncob 40% (crushed), sawdust 20%, bean hulls 15%, bran 20%, phosphate
fertilizer 1%, gypsum 1%, sugar 1%, plant ash 2%. Any one of the above three culture substrates may be chosen. The substrate-to-water ratio is 1:1.3, and the water content is maintained at 60%.
2. Cultivation methods
(1) Sterilized substrate cultivation after bag removal
Mix the substrate well, fill 17×33cm polypropylene or polyethylene plastic bags with the substrate, about 500-600 grams per bag, then sterilize under high pressure or normal pressure. After sterilization, inoculate, place at 22-25°C for culture, and after the mycelium fills the bags, extend the culture for another 5-6 days so that the mycelium grows fully, and then cultivation can begin.
① Indoor cultivation after bag removal. After disinfecting the mushroom house, first lay a plastic film on each bed surface, then spread 3cm of humus soil, flatten it, and arrange the bag-removed fungus sticks one by one on the bed. Generally, 40 sticks can be arranged per 1 sq m of bed surface. After arranging the fungus sticks, spray water lightly once, then cover with 3-5cm of soil, and on the surface cover another 2cm of broadleaf tree fallen leaves. Keep the soil moist and the air humidity at 85%-95%. Generally after more than one month, with a temperature of 4.4-16°C, fruiting bodies can emerge.
② Outdoor cultivation after bag removal. Fungus sticks cultured indoors can also be moved outdoors for cultivation. Choose woodland with 3 parts sunlight and 7 parts shade to make beds. The bed width is 1 m, the depth is 20-25cm, and the length is unlimited. After preparing the beds, spray or water lightly once, and use 10% lime water to kill pests and miscellaneous fungi. The method of removing bags and arranging fungus sticks is the same as indoor cultivation, except that the bottom layer does not need plastic film, but attention should be paid to temperature changes in the beds to prevent direct sunlight.
(2) Outdoor raw substrate cultivation
Outdoors, choose a place with 3 parts sunlight and 7 parts shade or half shade and half sun, loose and moist soil, and good drainage. Dig a pit 20-25cm deep, first wet the bottom of the pit with water, weigh any one of the above formulas in proportion, mix well with water, spread a layer of substrate on the bottom layer, flatten it to about 4-5cm, use 2 bags of spawn (12×28cm) per sq m, break into walnut-sized spawn pieces, evenly scatter them on the substrate, then cover with a thin layer of fine humus soil. Then spread a second layer of substrate on top, still
4-5cm thick, flatten it, and then sow in the same way. After sowing, cover with loose humus soil to a thickness of 3-5cm, then cover with a layer of broadleaf tree leaves to keep warm and moist. After covering, sprinkle some water appropriately. To prevent trampling by people or livestock and direct strong light, build some branches on top of the leaves.
Post-planting management
Because morel is a moisture-loving fungus, maintaining humidity throughout its entire growth period is very important. In outdoor cultivation, winter and especially early spring have more rain and higher humidity, and with suitable temperatures, the mycelium grows well, sclerotia are easily formed, and fruiting bodies grow well. If during the growth period, especially in early spring, there is drought, timely watering to maintain moisture is necessary. In early spring, a temperature of 4-16°C within a few weeks can stimulate the formation of morel fruiting bodies. If the temperature changes drastically at this time, such as cold below 4°C or temperatures exceeding 16°C, it will affect the formation and development of fruiting bodies. Therefore, at this time it is very necessary to create good conditions for sclerotium formation and fruiting body growth and development. In short, maintaining a certain temperature and suitable humidity for morel in early spring is the key to successful cultivation.
Harvesting and preservation
Seven to ten days after the fruiting bodies emerge from the soil, they grow mature. Generally, when the color changes from dark gray to light gray or brownish yellow and the honeycomb-like depressions on the cap surface are fully extended, they can be harvested. After harvesting, clean off the soil, dry them in the sun or by drying promptly, put them in plastic bags, seal them, and preserve them.