Detailed Explanation of Key Points for High-Efficiency Cultivation Techniques of Chinese Mahogany
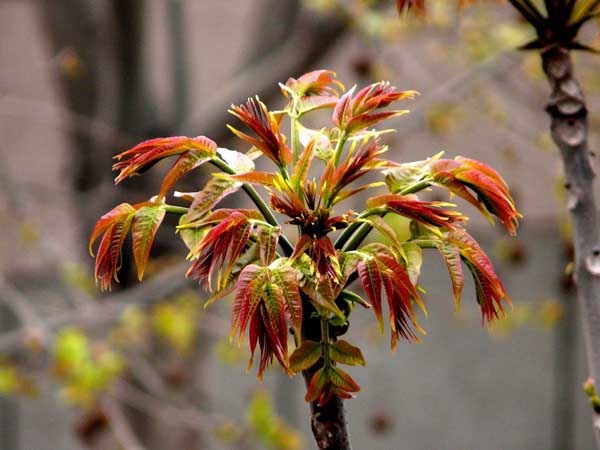
Chinese mahogany, also known as xiangchun ya, xiangchun, xiangzhuangtou, dahongchunshu, etc., has a root with two layers of bark and is also called chunbaipi. It originated in China and is distributed widely across areas north and south of the Yangtze River. It belongs to the Meliaceae family and is a deciduous tree with male and female flowers on separate plants. Its leaves are even-pinnately compound, its inflorescence is a panicle, and its bisexual flowers are white. The fruit is an elliptical capsule with winged seeds, and the seeds can be used for propagation. The tree is tall and, in addition to providing chun buds for consumption, is also a preferred tree species for landscaping. Chun buds are rich in nutrients and have dietary therapeutic effects, mainly used to treat externally contracted wind-cold, rheumatic arthralgia, stomach pain, dysentery, etc. Chinese mahogany is a tall arbor tree native to China. People have long been accustomed to eating Chinese mahogany, and as early as the Han Dynasty it was found throughout the regions north and south of the Yangtze River.
Propagation Techniques for Chinese Mahogany
These include seed seedling raising, stem cutting, root cutting, and root sucker propagation.
1. Seed seedling raising. Chinese mahogany seeds are small, with a hard seed coat and membranous long wings. Direct sowing makes it difficult for them to absorb water, and germination is difficult. To obtain uniform emergence, the seeds need to be pre-treated for germination before sowing. The methods are:
① Soaking seeds in warm water. In early March, soak the seeds in warm water at 30-40°C for a full day and night. After the seeds have absorbed enough water, remove them and place them in a cattail bag, then keep them at 20-25°C for germination. Water once each morning and evening, turning them evenly. When more than 50% of the seeds have sprouted white, they can be sown.
② Germination acceleration. Mix the seeds with river sand at a ratio of 1:2, and sprinkle in an appropriate amount of clean water. The moisture level should be such that it forms a ball when squeezed in the hand and breaks apart when the hand is released. Pile the sand-mixed seeds together in a steamed bun shape, water lightly each day, and turn them evenly from time to time. When 70% of the seeds have sprouted white, they can be sown.
2. Stem cutting. From after leaf fall in autumn to April-May of the following year, select 1-2 year old branches, cut them into 20 cm long cuttings, and insert them into a prepared seedbed at a row spacing of 25×15 cm, with 1/3 exposed above ground.
3. Root cutting propagation. When transplanting and planting out, cut off the overly long main and lateral roots of the plant, cut them into 15-20 cm segments, and in a prepared seedbed open furrows about 7 cm deep at a row spacing of 25 cm. Lay the roots horizontally in the furrows at a spacing of 10 cm, cover with soil and firm it, then water. When the seedlings are 10 cm tall, remove tillers in time, and pay attention to cultivating and weeding.
4. Root sucker propagation. The roots of Chinese mahogany have many adventitious buds. Under natural conditions, some young saplings often sprout around the tree crown, and these can be dug out and transplanted to cultivate new plants. However, natural suckering is limited, so artificial root cutting and sucker division can be used for propagation. The method: after the soil thaws in early spring and before budding, dig a trench 50-60 cm deep at the outer edge of the tree crown, cut off the root tips, and fill the trench back with soil. This can stimulate the root tips to form a large number of sucker seedlings and sprout new plants, which can be transplanted the following year.
5. Seedbed preparation. Choose flat terrain with fertile soil and good drainage, using sandy loam as the seedbed. Apply sufficient organic fertilizer at 4000 kg, spread it evenly, plow and turn, and make the soil fine and level. Make beds 1.2 m wide with deep furrows and high ridges. For seed sowing, open shallow furrows 5 cm deep at a row spacing of 20 cm, pour enough bottom water into the furrows, and after it seeps through, evenly broadcast the pre-germinated seeds in the furrows. Use 1.5-2 kg of dry seed per mu, cover with 2-3 cm of soil, then cover the bed surface with plastic film, covering it tightly and firming it, so as to raise soil temperature and promote earlier emergence.
6. Seedling stage management
① After the seeds germinate and emerge, immediately remove the plastic film in the evening, water lightly once, and take care to keep the bed surface moist.
② Thin and uniform the seedlings in time, removing overly dense seedlings as well as clustered, weak, and diseased seedlings, keeping a plant spacing of 3-5 cm. Along with pulling out weeds in the field, apply 10 kg per mu of diammonium phosphate as a top dressing, water thoroughly once, and loosen the soil shallowly, taking care not to damage the roots.
③ Thinning and transplanting. From late May to early June, when the seedlings have 4-6 true leaves and are 8-10 cm tall, in order to improve light and soil nutrient conditions for the seedlings, thinning and transplanting are needed, with a spacing of 10-15 cm, following the principle of keeping the strong and removing the weak, and keeping the sturdy and removing the thin. One day before thinning, water the bed surface thoroughly so that pulling the seedlings damages the roots as little as possible. Transplant the strong seedlings that are thinned out to a prepared seedbed in time at a row spacing of 25×15 cm, and water to settle the roots to promote survival.
④ After transplanting and survival, and after cutting propagation has produced young plants, apply fertilizer and water in time, cultivate and weed, and promote seedling growth. In the later stage, control plant height, adjust plant shape, increase nutrient reserves in the seedlings, and promote the formation of plump terminal buds through measures such as pinching, spraying paclobutrazol, or fertilizer and water management.
Field Planting of Chinese Mahogany
Planting can be carried out from after leaf fall to before budding in early spring of the following year. Before planting, apply 4000 kg of decomposed organic fertilizer per mu in the field, spread it evenly and plow deeply, make beds 2-2.5 m wide, and plant at a row spacing of 60-70×15-20 cm (dwarf dense planting), with 6000-8000 plants per mu, and more than ten thousand plants at the highest. After planting, water thoroughly in time to settle the roots and promote survival.
Field Management
1. Fertilizer and water
After planting and survival, apply fertilizer and water in time, and combine with cultivating and weeding to promote rapid growth of the seedlings.
2. Pest and disease control
The pests of Chinese mahogany include Chinese mahogany caterpillars, stinging moths, and cloud-banded longhorn beetles. During the larval stage, they can be sprayed and killed with 800 times diluted trichlorfon solution, and during the adult stage, they can be controlled with 1500 times diluted dimethoate. Diseases include leaf rust and powdery mildew, which can be controlled with 500 times diluted triadimefon. Clean the field in winter to reduce the overwintering base of pests and diseases.
3. Pruning
Each year after the spring harvest of chun buds is completed, from mid-to-late June to early July, prune the main trunk at a height of 20 cm above the ground (heading back) to stimulate lateral buds to sprout into new branches. From late July to early August, pinch the tops according to the vigor of the new branches. Those with strong vigor can be topped earlier; conversely, topping can be delayed. Combine this with fertilizer and water management to promote the formation of plump terminal buds. The growth period of Chinese mahogany buds is short, so they should be eaten early, fresh, and tender. There is a saying: "Chun buds before the rain are as tender as silk; chun buds after the rain are like wood." The harvest standard is preferably purple-red bud color and bud length of 10-15 cm. When harvesting, pick the terminal buds first and then the lateral buds. If the terminal buds are not harvested, the lower lateral buds are difficult to grow or grow poorly. When picking buds, gently twist them off by hand at the base of the leaf stalk, tie them into small bundles of 100-200 g, put them in plastic bags and seal them to prevent water loss and wilting, and improve market quality. Each year, chun buds can be harvested 3-4 times, with a yield of 400-500 kg.
Overwintering Protection Measures for Chinese Mahogany
Using plastic greenhouses to protect Chinese mahogany for overwintering cultivation: after leaf fall in autumn, dig out the transplanted Chinese mahogany plants together with their roots, tie every 50 plants into one bundle, pour mud slurry on the roots, and heel them in in a shady place. The method: in mid-to-late November, dig a trench 50-60 cm deep and 50 cm wide behind a house, stand the bundled plants in the trench at a slant, fill the roots level with soil, water thoroughly once, to the extent that it seeps to the bottom of the trench, and afterward keep it moist. After about 15 days of low temperature, they pass through the dormant period. Then plant them in a prepared greenhouse (row and plant spacing as above). Inside the greenhouse, maintain the temperature at 18-24°C during the day and 12-14°C at night. After 40-50 days, the first batch of chun buds can be harvested and marketed. Protected cultivation should strengthen fertilizer and water management to increase chun bud yield.
Processing, Pickling, and Storage
After processing and pickling, chun buds can be stored for a long time and transported out at any time. The method is simple and easy to carry out. Wash freshly harvested chun buds with water, dry them in the shade, then add 20 kg of salt per 100 kg. In a jar, place one layer of chun buds and one layer of salt, with less salt in the lower layers and more in the upper layers. After 3-4 hours, turn the jar, and after another 5-6 hours, turn the jar a second time. Turn the jar 5-6 times in total, and after about 20-30 days they will be properly pickled. Take them out, spread them out to dry for 1-2 days, add a small amount of rice vinegar to increase gloss and crispness, then sun-dry until 50-60% dry. Tie them into small bundles of 100-150 g, place them into small-mouthed jars, arrange them tightly and press them firm, seal the opening for storage, and they can be kept for 2-3 years.