Key Technical Points and Detailed Operation Methods for Efficient Vegetable Seedling Raising
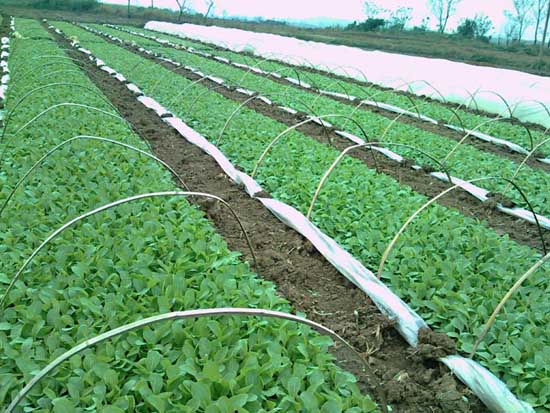
Vegetable seedling raising is a major feature of vegetable production and an important measure for gaining farming time, increasing the number of cropping cycles, giving full play to capacity, achieving early maturity, extending the supply period, reducing pests, diseases and natural disasters, and increasing yield. Seedling raising can also save seed, facilitate centralized management, and cultivate strong seedlings. Seedling raising is usually carried out ahead of the suitable sowing or field transplanting period, either during the severe cold of midwinter and early spring, or during the hot, rainy midsummer and early autumn. That is, during periods when climatic conditions are unsuitable for vegetable growth, protective facilities are used to create a suitable environment to cultivate seedlings of the right age. Once climatic conditions are suitable, they are transplanted to the field.
Types of Seedling Beds
1. Cold bed: A cold bed, also called a sun frame, is a protective facility that relies on sunlight for heating. It consists of three parts: the bed frame, glass covers (or plastic film), and straw mats. The site for a cold bed should be chosen in a place that is sheltered from wind and faces the sun, with high and dry terrain, good drainage, close to a water source, convenient transportation, near vegetable fields, near living quarters, and easy to manage. The cold bed should be oriented facing north to south with a slight deviation of 15° to the west, to increase light exposure and raise bed temperature. The bed frame structure can be built with cement and red bricks, or made of mud and straw, but the former is more durable, does not require annual repairs, and is more convenient to use. Generally, the north frame is 50cm high and the south frame is 15cm high. The glass windows both allow light in and provide insulation. Straw mats are generally laid over the glass windows on cold nights to enhance the insulation effect. Agricultural film can also be used instead of glass windows, but care must be strengthened on rainy or snowy days to ensure smooth drainage and timely clearing of snow.
2. Small plastic arch tunnel: A small plastic arch tunnel is made by bending bamboo strips into arched frames and covering them with plastic film. The frame height is 50cm, covered with a 2m-wide film. One side of the film is pressed down with soil to improve insulation and block wind; the other side is held down with bricks so the film can be lifted at any time for ventilation. Small arch tunnels are often used in early spring to sow seeds of gourds and beans, or to hold nutrient pots with seedlings of solanaceous fruits and gourds. They can also serve as temporary planting beds. Small arch tunnels are generally 1 to 2m wide and 20 to 30m long.
3. Plastic greenhouse: A plastic greenhouse is made by constructing an arched framework from bamboo, wood, reinforced concrete strips, or steel pipes, and covering it with plastic film. At present, provinces in the Yangtze River basin mostly use plastic greenhouses 30m long and 6m wide, or 20m long and 4m wide. In winter, plastic greenhouses are mainly used for raising solanaceous fruit seedlings (Figure 1-2). Small plastic arch tunnels are set up inside the greenhouse, and electric heating wires are laid inside the small arch tunnels for raising pepper, eggplant, and tomato seedlings. As a seedling-raising facility, the plastic greenhouse is more convenient to manage and more effective than cold beds, hot beds, and small plastic arch tunnels.
Preparation of Seedbed Culture Soil
1. Requirements for culture soil: The bed soil used for vegetable seedling raising is also called culture soil. The quality of the culture soil has a great bearing on the growth and development of seedlings. To cultivate strong seedlings, the culture soil is required to be fertile, loose, slightly acidic or neutral, with good water retention and drainage, and free of pathogens, insect eggs, and weed seeds. To give the culture soil the above excellent properties, it must undergo scientific blending, composting and fermentation, and chemical disinfection.
2. Proportions and raw material preparation for culture soil: Garden soil is the main component of culture soil and should generally account for 30-50%. When selecting garden soil, care must be taken to prevent the introduction of soil-borne diseases such as damping-off, Rhizoctonia rot, early blight and Phytophthora blight of solanaceous crops, and Fusarium wilt and anthracnose of gourds. Generally, do not use garden soil from vegetables of the same family. Soil that has grown solanaceous fruits or gourds should not be used; soil that has grown beans, onions, or garlic is preferable. This is because bean fields contain root nodule bacteria, which have a certain nitrogen-fixing effect and can increase soil fertility; onion and garlic fields contain large amounts of sulfur compounds such as allicin, which help inhibit or kill pathogens in the soil. If such garden soil is truly unavailable, the topsoil must be removed and subsoil dug out. Garden soil is best dug out during the high temperatures of August, fully baked in the sun, then crushed and sieved. The sieved garden soil should be stored indoors or covered with film, kept dry for later use. Organic fertilizers, such as human and livestock manure and urine, other barnyard manure or compost, edible mushroom spent substrate, and garbage, are the main nutrient sources and should account for 20-30% of the culture soil. These organic fertilizers must be fully fermented and decomposed before use. Undecomposed organic fertilizers adsorb more pathogens and easily damage seedlings. Therefore, pig manure residue and other barnyard manure or compost must first be piled for decomposition before use. Alternatively, mix them with garden soil and pile them together until fully decomposed before use. Chemical fertilizers: approximately 1kg of urea, 0.5kg of potassium chloride, and 2kg of superphosphate or calcium magnesium phosphate are added per 1000kg of culture soil. Carbonized rice husk or plant ash can increase potassium; it makes the soil loose, air-permeable, darker in color, absorbs more solar heat, and raises soil temperature, and can account for 20%-30% of the culture soil. When carbonizing rice husk, the appropriate degree should be controlled; generally, the rice husk should be completely carbonized but still basically retain its original shape. If rice husk is lacking, waste cottonseed hulls from edible mushroom cultivation can be used instead, piled and fermented together with garden soil and barnyard manure.
3. Composting and fermentation of culture soil: After the raw materials are prepared, composting and fermentation should be carried out 40-50d before sowing and seedling raising. Generally, a high, dry, well-drained flat area near the seedling-raising site is chosen for composting the culture soil. The pile width is 1-1.5m, and the pile length depends on the amount of culture soil; the pile is shaped as an elongated trapezoid. Specific method: First spread a 20cm-thick layer of garden soil on the ground, then soak it thoroughly with manure water, then spread a 10-13cm-thick layer of barnyard manure and other miscellaneous fertilizers, and splash another layer of manure water. Then continue adding to the pile in the above order, generally to a height of 1.5m, and then cover with plastic film to protect from rain.
Installation of Electric Heating Hotbeds
1. Performance and models of electric heating wires: Electric heating hotbeds mainly rely on electric heating wires to raise seedbed temperature. An electric heating wire is essentially an electric-to-heat conversion device, a specially made wire with a certain resistance. Its exterior is wrapped with strong heat-resistant vinyl resin as an insulating layer. It is buried in a soil layer at a certain depth. After electricity is connected, current passes through the high-resistance conductor, generating a certain amount of heat, converting electrical energy into thermal energy, thereby raising soil temperature. The heat emitted by electric heating is transferred horizontally outward layer by layer, with a transfer distance of about 25cm, and the most heat is within 15cm. The closer to the electric heating wire, the higher the soil temperature; the farther away, the lower. Therefore, to distribute heat evenly in the seedbed soil, the distance between wires should not exceed 30cm.
2. Installation procedure for electric heating hotbeds
① Level the bed bottom: In a PS—4 type greenhouse, make beds according to the standard of 10m or 20m bed length and 1m width, remove excess soil from the bed, and level the bed bottom.
② Lay the insulation layer: Lay a 5cm-thick insulation layer on the bed bottom and rake it level.
③ Lay the heating wires: Before laying the wires, prepare several small bamboo skewers. When laying the wires, insert the small bamboo skewers directly at both ends of the seedbed according to the wire spacing. Then use 3 people to lay the wires, with two people pulling the wire at both ends, pulling each one tight. Before laying the wires, it must be considered that the two lead-out wires of the electric heating wire are at the same end of the seedbed for easy connection to the power supply. A (10×1) m2 seedbed uses 1 DV20810 type electric heating wire, which makes exactly 5 loops; a (20×1) m2 seedbed requires 2 DV20012 type electric heating wires, which make exactly 6 loops. This ensures that the lead-out wires are all at the same end of the seedbed. When laying the wires, note: First, wires must not overlap or cross, and must not be twisted, to prevent burning out when electricity is connected. Second, the heating wire must not be arbitrarily lengthened or shortened, because its resistance and power are rated; otherwise it will burn out. Third, when 2 or more electric heating wires are laid in the same bed, they can only be connected in parallel, not in series.
④ Power-on test: After the wires are laid, connect the power supply, close the knife switch, and power on for 1-2min. If the heating wire becomes soft and warm, it indicates normal operation, and the bed soil can be covered; if the heating wire does not heat up, it indicates the circuit is not connected, and the circuit should be checked and the fault eliminated.
⑤ Cover with bed soil: After the power-on test, cover the electric heating wires with 8-10cm-thick bed soil, that is, cover 100-125kg of bed soil per m2. When covering with soil, note that part of the bed soil should first be used to press down the electric heating wire in sections to prevent displacement when filling soil, and the bed soil should be spread along the direction in which the electric heating wires extend. After the bed soil is covered, scrape the bed surface flat with a wooden board for sowing.
Sowing in Electric Heating Hotbeds
1. Determination of sowing time: The sowing time for electric heating hotbeds depends on the cultivation method, cultivation purpose, and the amount of power-on time. For early spring cultivation in greenhouses, solanaceous fruits should be sown in mid-to-late October, and grown into large seedlings of the right age to overwinter, then transplanted into plastic greenhouses in mid-February. Cucumbers should be sown in early February and transplanted into plastic greenhouses in mid-March. For open-field cultivation, solanaceous fruits are sown from late December to early January and transplanted to the open field in early April; cucumbers are sown in early March and transplanted to the open field in early April. In addition, if early-maturing varieties are chosen for early-maturing cultivation, sowing can be appropriately advanced by 7-10d; if mid-to-late-maturing varieties are chosen for high-yield cultivation, sowing can be appropriately delayed by 7-10d. If the power-on time for seedling raising is short and seedlings grow slowly, sowing can be appropriately advanced. In recent years, some vegetable growers have explored a method of powering on only during the emergence stage and not during other periods, while advancing the sowing time to mid-November, greatly reducing the cost of seedling raising.
2. Seed treatment before sowing: The common methods of seed treatment currently used in production are warm water soaking and germination.
① Warm water soaking. Warm water soaking can kill pathogens lurking on the seed surface and promote uniform water absorption by the seeds. The specific method is: Put the seeds in a gauze bag (fill only half the bag so the seeds can be stirred), generally first soak in room-temperature water for 15min, then transfer to warm water at 55-60℃, with the water amount being 5-6 times the seed amount. To heat the seeds evenly, stir continuously and promptly add hot water to maintain the water temperature within the required range for 10-15min. Then allow the water temperature to gradually decrease and continue soaking for several hours. Usually solanaceous fruit seeds are soaked for 4-5h, cucumber, pumpkin, and melon seeds for 2-3h, and other gourd seeds are soaked for correspondingly longer time depending on seed coat thickness.
For warm water soaking, strictly control the water temperature and time. If the temperature is too low and the time is short, the sterilization effect will not be achieved; if the temperature is too high and the time is too long, the seeds will be scalded. When adding hot water, do not pour it directly onto the seeds. After soaking, rinse the mucus on the seed surface clean with clear water and drain the surface moisture.
② Germination: Germination can make seeds sprout quickly and uniformly, shorten the heating time in electric heating hotbeds, and reduce energy consumption. The method is: Mix the warm-water-soaked seeds evenly with moist fine coal ash, with a seed-to-coal-ash volume ratio of 1:2-3. After mixing, adjust the moisture content to 60%, that is, it can be formed into a ball by hand and scattered when released. Then put the coal-ash-mixed seeds into a container (clay jar, plastic bag, etc.), leave ventilation holes on the top or side, and immediately place in a 28-30℃ constant-temperature incubator or soil incubator for germination. During germination, check once every 12h, turn the seeds, and replenish oxygen and moisture. Generally cucumber seeds sprout after 15-20h, tomato seeds after 2-3d, pepper seeds after 3-4d, and eggplant seeds after 3-5d. When 75% of the seeds have sprouted (white radicle tip showing), they can be sown.
③ Sowing: Sowing should be done on a sunny day or when the weather is about to warm up just after a cold wave. When germination begins, monitor weather changes to ensure good weather at sowing. Before sowing, water the leveled bed surface thoroughly with bottom water. After the water seeps down, scatter a thin layer of medicated soil (the medicated soil mixing ratio by weight is 1 part chemical agent mixed with 1000 parts soil. Commonly used pesticides include quintozene, dexon, thiram, etc.), then begin sowing. The sowing rate per m2 varies by crop type: tomato 8-10g, pepper 15-20g, eggplant 10g, cucumber 40-50g. Solanaceous fruit and cucumber seedlings all need temporary planting, so the broadcast sowing method is generally used. Spread the germinated seeds together with the coal ash evenly over the seedbed, then promptly cover with 0.5-1.0cm-thick seed-covering culture soil, and spray a thin layer of water with a watering can. Any seeds that are washed out should be covered again with culture soil. To increase heat and moisture retention, cover the bed surface with a ground film, then set up a small plastic arch tunnel, forming a three-layer integrated cover of ground film, small arch tunnel, and greenhouse for insulation.
Seedling Cultivation and Management
1. Management of the sowing bed: Management of the sowing bed refers to the management during the period from sowing to pricking out, and can be divided into three stages.
① Emergence stage: From sowing to the cotyledons slightly unfolding, generally 3-5d. Management mainly maintains relatively high temperature and humidity. After sowing, generally no ventilation is given, and the temperature is kept at 25-30℃, with air relative humidity above 80%, to reduce bed soil evaporation. If the bottom water is found to be insufficient, replenish it promptly. After the 3rd day of sowing, seedlings begin to arch through the soil. If seedlings are found to be “wearing caps”, remedial measures can be taken: if the soil cover is too thin, add more covering soil; if the surface soil is too dry, spray water to help the seed coats detach. When a small number of seedlings are found arching through the soil, do not immediately remove the ground film, otherwise emergence will be uneven. Wait until most seedlings' cotyledons emerge from the soil before removing the ground film, but do not remove it too late either, to avoid forming “leggy seedlings”.
② Heart-leaf stage: From the cotyledons slightly unfolding to the appearance of heart leaves, generally about one week or a bit longer. Its growth characteristic is that seedlings enter the greening stage, growth slows down, cotyledons begin photosynthesis, and a moderate amount of dry matter accumulates. Management at this stage mainly ensures steady growth of the seedlings. There are four main measures:
◆ Lower bed temperature: For pepper and eggplant, control at 18-20℃ during the day and 14-16℃ at night; for cucumber and tomato, the bed temperature should be controlled about 2℃ lower than for pepper and eggplant. While lowering the temperature, strictly prevent seedlings from freezing, because once seedlings at the heart-leaf stage are frozen, it is very difficult for them to recover, and they may even form “bald-top seedlings”.
◆ Lower humidity: If the bed soil is too wet, seedlings will have few fibrous roots and the hypocotyl will elongate too quickly, causing spindly growth, and it also easily induces diseases such as damping-off and gray mold. Bed soil moisture is generally controlled at 60%-80% of field capacity. Under excessively high humidity, measures such as ventilation, controlling watering, and scattering dry fine soil can be taken to reduce humidity, so that the bed soil surface “shows white”; do not spray water unless it “shows white”. This can both control hypocotyl elongation and promote deeper root growth. Air humidity should also not be too high; generally a relative humidity of 60%-70% is suitable. The main method of reducing air humidity is ventilation. When ventilating, note that the ventilation opening must face away from the wind.
◆ Strengthen light: Sufficient light is an important guarantee for improving seedling quality during the greening stage. Therefore, under suitable temperature conditions for greening, seedlings should be exposed to as much sunlight as possible. When the temperature is not too low, remove the film inside the tunnel as early as possible in the morning and cover it as late as possible in the afternoon.
◆ Timely thinning: To prevent seedlings from crowding and the hypocotyl from elongating too quickly to form “leggy seedlings”.
③ Basic vegetative growth stage: During this period, seedlings mainly carry out vegetative growth, with a relatively high growth rate, especially rapid increase in root weight. The length of this period, except for gourds, generally requires 20-30d for pepper and tomato. The basic management principle is: After the “control” management of the heart-leaf stage, switch back to “promotion” management. The main “promotion” measures are as follows.
◆ Appropriately raise bed temperature: Raise the bed temperature by 2-3℃ compared with the heart-leaf stage, and adopt variable temperature management, with higher daytime temperature (20-23℃) and slightly lower nighttime temperature (13-16℃).
◆ Strengthen photosynthesis: During this growth period, large amounts of nutrients must be accumulated. Therefore, light must be increased to strengthen photosynthesis. Generally, without artificial supplemental lighting, ventilate and expose to light as much as possible on clear days, and also ventilate and expose to light appropriately around noon on cloudy and rainy days.
◆ In water management, ensure that the bed soil surface is in a semi-dry, semi-moist state. This requires watering immediately when the bed soil surface has not yet “shown white”. Generally, on normal clear days, water once every 2-3d, with about 0.5kg of water per m2 each time. This ensures that the bed soil surface alternates between moist and dry, which can play a good role in preventing damping-off and gray mold.
◆ Appropriate topdressing: If the bed soil nutrients are insufficient and seedlings grow thin and weak, topdress in combination with watering. For topdressing, choose 0.1% NPK compound fertilizer solution or 20%-30% decomposed human manure water.
◆ Improve seedling resistance and adaptability to environmental conditions after pricking out. Generally, 2-3 days before pricking out, gradually ventilate and lower temperature to harden the seedlings.
2. Pricking out: Pricking out is also called temporary planting or seedling arrangement. It is done to prevent seedlings from crowding and growing spindly, expand the spacing between seedlings, increase the nutritional area, satisfy the light and nutrient conditions needed for seedling growth and development, promote further growth and development of seedlings, make seedlings thick-stemmed, short-internoded, dark green in leaf color, and well-rooted. It is a fundamental measure for cultivating strong seedlings.
① Seedbed preparation: The pricking-out bed should be prepared early; only the bed can wait for the seedlings, not the seedlings for the bed. Generally, preparation should be completed half a month before the pricking-out period: prepare the land, apply sufficient base fertilizer, and cover with plastic film to keep the bed soil dry.
② Pricking-out time: The pricking-out time should be determined according to climatic conditions and the morphological indicators of the seedlings. After the beginning of spring, when the climate warms and there are no major fluctuations, pricking out can begin; from the morphological indicators of the seedlings, cucumbers are ready for pricking out at two cotyledons and one heart leaf, and solanaceous fruits at 3-4 true leaves.
③ Pricking-out density: The pricking-out density varies by type. According to experiments, pricking-out density has a great relationship with the early yield of the crop. Generally, increasing seedling spacing significantly increases early yield and can achieve higher yield. Therefore, when the pricking-out bed is sufficient, appropriately sparse pricking out is conducive to cultivating strong seedlings. Specific pricking-out densities: cucumber and tomato 10×10cm, eggplant 8×8cm, pepper 6.5×6.5cm.
④ Pricking-out method: For pricking out, watch the weather carefully and choose a “cold tail and warm head” period, a clear and windless day, and complete it around noon. Half a day before pricking out, water the seedbed to facilitate digging up seedlings with more soil and less root damage. When pricking out, it is best to plant large and small seedlings separately for easier management. Pricking out should be shallow, generally with the cotyledons 1-2cm above the soil surface. After pricking out, firm the soil around the roots and promptly water with settling water. In addition to seedbed pricking out, in recent years nutrient pot pricking out has been widely used in seedling raising of solanaceous fruits and gourds. Nutrient pot seedling raising can shorten the recovery period after transplanting to the field, allow survival immediately after transplanting, and accelerate plant growth and development. It is an important measure for achieving early maturity and high yield of fruit vegetables. Common nutrient pots include plastic pots, paper pots, and straw pots, with an upper diameter of 9cm, a lower bottom diameter of 7cm, and a height of about 9cm. Whether seedbed pricking out or nutrient pot pricking out, after pricking out they must be covered with a small plastic arch tunnel for cold protection.
3. Management of the pricking-out bed: Seedlings grow for a relatively long time in the pricking-out bed, and management can generally be divided into three stages.
① Recovery stage: After pricking out, the seedling root system is damaged to a certain extent and needs 4-7D to recover, which is called the recovery stage. During this period, management should maintain a relatively high bed temperature, striving for soil temperature of 18-22℃, air temperature of 25-30℃ during the day and 20℃ at night. At the same time, keep the tunnel closed, basically without ventilation, to maintain relatively high air humidity, reduce plant transpiration, prevent excessive water loss causing severe wilting, and thus promote wound healing and new root formation.
② Vigorous growth stage: During this period, seedling growth is large, growth speed is fast, leaf area increases rapidly, and vegetative growth and reproductive growth proceed simultaneously. Management should provide suitable temperature, strong light, sufficient water and nutrients, and reflect control within promotion, promoting steady growth. After seedlings resume growth, the temperature control indicators should be slightly lower than in the recovery stage, generally air temperature lowered by 4-5℃ and soil temperature lowered by about 2℃. Also increase ventilation and light exposure to improve seedling photosynthetic efficiency, and ensure water and nutrient supply. On normal clear days, water once every 2-3D; on cloudy and rainy days, water once every 4-5d; strictly prevent the bed soil from “showing white”. Watering should be combined with topdressing, using 0.2% NPK compound fertilizer and about 30% decomposed human manure for irrigation.
③ Hardening stage: To improve seedling adaptability to the environment after transplanting and shorten the recovery time after transplanting, seedling hardening should be carried out about one week before transplanting. Specific measures include:
◆ Lower bed temperature: Daytime air temperature can be lowered to 18-20℃, nighttime to 13-15℃.
◆ Control water: Generally no more watering during the hardening stage, to promote the bed soil to “show white”.
◆ Remove film and ventilate: When hardening begins, first remove part of the film; as the hardening period extends, gradually remove more, until finally all the film is removed, allowing complete adaptation to the open-field environment.
◆ Take pesticide to the field: Apply pesticide once 2-3 days before transplanting, strictly preventing diseased or pest-carrying seedlings from being taken to the field.