How to Grow Peppers for High Yield? A Detailed Guide to Practical Cultivation Techniques
Peppers are solanaceous fruit vegetables, divided into "hot peppers" and "sweet peppers." People customarily classify peppers by whether they have a spicy taste, and further divide them by the degree of spiciness into "strongly pungent peppers" and "mildly pungent peppers." Peppers are a vegetable and seasoning that the people of our country enjoy eating, and have even become a special craving for people in some provinces (regions), gradually spreading throughout the country's cities and countryside. Peppers are rich in nutrients and have relatively high medicinal value. According to measurements, the vitamin A and B contained in pepper fruits are higher than in cucumber, tomato, eggplant and other fruit vegetables. In particular, the vitamin C content is 4-7 times higher than the above vegetables; every 100 grams of fresh peppers contains 170-360 mg of vitamin C, up to a maximum of 460 mg. Peppers serve as a seasoning because they contain capsaicin; eaten in small amounts, it strengthens the spleen and opens the appetite, increases appetite, and aids digestion, and also has medicinal functions such as dispelling cold and removing dampness, invigorating blood and unblocking collaterals. It also has certain therapeutic effects on arthritis, chilblains, green snake bites, underarm odor, and so on, and is therefore hailed as a "health food."
With the acceleration of the pace of adjustment in the planting industry structure, the pepper planting area in our county has shown a year-by-year increasing trend. In terms of planting patterns, it has developed from plastic-mulch peppers as the foundation toward greenhouse peppers, and has also broken the original single focus on bell peppers, gradually developing Three Cherry Peppers on a larger scale. In order to support pepper production in our county and meet the technical needs of the broad masses of farmers, this focuses on introducing the cultivation techniques for plastic-mulch peppers, autumn-delayed greenhouse peppers, and Three Cherry Peppers.
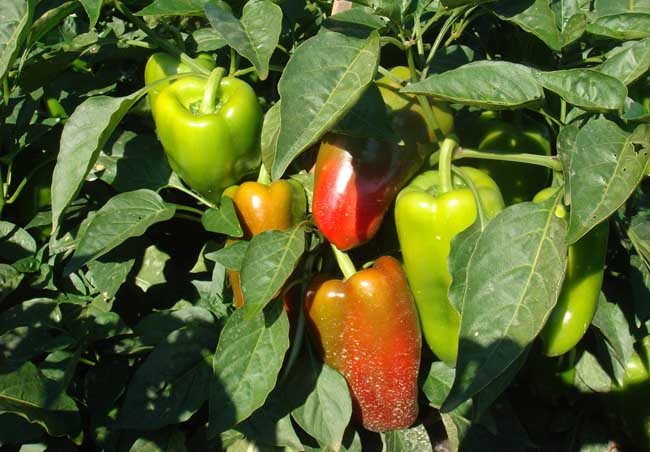
Morphological Characteristics of Peppers
1. Roots: The taproot of peppers is not very developed, with few roots and shallow soil penetration; the root mass is generally distributed in the topsoil layer 25-30 cm deep. Under seedling-raising and transplanting conditions, because the taproot is cut off, the main root mass is distributed only within a 10-15 cm thick soil layer. The root system has weak regeneration ability, and adventitious roots are not easily produced at the base of the stem. For this reason, when raising seedlings and transplanting, root-protecting seedling methods should be adopted as much as possible.
2. Stem: The stem of peppers is lignified, relatively tough, and can grow upright; no support is needed in cultivation. According to the branching and fruiting habits of peppers, they can be divided into two types: indeterminate branching and determinate branching. At present, most peppers in production in our county are of the indeterminate branching type, that is, when the main stem grows to 7-15 true leaves, flower buds begin to form at the stem tip, and then lateral branches and dichotomous branches gradually grow. Customarily, the first fruit set on the main stem is called the "door pepper"; the 2 fruits set on the first-order branches are called "opposite peppers"; the 4 fruits set on the second-order branches are called the "four-door cluster"; the 8 fruits set on the third-order branches are called the "eight-direction wind"; and those set further up, because there are more fruits, are called the "starry sky." In this type of pepper, lateral branches can sprout from the main stem and leaf axils below the first flower; this is commonly called "chicken-feather legs," and in cultivation they should be removed as early as possible (commonly called pruning) to reduce nutrient consumption and facilitate ventilation and light penetration. The branching pattern of the determinate branching type (such as the Three Cherry Pepper) is: when the main stem grows to 14-18 true leaves, the terminal bud forms a flower bud, and branches sprout from the axillary buds below the flower bud, called "lateral branches." When the terminal bud of a lateral branch again forms a flower bud, another branch sprouts below the flower bud, called a "secondary lateral branch." When the terminal bud of the secondary lateral branch forms a flower bud once more, the plant stops growing and no longer branches, commonly called "topping off."
3. Leaves: Pepper leaves are simple leaves, alternate, ovate or long-ovate, without incisions, with a smooth surface and a slight gloss. When nitrogen is sufficient, the leaves are longer; when potassium fertilizer is sufficient, the leaves are wider. With excessive nitrogen and excessively high night temperatures, the petioles are long and the tender leaves at the tip are uneven. When night temperatures are low, the petioles are short. When the soil is dry, the petioles bend slightly and the leaf blades droop. When soil moisture content is too high, the entire leaf wilts and droops.
4. Flowers: Pepper flowers are relatively small, white or green in color. Indeterminate branching varieties mostly have solitary flowers, while determinate branching varieties mostly have clustered flowers. The first flower of a pepper generally appears on nodes 7-15 of the main stem; early-maturing varieties have lower node positions, and late-maturing varieties have higher node positions. Pepper flowers are bisexual flowers with both stamens and pistils, self-pollinating, with a natural cross-pollination rate of about 10%, making them often cross-pollinated crops.
5. Fruit: The pepper fruit is a berry. According to variety, fruit shapes include lantern-shaped, square-shaped, thick long horn-shaped, goat horn-shaped, linear, and conical. Regarding the fruit-setting position, generally speaking, indeterminate branching varieties mostly grow drooping, with a few varieties growing obliquely, while determinate branching varieties mostly grow upward.
5. Pepper fruits take 25-30 days from flowering and pollination to commercial maturity, when they are green, and 50-60 days to biological maturity, when they are red. Generally, when the fruit of a variety matures, it turns directly from green to red, but a few varieties first turn from green to yellow and then from yellow to red. The "five-color pepper" grown as an ornamental forms several different colors because the fruits on the same plant have different color-changing periods. Generally, large-fruited horn peppers have a relatively mild spiciness, medium-fruited goat horn peppers have a stronger spiciness, and small-fruited and linear peppers are extremely spicy.
6. Seeds: Mature pepper seeds are flat and round, light yellow, and glossy. The thousand-seed weight is 6-7 g, the average germination capacity is 4 years, and the usable life is generally 2-3 years. New and old pepper seeds have obvious differences. By eye: new seeds are light yellow and slightly glossy, while old seeds are earth-yellow, and if stored too long the seed coat turns red. By nose: new seeds have a strong pungent sensation that makes you want to sneeze, while old seeds are less irritating. By tooth: new seeds have a strong spicy taste, while old seeds have a weak spicy taste.
Environmental Conditions for Pepper Growth and Development
Requirements of peppers for environmental conditions: they like warmth, fear cold (especially frost), and also avoid high temperatures and strong sun exposure; they like moisture but fear waterlogging, and are relatively tolerant of fertilizer. Specifically:
1. Temperature: Peppers like warmth and cannot tolerate frost. They can grow within the range of 15-30°C. The most suitable growth temperature is 23-28°C during the day and 18-23°C at night. Below 15°C, plants grow slowly, pollination is difficult, and flower and fruit drop is easily caused. Above 35°C, flowers develop poorly or the stigma dries out and cannot be fertilized, causing flower drop; even if fertilized, the fruit cannot develop normally and dries up. Therefore, in high-temperature summer, when the temperature exceeds 35°C, peppers often fail to set fruit. During the full fruiting period, appropriately lowering the night temperature is beneficial to fruiting; even if it drops to 8-10°C, they can still grow and develop well. During the summer fruiting period, if the soil temperature is too high, especially with strong light directly hitting the ground, root development is unfavorable; in severe cases, exposed roots can turn brown and die, and viral diseases are easily induced. In short, throughout the entire growth period of peppers, the temperature range is 12-35°C, and the suitable temperature difference is 10°C, that is, 26-27°C during the day and 15-16°C at night. Below 12°C, film covering for insulation is needed; above 35°C, watering to cool down is needed.
2. Light: Peppers like light but fear exposure to strong sun. Excessive light easily causes sunscald; weak light and overly dense rows easily cause flower and fruit drop. Seed germination requires dark conditions, but plant growth requires good light. During the seedling-raising period of autumn-delayed greenhouse peppers, shading must be carried out to avoid inducing viral diseases and sunscald. Peppers are short-day crops, but they have strong adaptability to photoperiod; regardless of day length, as long as there are suitable temperatures and good nutritional conditions, flower bud differentiation can proceed smoothly.
3. Water: Peppers are neither drought-tolerant nor waterlogging-tolerant. Although the plant itself does not require a large amount of water, because the root system is not very developed, frequent watering is needed for good growth. Generally, large-fruited varieties need more water, and small-fruited varieties need less. Peppers also have different water requirements at different growth stages: seed germination needs to absorb enough water. During the seedling stage, the plant does not use much water, and the ground should be kept alternately dry and wet; if soil moisture is too high, root development will be poor and the plant will grow excessively and become weak. At the early flowering stage, plant growth is large and water demand increases accordingly, but excessive humidity can still cause flower drop. During the fruit enlargement stage, sufficient water is needed; insufficient water supply affects fruit enlargement, and if the air is too dry it can also cause flower and fruit drop. Therefore, supplying sufficient water and frequently keeping the ground moist is an important measure for obtaining high quality and high yield.
4. Soil and Nutrition: Peppers can be planted in soils of different textures, but soils that are high and dry, well-drained, with deep fertile layers and rich in organic matter, or sandy loam, are preferable. Soil pH should be neutral or slightly acidic.
Looking at the whole life of peppers, they have a large demand for N and K and a smaller demand for P; the N:P:K ratio is 1:0.5:1. During the seedling stage, because the plant is small, nutrient uptake is low, but fertilizer quality should be good. At the early flowering stage, the plant gradually develops and grows, but fertilizer demand is not too high; at this stage, excessive N fertilizer should be avoided to prevent excessive vegetative growth and delayed flowering and fruit setting. During the full fruiting stage, the demand for N, P, and K fertilizers is highest, with N, P, and K uptake accounting for more than 57%, 61%, and 69% of their respective total uptake. N fertilizer supports the development of branches and leaves; P and K fertilizers promote root growth, fruit enlargement, and increase fruit color. Fertilization during the full fruiting stage of peppers should be applied 1-2 days before harvest; generally, fertilize once after each harvest.
High-Yield Cultivation Techniques for Autumn-Delayed Peppers
Autumn-delayed pepper greenhouse cultivation is carried out in plastic greenhouses with summer sowing, autumn planting, and winter harvest, that is, shaded seedling raising in mid-to-late July, transplanting into the greenhouse in mid-to-late August when seedlings have 8-10 true leaves, gradually sealing the greenhouse tightly in October as the temperature turns cooler, installing an inner arched shed, and then covering the arched shed with straw curtains, so peppers are concentrated on the market from New Year's Day to the Spring Festival. This planting model not only requires small investment and brings quick results, with relatively simple cultivation techniques (compared with greenhouse peppers), but is also suitable for township or village-level scale development.
1. Variety Selection
(1) Conditions the variety should have
① Strong stress resistance and disease resistance: The seedling-raising period of autumn-delayed peppers is in the high-temperature and high-humidity summer, and diseases such as Phytophthora blight, viral diseases, and scab are relatively likely to occur, as well as leaf drop caused by improper fertilizer and water management. Therefore, varieties with strong disease resistance and tolerance are required.
② Good yield potential: Autumn-delayed peppers are grown when market prices are rising, so there is no need to consider the early maturity that spring cultivation requires. Varieties with large fruit and good yield potential should be selected; large-fruited varieties also have good market quality, and their fruits redden slowly.
③ Heat tolerance and strong cold resistance: Because autumn-delayed pepper cultivation involves summer sowing, autumn planting, and winter harvest, varieties with strong heat tolerance and cold resistance should be selected.
④ Compact plant type, high fruit-setting rate, and concentrated fruit setting: Because autumn-delayed pepper cultivation is carried out in plastic greenhouses with an added small arched shed, and generally adopts one concentrated harvest (before the Spring Festival), the variety must have characteristics such as a short and compact plant type, short internodes and a high fruit-setting rate, concentrated fruit setting, large fruit with thick flesh, uniform fruit, and tolerance to storage and transportation.
(2) Main varieties
Bianjiao No. 1: plant height 52 cm, spread 55 cm, short internodes, compact plant type, mid-early maturing, first flower node at 9-11 nodes, thick dark green leaves. The fruit is thick horn-shaped, 14-16 cm long, 5.5 cm thick, single fruit weight 80-100 g; the fruit is dark green, glossy, moderately spicy, and has good market quality. Fruit setting is concentrated, and yield is high in the early and middle stages. This variety has strong disease resistance, especially outstanding resistance to viral diseases.
Xiangyan No. 13: plant height 52.5 cm, spread 64 cm, mid-maturing, high yield, high fruit-setting rate, large and straight fruit, smooth fruit surface, good market quality, spicy. In production, it is relatively resistant to Phytophthora blight, anthracnose, and viral diseases.
In addition, there are also varieties such as Sujiao No. 5 and Luojiao No. 4.
2. Raising Strong Seedlings
(1) Seedling-raising time
The seedling-raising time for autumn-delayed peppers is relatively strict. If sown too early, the seedling stage lasts through a long period of high temperature and rain, seedlings grow weakly, are prone to excessive growth, and viral diseases easily occur. If sown too late, although viral diseases occur less, temperatures are low in the later period, and the growth period and accumulated temperature for upper fruits are insufficient, affecting yield and quality. Generally, peppers require about 120 days from sowing to harvest. Calculating based on the first early frost appearing at the end of October, the suitable sowing period is mid-to-late July.
(2) Seedbed selection
The pepper seedling bed must be selected in a plot that has not previously grown solanaceous fruits, cucurbits, potatoes, or other vegetable crops. The seedbed site must be high and dry, well ventilated and drained, free of weeds around it, and rich in soil organic matter.
(3) Seedbed disinfection
For the seedling bed, clear the previous crop 10-20 days in advance as much as possible. After turning and sun-drying the soil clods, apply fully decomposed organic fertilizer, then for each 1 sq m of seedbed use 10 g thiram plus 10 g quintozene, or 10 g 40% carbendazim plus 10 g zinc sulfate, mixed with 10 kg fine moist soil, and evenly sprinkle on the seedbed surface. Use a rake to shallowly scratch back and forth. Finally, for each 1 sq m of seedbed, use 10 g carbofuran mixed with fine soil, or 5 g phoxim diluted in water and evenly sprinkled on the seedbed surface, then use a rake to turn 10-14 cm deep. This can effectively kill seedbed pathogens and control underground pests damaging seedlings.
(4) Preparing nutrient soil
In order to make pepper seedlings grow in a fertile, loose, and sterile environment, during seedling raising it is generally required to prepare a certain amount of nutrient soil as much as possible. The soil-to-fertilizer ratio of nutrient soil can be prepared at 5:5 or 6:4, that is, 5 or 6 parts garden soil and 5 or 4 parts fully decomposed organic fertilizer. When selecting garden soil, generally do not use soil from plots that grew the same kind of vegetable; soil that has grown legumes or allium and garlic vegetables is best. To prevent the spread of diseases, after preparing the nutrient soil it should also be disinfected. A commonly used method is: mix equal amounts of 70% quintozene powder and 50% thiram or 65% zineb wettable powder for disinfection; generally, mix 0.12-0.15 kg of the mixed agent into 1 cubic m of nutrient soil. Of this nutrient soil, 2/3 is used as seed-bedding soil and 1/3 as seed-covering soil; generally bed seeds 1-2 cm and cover seeds 0.5-1 cm.
(5) Seed treatment
Seed treatment is a step that cannot be ignored in promoting seed development, increasing seedling survival rate, raising strong seedlings, preventing seedling-stage diseases, and controlling the occurrence of viral diseases. The procedure is to sun the seeds first and then disinfect them.
① Sunning seeds: Sunning seeds can promote after-ripening of seeds, reduce seed moisture content, improve the air and water permeability of the seed coat, and enhance the water absorption capacity of seeds. At the same time, the seed embryo is exposed to sunlight, increasing its vitality. Seeds that have been sunned can quickly absorb water after sowing, swell, and germinate, emerging quickly and with a high emergence rate, and have a yield-increasing effect.
For sunning seeds, choose a sunny day from 9 a.m. to 3 p.m., spread the seeds thinly on a reed mat or winnowing basket, and dry them in a ventilated place for 1 day.
② Seed soaking:
Step one: Hot-water soaking: Put the sunned seeds in a gauze bag and place them in warm water at about 55°C, stirring continuously. After 15 minutes, when the water temperature drops to 30°C, soak for 6-8 hours, then wash off the sticky substance attached to the seed coat.
Step two: Medicinal solution soaking: Soak the seeds after hot-water soaking in a 10% trisodium phosphate aqueous solution (or in a 0.5% potassium permanganate solution). Be sure to let the solution submerge the seeds and stir frequently. After 15 minutes, remove them and rinse several times with clean water.
(6) Sowing
Step one: Level the bed, cover with soil, and water thoroughly to supply bottom water. Before sowing, first level the seedbed, second evenly spread 2/3 of the nutrient soil on the seedbed 1-2 cm thick, and third water thoroughly to supply bottom water.
Step two: After the water drains down, mix the soaked pepper seeds with a small amount of dry fine soil as appropriate, then evenly broadcast them on the seedbed.
Step three: Cover seeds. Cover the remaining 1/3 of the nutrient soil over the seeds to a thickness of 0.5-1 cm.
Step four: Spray water. Use a watering can to spray a thin layer of water so that the seedbed is in a moist state.
Step five: Cover with film and spray water to preserve moisture. First, cover the seedbed with plastic film to preserve moisture; second, cover the seedbed above with straw mats or other coverings; third, use a watering can to slightly wet the covering, which helps preserve moisture and achieve uniform emergence.
(7) Seedling-stage management
Emergence stage: The optimum temperature for pepper seed germination is 25-30°C. In management: first, ventilate to dissipate heat; second, shade to cool down; third, splash with well water to increase humidity and lower temperature. When 70% of pepper seedlings have broken through the soil, immediately remove coverings such as plastic film and straw mats from the seedbed, but the shade net (or straw mats and other coverings) on the seedling-raising shed should still be retained to facilitate shading and cooling. Then spray with 500-fold liquid of 75% dexon, 25% carbendazim, or thiophanate-methyl and other fungicides, and immediately spray with clean water to wash the medicinal liquid into the seedling roots, which can effectively prevent damping-off and Rhizoctonia rot. The emergence stage generally takes 5-8 days.
Heart-breaking stage: The heart-breaking stage takes about one week. The key to management at this stage is to shift from promoting to appropriate control, ensuring steady growth of pepper seedlings. First, reduce humidity. If the bed is too wet, seedlings will have few fibrous roots and are prone to lodging or disease induction; measures such as ventilation, controlled watering, and spreading dry fine soil can be used to reduce humidity. The seedbed surface can even be allowed to "show white," which can inhibit hypocotyl elongation and promote deeper root growth. Second, thin seedlings in time, removing weak seedlings, diseased seedlings, and weeds to prevent crowding of seedlings and overly rapid hypocotyl elongation that forms "leggy seedlings."
Vegetative growth stage: During this period, seedlings mainly carry out vegetative growth, especially rapid increase in roots and stems. Management at this stage is "mainly promoting, combining promotion with control." First, water management: ensure the seedbed surface is semi-moist. This requires watering with clean water as soon as the seedbed surface has not yet shown white. Generally, on normal sunny days, water once every 2 days, keeping the seedbed surface alternately moist and dry, dry and wet alternating, dry then wet, which can play a good role in preventing damping-off, Rhizoctonia rot, and Phytophthora blight. Second, appropriate topdressing: if the seedbed nutrients are insufficient and pepper seedlings grow thin and weak, foliar spray with 0.3% urea or 0.1% monopotassium phosphate.
In addition, in order to prevent long-term covering with shade net (or straw mats) from causing pepper excessive growth, on cloudy days the shade net (or straw mats) should be removed. On sunny days before 8 a.m. and after 5 p.m., when temperatures are lower and light is weaker, the straw mats should also be removed so that peppers in the shed receive sufficient light.
(8) Seedling division
① Function of seedling division: To prevent crowding of seedlings, expand spacing between plants, increase nutritional area, satisfy the light and nutritional conditions required for pepper seedling growth and development, and reduce the occurrence of pests and diseases. Seedling division especially has a significant effect on pepper seedling root growth. On one hand, after seedling division, varying degrees of root breakage occur, reducing the water absorption capacity of the root system and inhibiting normal seedling growth. On the other hand, because seedling division cuts the taproot, it promotes lateral root development and causes the root mass to be distributed in the shallow soil layer centered on the taproot.
② Seedling division method: For autumn-delayed peppers, the calendar seedling age from sowing to seedling division is generally 12 days, and the physiological seedling age is 3-4 true leaves. The day before seedling division, water with "seedling-starting water" and spray with 1000-fold virus A or potassium permanganate solution to prevent viruses and pathogens from being carried into the seedling division bed with the seedlings. When dividing seedlings, holes can be dug directly at 8×8 cm for seedling division, or the strip-trench seedling division method can be used, that is, first open trenches with a hoe at a row spacing of 10-12 cm, water lightly, place pepper seedlings at a hole spacing of 7-9 cm, and before the water has fully seeped, the seedlings are already planted evenly, then cover with soil and close the trench using a hoe.
③ Seedling division bed management: If conditions permit, seedling division is best also carried out in a greenhouse. For 3-5 days after seedling division, from 10 a.m. to 4 p.m. on sunny days, straw mats should be added over the greenhouse. Generally after about 4 days, new leaves grow and the slow seedling period ends. When the temperature is high at 32°C, on sunny days during the day roll up the seedbed shed film upward to facilitate heat dissipation and moisture removal; on cloudy and rainy days put the shed film down in advance to prevent rain. In normal clear weather, water based on wet and dry conditions, strictly preventing pepper seedlings from excessive growth. Each watering amount should not be too much, to prevent excessive seedbed soil moisture leading to disease occurrence. On cloudy and rainy days, control watering. If nutrient deficiency symptoms appear, spray nutritional fertilizer 2-3 times.
3. Land Preparation and Fertilization
After the previous crop is harvested, promptly clear residual branches, dead leaves, and weeds. Apply more than 4 cubic m of decomposed organic fertilizer per mu, 20-25 kg urea, 50 kg superphosphate, 25-30 kg potassium fertilizer, 1 kg borax, or alternatively 1 cubic m of dried chicken manure, 100 kg cake fertilizer, and 50 kg compound fertilizer. After broadcasting, plow 25-30 cm deep, then prepare the land into beds, two beds per shed, with a 60 cm working ditch left in the middle.
4. High-Temperature Greenhouse Sealing
High-temperature greenhouse sealing can not only kill most pathogens and heat-kill most underground pests, but can also suffocate most weed seeds and accelerate the decomposition of organic fertilizer. Therefore, after preparing the land, promptly set up the frame and close the shed. Choose 6-7 consecutive sunny days to seal the greenhouse tightly, causing the temperature inside to rise to 60-70°C, which can play a very good sterilizing and disinfecting role.
5. Timely Transplanting
(1) Preparation before transplanting: Transplanting and field setting are generally completed around End of Heat. Select peppers with 8-10 true leaves, well-developed root systems, and no disease for transplanting. Preparation work: First, water the seedbed thoroughly one day before transplanting, which helps lift seedlings and prevents root damage. Second, spray once with 1000-fold virus A, virus K, or potassium permanganate solution, which can prevent pathogens from being carried into the field with the seedlings.
(2) Transplanting and field setting: When transplanting, six rows per bed, row spacing 33 cm, hole spacing 25-28 cm, one plant per hole, 4700-5200 plants per mu. If transplanting is later (after mid-September), use row spacing 33 cm, hole spacing about 30 cm, two plants per hole, 8000-9000 plants per mu.
6. Management after Field Setting
(1) Timely watering: Pepper leaves are small, and transpiration is also small. When transplanting, do not water too heavily. After 3-5 days, water once to help seedlings recover, then shallow-cultivate twice in succession to promote root establishment. After watering the "field-setting water" and "slow-seedling water," in the early stage watering in the shed should follow the principle of seeing dry and wet; water again after the soil surface turns white, to help roots grow downward and strengthen the plant and prevent excessive growth. Do not water during the flowering and fruiting period of the door pepper. When the "door pepper" enlarges, combined with topdressing, water heavily once. Later watering should be determined by weather and surface dryness, to prevent the spread of Phytophthora blight. When watering is needed, choose sunny mornings, and after watering pay attention to ventilation and moisture removal.
(2) Scientific topdressing: In the middle period, apply chemical fertilizer to strengthen seedlings and promote fruit; in the later period, combine manure water and chemical fertilizer to maintain seedlings and restore vigor. On the basis of heavy basal fertilizer, topdressing is generally not needed in the early stage, and foliar spraying alone is sufficient. If basal fertilizer is insufficient, appropriate additional application should be made. After flowering and fruiting, once the door pepper and opposite peppers have formed, chemical fertilizer should be applied in time. The first topdressing should be carried out 3-4 weeks after field setting (20-30 days after planting), when the lower branches of the pepper main stem are gradually increasing, each branch has 4-5 leaf layers, and fruit development is about to accelerate. Combined with watering, apply 10 kg urea, 5 kg diammonium phosphate, and 5 kg potassium sulfate per mu. The second topdressing is 5-6 weeks after field setting (after the door pepper is harvested and when the opposite peppers have taken shape), applying 10 kg urea, 5 kg diammonium phosphate, and 10 kg potassium sulfate per mu. The third topdressing is before adding the small arched shed, applying 5 kg urea, 5-10 kg diammonium phosphate, and 5-10 kg potassium sulfate per mu.
(3) Chemical control and pruning: When peppers have 3-4 leaves or at the early flowering stage and grow excessively, causing an imbalance between vegetative growth and reproductive growth, delaying flowering and fruit setting, and the branches are tender and weak and susceptible to various diseases, plant growth regulators such as paclobutrazol, chlormequat, or mepiquat chloride can be used for chemical control. To improve the fruit-setting rate of autumn-delayed greenhouse peppers, auxin (2,4-D or fruit-setting hormone) treatment can be used, with good flower and fruit preservation effects. The 2,4-D concentration is 15-20 ppm, and smearing flowers before 10 a.m. gives relatively good results. Pepper cultivation does not require trellising, but during the peak growth period, branches easily sprout in leaf axils below the door pepper. To save nutrients, lower lateral branches must be removed in time.
(4) Temperature and humidity regulation: The most suitable temperature for peppers during the full fruiting period is 15-26°C. After the Start of Autumn, temperature changes are relatively large, so cold prevention and heat preservation work should be done well. When the night temperature is above 15°C, ventilation can be carried out day and night. When the nighttime temperature inside the shed drops below 15°C, the side film and shed door should be tightly closed at night, and ventilation can only be carried out during the day when temperatures are high, keeping the shed temperature between 20-25°C. When the lowest nighttime temperature drops to about 5°C, a small arched shed should be added immediately for cold prevention and heat preservation. If there is not enough time to add a small arched shed, plastic film can be used to cover another layer over the pepper plants to prevent freezing damage. However, at noon on sunny days, short-term ventilation should still be carried out in a leeward place to remove harmful gases in the shed, supplement oxygen and carbon dioxide, reduce humidity in the shed, and reduce disease occurrence.
(5) Harvesting to promote reddening: After field setting, autumn-delayed peppers can generally be harvested and marketed after 50-60 days. If the price is reasonable at that time, the door pepper and opposite peppers can be picked and sold, because they will no longer grow larger; after picking, the burden on the plant is reduced, which is beneficial to the enlargement and growth of fruits above the door pepper. In early November, as temperatures drop, promptly cover the small arched shed with straw mats to increase the temperature inside the shed and promote peppers to grow older and turn red. Generally, covering with an arched shed can increase temperature by 5°C, and covering the arched shed with straw mats can increase temperature by another 3-5°C, allowing grown peppers to remain on the plant for freshness preservation. Uncover and cover the straw mats of the small arched shed every day so they receive light and gain heat, thus extending harvest and marketing to New Year's Day and the Spring Festival.
(6) Storage and freshness preservation: Pepper storage is an effective measure for realizing Spring Festival supply, adjusting the off-season contradiction, and improving the economic benefits of vegetable farmers. Peppers for storage are mainly mid- and late-maturing varieties. Fruits to be stored should be thick-fleshed, deep-colored and glossy, without disease spots, insect damage, cracks, and so on. Before storage, first remove the straw mats from the arched shed in the greenhouse so peppers precool for 2-3 days, then cut off fruitless branches and tender tips, and spray once with 800-fold aqueous solution of thiophanate-methyl or carbendazim; be sure to spray the plants and fruits thoroughly. The storage method is generally mainly storage with plants: pull up the peppers together with the fruits, choose an open field, arrange them row by row, press the roots of each row of pepper plants with a little moist soil, and after arranging, spray once more with carbendazim, and finally set up a shed over the pepper plants for insulation. The temperature inside the shed can generally reach 3-7°C. Check once every ten days; when it is above 10°C, carry out short-term ventilation; when it is below 3°C, add straw mats.
High-Yield Cultivation Techniques for Plastic-Mulch Peppers
Plastic-mulch peppers are generally sown and raised as seedlings in late December and transplanted in mid-to-late April the following year, until vines are pulled in late October, with a growth period of 10 months and an average yield of about 4000 kg per mu. They can be intercropped with wheat, or grown as a single pepper crop on winter fallow land. The average output value per mu is generally about 2500 yuan. The key points of cultivation techniques are as follows:
1. Raising Strong Seedlings
Plastic-mulch pepper varieties are generally mainly the Bianjiao series, with sowing period from mid-to-late December to early January. Before sowing, first carry out seed treatment, then place the disinfected seeds in warm water at about 30°C and soak for 8-12 hours. After the seeds have absorbed enough water, wrap them in a clean wet cloth and place them under conditions of 28-30°C for germination. When most seeds have shown white, they can be sown. Plastic-mulch pepper seedling raising is generally carried out in a greenhouse or heated bed. After sowing, keep the seedbed temperature at 25-30°C during the day and 18-20°C at night. When seedlings have emerged uniformly, lower the daytime temperature to 20-25°C and keep it at 15-18°C at night. Gradually uncover the film for ventilation 5-7 days before seedling division to carry out low-temperature hardening.
2. Timely Seedling Division
Plastic-mulch peppers all require seedling division, generally in early-to-mid March, when seedlings have 3 leaves and 1 heart. One day before seedling division, water the sowing seedbed appropriately so as to reduce root damage when lifting seedlings. The seedling division spacing should preferably be 8-10 cm square, with two plants per hole. At the same time, large and small seedlings should be separated. After planting, promptly add a small arched shed; if the nighttime temperature is low, also add straw mats. For 3-5 days after seedling division, generally do not ventilate. Uncover straw mats during the day and cover them at night, increasing the temperature of the seedling division bed as much as possible to promote root growth and help seedlings recover. After 5-7 days, new leaves grow and the slow seedling period ends; afterward, ventilation can gradually be increased according to weather conditions. From 7-10 days before field setting, around April 10, ventilate day and night to harden the seedlings. In order to control excessive seedling growth, apart from watering at seedling division, generally no further watering is done until one seedling-lifting water is applied before transplanting to the field.
3. Land Preparation and Fertilization
Peppers avoid continuous cropping. The plot for planting plastic-mulch peppers is best one that has not grown solanaceous fruit vegetables within 2-3 years. The previous crop is best allium and garlic vegetables, followed by legumes, cabbage vegetables, and so on. Before land preparation, broadcast more than 5 cubic m of decomposed organic fertilizer, 50 kg superphosphate, and 20 kg potassium sulfate per mu as basal fertilizer. After plowing, raise small high ridges 60 cm wide every 40 cm, and cover with film about 7 days before field setting to raise temperature.
4. Timely Field Setting
Plastic-mulch peppers are generally transplanted in mid-to-late April (around Grain Rain). When transplanting, first dig holes on the small high ridges at row spacing 40 cm and plant spacing 33 cm, with the triangular seedling-setting method being most suitable, 4000 holes and 8000 plants per mu. If water and fertilizer conditions are poor, planting density can be appropriately increased.
5. Field Management
On the basis of watering well at field setting, water promptly to help seedlings recover after the slow seedling period. Until the door pepper has set, generally no more watering is done. When the door pepper grows to about 3 cm, combine with watering and apply a heavy topdressing, applying 15-20 kg urea and 10 kg potassium fertilizer per mu, and afterward topdress once every 2-4 waterings. Watering should be done as small frequent waterings, and flood irrigation must be avoided. When rainfall is excessive, drain promptly. Under normal conditions, the door pepper should be harvested in time to avoid "dragging down the plant."
Key Points of Three Cherry Pepper Cultivation Techniques
Three Cherry Pepper, also known as Japanese Three Cherry Pepper, is a variant of facing-heaven pepper. It has a compact plant type, clustered fruits that grow upward, thin flesh, strong spiciness, and high oil content. The field growth period of Three Cherry Pepper is 120-135 days, plant height 40-60 cm, 8-15 branches per plant, 150-200 peppers per plant, and the maturity period is concentrated, allowing one-time harvest, with 200-300 kg of dried peppers per mu.
Three Cherry Pepper is generally grown using a wheat-pepper intercropping model, that is, when sowing wheat before the new year, sow one drill of wheat and leave one drill of open space (a 120 cm strip, sow three rows of wheat occupying 40 cm width, leave an 80 cm gap), transplant and set seedlings in late April, and harvest until mid-to-late October.
1. Seedling-Raising Techniques
Three Cherry Pepper is generally sown and raised as seedlings in early-to-mid March, and must use a sunny bed or small arched shed for seedling raising. To plant one mu, 35-40 sq m of seedlings are needed. After treating the seeds, choose the "cold tail and warm head" for sowing, that is, after sowing there should be 5-6 consecutive sunny days. Seedbed management should grasp three links well: the early stage should be well insulated against freezing to promote early emergence and uniform emergence; the middle stage should reasonably regulate temperature and humidity to prevent seedling scorching, seedling flashing, and seedling collapse; the later stage should strengthen seedling hardening to prevent excessive growth and improve seedling adaptability and stress resistance. When seedlings emerge and cotyledons unfold, thin seedlings in time; when 2-3 true leaves have unfolded, keep seedling spacing at 3-5 cm. When seedlings have 4-6 leaves, gradually increase ventilation. From 5-7 days before field setting, uncover the film all day.
2. Timely Field Setting
For wheat-pepper intercropped Three Cherry Pepper, on the basis of applying sufficient basal fertilizer when sowing wheat before the new year, apply 25 kg diammonium phosphate and 10-15 kg urea or 30-40 kg ammonium bicarbonate per mu as basal fertilizer. The transplanting and field-setting time is generally in mid-to-late April. One day before transplanting, water the seedbed thoroughly so that more soil is carried when lifting seedlings and roots are less damaged. When transplanting, plant three rows in the 80 cm gap, with row spacing 20-25 cm and plant spacing about 25 cm, two plants per hole, 6500-7000 holes per mu.
3. Field Management
Three Cherry Pepper generally adopts a one-time fertilization method, with no topdressing during the growth period. However, for plots with poor fertilizer retention or fertilizer loss, quick-acting chemical fertilizer can be topdressed after pepper fruit setting. During the entire growth period, the ground should be kept alternately dry and wet. The yield of Three Cherry Pepper is mainly concentrated on lateral branches; the yield on the main stem accounts for only 10%, while the yield on lateral branches accounts for 80-90%. Therefore, within 5-7 days after seedling recovery, topping should be carried out in time to limit main stem growth and promote lateral branch sprouting.
4. Timely Harvesting
Three Cherry Pepper is generally harvested once by pulling up the whole plant before Frost's Descent. Therefore, in order to promote the upper green fruits to turn red, about 10 days before Frost's Descent, spray the whole field once with ethephon. Before pulling up the pepper plants, all leaves fall off and all fruits turn red. After pulling up the whole plant, spread it in the field or hang it upside down on trees, ropes, or erected wooden frames to dry. After the whole Three Cherry Pepper plant is thoroughly sun-dried, sprinkle water 12 hours before picking to remoisten, then grade and pick according to color and integrity. After picking, spread thinly and continue drying; after drying, they can be sold.
Pest and Disease Control
1. Pepper Seedling-Stage Diseases
Pepper seedling-stage diseases mainly include damping-off, Rhizoctonia rot, and Phytophthora blight.
(1) Damping-off
Symptoms: At the cotyledon stage of seedlings, water-soaked lesions appear at the base of the young stem, then the diseased part turns brown, gradually constricts into a line, and finally the seedling suddenly falls over. Under high temperature and high humidity, there are many white flocculent molds near diseased seedlings. The disease develops very quickly; at first only individual seedlings are seen to be diseased, and after a few days, with that as the center, it spreads rapidly outward, finally causing patches of seedlings to damp off.
(2) Rhizoctonia rot
Symptoms: This disease can harm seedlings from just after emergence until the base of the adult plant has formed xylem, but generally occurs mostly in the middle and late seedling stages. The damaged part is the root-collar area of the seedling. Diseased seedlings produce oval dark brown lesions at the stem base; then they lose water and turn black-brown. Early diseased seedlings wilt during the day and recover at night, but as the lesions expand and encircle the stem, the damaged part constricts and dries up, and finally the plant dies. Pale brown spiderweb-like mold often appears on the diseased part, but it is not prominent. Leaves of diseased plants mostly turn light green, then yellow, and finally wither and fall off. Because this disease mostly occurs after seedling lignification, the plants die but do not fall over, hence the name Rhizoctonia rot.
Control methods for the above two diseases:
First, the seedbed should be set in a place with higher terrain that is not easily flooded. The bed soil is best new soil or strictly disinfected.
Second, do a good job of seed treatment.
Third, strengthen seedling-stage management, strictly prohibit the bed surface from being too wet, and prevent excessive seedling growth.
Fourth, chemical control: First use medicated soil to protect seedlings (the specific method has been described earlier). If diseased seedlings are found, immediately spray 600-fold 75% chlorothalonil wettable powder or 500-fold 64% sandofan wettable powder, spraying once every 5-7 days, for 2 consecutive sprays.
(3) Phytophthora blight
Symptoms: Peppers can be harmed by Phytophthora blight at both the seedling stage and adult plant stage, and stems, leaves, and fruits can all develop the disease. When seedlings develop the disease, it mostly occurs at the root-collar area. The stem base is initially water-soaked and dark green, then forms large spindle-shaped lesions; the diseased part constricts, turns black-brown, and seedlings easily bend and fall over. When adult plants develop the disease, leaves initially wilt during the day and recover at night; after several days the whole plant dies, the root-collar area turns brown, and when humidity is high a white mold layer appears on the diseased part. When leaves develop the disease, it mostly starts from the edges, initially like scalding by boiling water, with dark green lesions. When fruits develop the disease, it mostly starts from the stem end, initially showing dark green water-soaked irregular lesions, then spreading to the whole fruit.
Disease pattern: Phytophthora blight pathogens generally overwinter in diseased pepper residues or in soil and on seeds. They are the primary source of infection for peppers. Under suitable conditions of high temperature and high humidity, pathogens spread to the stem base through rain splashing or irrigation water and cause disease. When field temperature is 25-30°C and relative humidity is above 85%, the disease is severe. Generally in the rainy season or after heavy rain when the weather suddenly clears and temperature rises sharply, Phytophthora blight is most likely to become epidemic. If soil humidity is above 95% and lasts for 4-6 hours, the Phytophthora blight pathogen completes infection, and one generation can occur in 2-3 days. Especially in seedbeds with poor drainage, excessive density, no seedling division, and poor ventilation and light penetration, the disease is most severe; if seedlings are divided at the 3-4 leaf stage, the disease is lighter.
Control methods:
First, crop rotation.
Second, carry out seed treatment.
Third, high-temperature greenhouse sealing (only applicable to autumn-delayed peppers)
Fourth, adopt high-ridge cultivation and rational close planting, and strictly prohibit flood irrigation.
Fifth, chemical control: If only a small amount occurs, promptly pull out diseased seedlings; then treat the soil around the diseased seedlings with chemicals. If the occurrence is relatively large, use 250-fold 40% phosethyl-Al wettable powder, 600-fold 75% chlorothalonil wettable powder, 800-fold 21% ridomil wettable powder, 600-800-fold 72.7% propanocarb aqueous solution, 500-fold 64% sandofan wettable powder, and other chemicals. Choose any one and spray alternately, once every 5-7 days, for 2-3 consecutive sprays.
2. Field diseases of chili peppers
(1) Viral disease
Symptoms: Based on the symptoms, it is divided into the following three types.
The first is the mosaic type, in which diseased leaves show a mosaic pattern of alternating dark green and light green, with crinkling.
The second is the leaf deformity or clustering type. Initially, the veins of the heart leaves become chlorotic, gradually becoming mottled, with mosaic and crinkling. Later, the diseased leaves thicken, the leaf margins curl upward, and young leaves become narrow or develop linear leaves. In the later stage, the upper part of the plant becomes clustered, the internodes shorten, and the plant becomes dwarfed.
The third is the streak type, in which the main veins of the leaves show brown or black necrosis, gradually spreading to the side branches, main stem and growing point, causing flower drop, leaf drop, fruit drop, and even death of the entire plant.
Disease pattern: The main pathogens are Cucumber Mosaic Virus and Tobacco Mosaic Virus. Cucumber Mosaic Virus mainly overwinters on perennial weeds and vegetables in protected cultivation, and is transmitted by aphids the following year. Tobacco Mosaic Virus overwinters in soil, diseased residues, seeds and tobacco leaves, and is mainly transmitted through sap contact during various field farming operations (sowing, seedling separation, transplanting, pruning). High temperature and drought are conducive to aphid reproduction and virus transmission. In addition, continuous cropping, water shortage, fertilizer deficiency, extensive management, small seedlings, and late transplanting can all cause the prevalence of this disease.
Control methods:
① Select disease-resistant varieties
② Seed disinfection: Soak seeds in 10% trisodium phosphate solution for 20 minutes, wash clean with water, then soak and sprout. Before seedling separation and transplanting or at the flowering stage, spray 0.1--0.2% zinc sulfate.
③ Cultivation management: Cultivate strong, large seedlings with buds, avoid high temperature and direct strong light, or use plastic film mulching cultivation, and promptly control aphids, etc.
④ Chemical control: Use 20% Virus A wettable powder at 300 times dilution, or potassium permanganate at 1000 times dilution + 300-500 times potassium dihydrogen phosphate + 200 times urea + 200 times brown sugar (or white sugar), that is, add 10 g, 20-30 g, 50 g, 50 g respectively to 10 kg water. Spray once every 10 days during the seedling stage or after transplanting, for 3-4 consecutive treatments.
(2) Anthracnose
Symptoms: It mainly damages fruits and leaves. When fruits are damaged, water-soaked yellow-brown round or irregular lesions first appear, then become slightly sunken, with a grayish-brown center bearing small black dots in concentric rings. When leaves are damaged, chlorotic water-soaked spots first appear, gradually turning brown, with a pale gray center.
Disease pattern: The pathogen lurks on seeds or overwinters in the soil in the residues of diseased plants. It is spread by wind and insects. When the temperature is around 27°C and the air humidity is above 95%, the disease develops rapidly. When relative humidity is below 70%, disease generally does not occur. It is severe in hot and rainy seasons. Poor drainage and excessive planting density both aggravate the spread and expansion of anthracnose.
Control methods: Same as for phytophthora blight.
3. Field insect pests of chili peppers
(1) Aphids
Life habits and damage: They like to gather on the underside of leaves, flower stalks or tender stems, sucking plant sap and secreting honeydew. Damaged leaves turn yellow, and the leaf surface becomes crinkled and curled. In addition to sucking plant sap and causing damage, aphids can also transmit various viral diseases. As long as aphids have fed on diseased plants and then migrate to disease-free plants, they can complete virus transmission in a short time.
Control methods:
① Remove weeds in and around the field to reduce aphid sources.
② Chemical control: It is best to eliminate aphids at the initial stage. You can choose 10% imidacloprid at 1000 times dilution or 1% Yashijing at 2000 times dilution for spraying.
(2) Tea yellow mite
Life habits and damage: Tea yellow mites are very small and not easily seen with the naked eye. They gather on the tender parts of the plant and pierce and suck sap, so that tender leaves, tender stems, flower buds, etc. cannot grow normally. Damaged leaves thicken and become stiff, leaf margins roll downward, the underside of leaves appears oil-soaked, the whole plant becomes short and clustered, and flowers and fruits drop.
Control methods:
① Promptly remove weeds and dead branches and fallen leaves in and around the field to reduce pest sources.
② Chemical control: When pest damage is found, apply pesticide promptly. You can choose 15% Saomanjing wettable powder at 2000 times dilution, 40% dimethoate emulsifiable concentrate at 1000 times dilution, or 75% propargite emulsifiable concentrate at 1500 times dilution. Focus on spraying the underside of tender leaves and tender stems in the upper part of the plant, once every 10 days, for 3 consecutive sprays.