How to grow Isatis indigotica seeds? Planting methods and sowing technique essentials
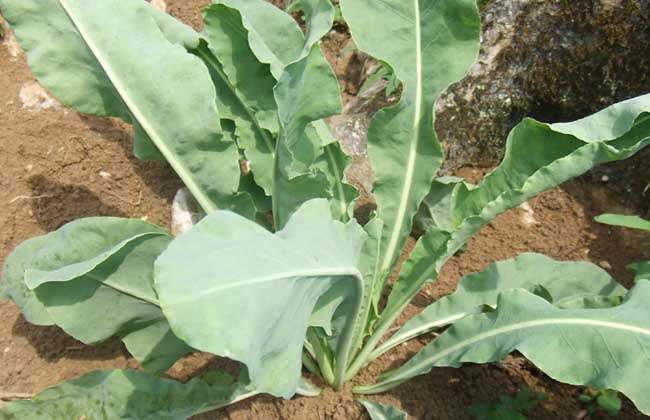
Isatis indigotica, also known as caodaqing and indigo, is a plant of the genus Isatis in the crucifer family. It is cultivated throughout the country. Isatis indigotica prefers a warm, sunny environment and is not demanding about soil. It is drought-resistant, cold-tolerant, and intolerant of waterlogging. Isatis indigotica is propagated by seed and can be grown by direct sowing. Let's take a look below at how to grow Isatis indigotica seeds!
Planting season
Depending on the sowing season, the harvested product of Isatis indigotica differs. According to sowing time, Isatis indigotica can be divided into four stages: autumn sowing, early spring sowing, spring sowing, and summer sowing. Autumn sowing and early spring sowing are mostly aimed at harvesting seeds; the roots of Isatis indigotica planted in these two periods cannot be used as medicinal material. Summer sowing is suitable for use in southern regions with a long plum rain season; this method can reduce pests and diseases, but the yield is lower. Spring-sown Isatis indigotica can yield both leaves and roots, and the yield is relatively high, making it the most commonly used method.
Preparation before sowing
Isatis indigotica is a deep-rooted plant that prefers a cool environment, is relatively cold-tolerant, and fears waterlogged, low-lying land. It is suitable for cultivation in North China and Northwest China. Before sowing Isatis indigotica, some preparatory work must be done, mainly including site selection, land preparation, and fertilization.
1. Site selection: Isatis indigotica is suitable for planting in sandy loam or river alluvial loam with a low groundwater table, good drainage, and loose fertility. Isatis indigotica planted on such land has high yield, good quality, saves labor, requires small investment, and has relatively high economic returns. Here we must pay special attention: when selecting a site, never choose clay soil or low-lying, easily waterlogged plots, as such plots easily cause root rot in Isatis indigotica. In addition, the plot is best chosen in a place sheltered from the wind, facing the sun, and close to a water source, which facilitates light exposure and irrigation during the growth of Isatis indigotica. The previous crop of the selected plot is preferably soybean stubble or corn stubble. If the selected plot is sloping land, the slope should generally not exceed 15°; drainage facilities should be set up well on sloping land to prevent the loss of water, soil, and manure, which would affect the growth and yield of Isatis indigotica.
2. Fertilization: Base fertilizer should be applied before land preparation. The best base fertilizer is decomposed pig manure, horse manure, or sheep manure. Never apply raw manure, otherwise the heat generated by fermentation after application will burn the root system of Isatis indigotica. To prevent insect pests, it is best to spray 90% trichlorfon 800-fold solution evenly during the piling of manure to kill eggs, pupae, and larvae. The organic matter content of these fertilizers is high, and they contain complete nitrogen, phosphorus, potassium, and trace elements. They can not only meet the growth needs of Isatis indigotica but also loosen the soil and improve soil structure and physical and chemical properties, clearly promoting the growth, development, and yield increase of Isatis indigotica. Apply 2000-3000 kg of base fertilizer per mu; if manure is sufficient, up to 4000 kg per mu can be applied. When manure is insufficient, an additional 50 kg per mu of diammonium phosphate or superphosphate and 15 kg of potassium fertilizer such as potassium chloride or potassium sulfate can be applied.
3. Land preparation: Because Isatis indigotica is a deep-rooted medicinal crop, the soil layer for the roots must be loose. Therefore, after fertilization, deep plowing is also needed. To ensure the growth conditions for the root system of Isatis indigotica, the plowing depth should be more than 30 cm, which helps the roots extend downward, remain straight, smooth, and unbranched. During land preparation, sandy land can be plowed slightly shallower, and heavier clay land can be plowed slightly deeper. Finally, break up the clods and level the plot.?
Once the plot is prepared, beds should be made. In the north, in areas with little rainfall, flat beds can be made, with a bed width of 1.5-1.8 m. In the south, high beds should be made to facilitate drainage. The bed height is 20-30 cm. Generally, where the terrain is high, make the beds lower; where the terrain is low, make the beds higher. The bed length can be determined according to the terrain: flat plots can have long beds, and undulating plots can have short beds. Leave a 30 cm wide working path between two beds. While making the beds, further break up the clods so that the soil is fine and crumbly, preventing clods and debris from mixing into the beds, which would affect the germination and root growth of Isatis indigotica, and ensuring the quality of land preparation. The standard for a well-prepared planting bed is a level bed surface and fine, crumbly soil. After land preparation is completed, it is time to sow.
Sowing Isatis indigotica
1. Seed selection: The seeds of Isatis indigotica should be new seeds collected the previous year with black on the seed coat. Such seeds have good maturity, and the germination rate can be guaranteed to be above 95%. Moreover, such seeds will not bloom in the same year after sowing; if seeds stored for many years are chosen, not only is the germination rate low, but they also tend to bloom in the same year, affecting the yield and quality of Isatis indigotica.
2. Seed treatment: After the seeds are selected, to increase the germination rate of Isatis indigotica seeds, the seeds should also be treated before sowing. First soak the seeds in clean water for 12-24 hours. This can remove grass debris and shriveled seeds mixed in with the Isatis indigotica seeds, and it can also soften the seed coat of Isatis indigotica seeds, favoring sprouting. After soaking, remove them and dry them, and then they are ready for sowing.
3. Sowing time: In the cultivation of Isatis indigotica, there are strict requirements for sowing time and sowing methods. Let's first understand the sowing time. For spring-sown Isatis indigotica, northern regions generally sow in early April, while southern regions can sow appropriately earlier, but sowing is only allowed when the local temperature is stable above 12°C, which favors deep rooting of the root system and prolongs the growth period.
4. Sowing: One week before sowing, water thoroughly once to ensure the moisture needed for the seeds of Isatis indigotica to germinate and take root. There are many sowing methods for Isatis indigotica, but the commonly used methods are drilling and hole sowing. Drilling uses a row spacing of 30 cm, with a sowing rate of about 3 kg per mu; hole sowing uses a row and plant spacing of 30×20 cm or 30×30 cm, uses less seed, and the amount per mu is between 1.5-2 kg. The sowing depth is 3 cm. After sowing, cover with a layer of fine soil, with a covering thickness of about 1 cm, and finally cover the bed surface with plastic film to retain moisture. Because spring winds are strong, to prevent the wind from lifting the film, after the film is covered on the bed surface, in addition to pressing the edges firmly with soil, soil should also be pressed in the middle of the film. Note here that because the seedlings of Isatis indigotica are weak in pushing through the soil, soil should be pressed between the two sowing furrows to avoid affecting seed germination.
Seedling stage management
After sowing, Isatis indigotica seeds generally emerge in 7 to 10 days, and all seedlings can emerge in 15 days.
1. Poking holes for ventilation: Once Isatis indigotica seedlings are found to have emerged, the film above the seedlings should be punctured promptly. This helps the seedlings continue to grow upward and can prevent the high temperature under the film from burning the seedlings to death. Because the nighttime temperature is still relatively low at this time, the ventilation holes must not be made too large, otherwise the seedlings will stop growing. The best ventilation hole size is slightly larger than the seedling. The work of puncturing the film for ventilation must be carried out every day and continued until all seedlings on the bed surface have emerged.
2. Weeding: During this period, because the temperature and humidity under the film are high, some weeds will grow rapidly and push through the film. When weeds are found breaking through the film, they should be pulled out promptly. To prevent weeds from continuing to grow in that spot, after pulling out the weeds, a hard clod of soil should be pressed onto that position.
3. Thinning: As the Isatis indigotica seedlings grow, in order to improve ventilation and light conditions for the seedlings and ensure normal nutrient supply, thinning should be carried out once when the seedlings reach 5 to 6 true leaves. This thinning should follow the principle of removing small ones and keeping large ones, removing weak ones and keeping strong ones, with a seedling spacing kept at 5 to 8 cm. As the outside temperature rises, the soil temperature also keeps rising. Some people think the film can be removed at this time, but this is actually a wrong practice, because although the Isatis indigotica seedlings can grow quickly when the soil temperature is high at this time, weeds grow even faster. If the film is removed now, weeds will quickly cover the entire bed surface and affect the continued growth of the seedlings. The purpose of not removing the film during this period is to use the high temperature under the film to kill weeds and also to help preserve soil moisture. When the Isatis indigotica seedlings grow to 10 cm tall, a second thinning should be carried out. This thinning is also the final thinning of the Isatis indigotica seedlings. Before final thinning, first remove the covering film on the bed surface, and then carry out one intertillage of the bed surface.
4. Intertillage: Intertillage can first change the permeability of the bed surface soil and help preserve soil moisture; second, this intertillage helps the seedling roots extend downward. Because the root system of Isatis indigotica seedlings at this time has not yet extended very deep, the intertillage depth should be shallow rather than deep, preferably 2 to 3 cm. After intertillage is completed, final thinning should be carried out.
5. Final thinning: The spacing for this final thinning is 20 to 25 cm. While final thinning is being done, weeds should also be removed. In addition, if broken rows or missing plants are found during final thinning, seedlings should be replanted promptly. The method of replanting is to dig out overly dense Isatis indigotica seedlings together with their roots, preferably with a soil ball, dig a small hole 5 cm deep where seedlings are missing, and replant the seedlings in the hole. To help the seedlings survive, after replanting, water promptly and lightly to help them recover. After final thinning is completed, spray once with 50% carbendazim wettable powder 1000-fold solution to prevent sclerotinia disease.
6. Topdressing: Three days after removing the film, after the seedlings have adapted to the environment, apply one topdressing of organic fertilizer. Isatis indigotica needs nitrogen fertilizer at the seedling stage, so this fertilization should be topdressed with urea at 3 to 5 kg per mu. Because the Isatis indigotica seedlings are still relatively small at this time and the leaves are tender, when chemical fertilizer falls on the leaves it can easily burn them to death and affect yield. This requires that after fertilization, gently move the Isatis indigotica seedlings with a thin twig so that the urea falling on the seedlings drops to the ground. After fertilization, water once. Considering that the seedlings are still small at this time, the amount of water for this irrigation should be smaller, just enough to wet the soil surface.?