Detailed Explanation of Morinda officinalis Cultivation Techniques and Management Methods
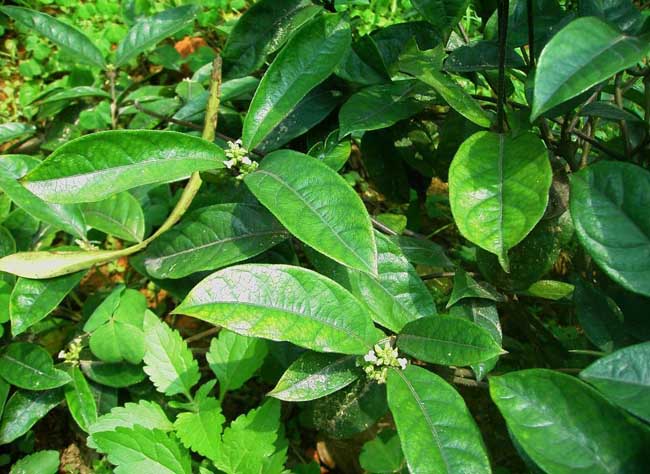
Morinda officinalis is the dried root of the Rubiaceae plant Morinda officinalis, also known as bajitian or jichangfeng. It has the functions of tonifying kidney yang, strengthening bones and muscles, and dispelling wind-dampness. It is mainly produced in Guangdong, Guangxi, Fujian, Hainan and other provinces and autonomous regions, either cultivated or wild.
Morphological Characteristics of Morinda officinalis
Perennial woody vine. Root cylindrical, contracted into a bead-like string, resembling chicken intestine. Stem cylindrical, gray-green or dark brown, young branches initially hairy, later becoming rough. Leaves opposite, oblong, upper surface initially hairy, lower surface with coarse hairs along the midrib. Umbellate inflorescence, corolla white. Fruit nearly spherical, red. Seeds 1-4, nearly ovate. Flowering period June-July, fruit ripening period August—October.
Growth Habits of Morinda officinalis
Native to the warm and humid secondary forest understory of the southern subtropical and tropical regions, with an optimal growth temperature of 20-25°C. It prefers warmth and fears severe cold. Suitable climatic conditions for growth include an annual average temperature above 20°C. When temperatures drop below 0°C or when encountering low-temperature frost, it often causes leaf drop, or even freezing injury or death. Annual average precipitation of 1600 mm. Young plants prefer shade, while mature plants prefer sunlight. The soil should be deep, fertile, and moist. In fertile paddy soil or soil with excessive nitrogen, the fleshy roots actually grow very few and yields are low.
Wild distribution occurs in valley understories of most mountainous areas in Guangdong Province. Starting in the 1960s, the transition from wild to domestic cultivation and introduction for cultivation was carried out successfully.
Propagation Methods of Morinda officinalis
Morinda officinalis is commonly propagated by cuttings, root tubers, and seeds.
1. Cutting Propagation
① Selection and cutting of cuttings: Select one- to two-year-old robust vine stems free of pests and diseases. After cutting from the mother plant, cut into 5 cm single-node sections, or 10-15 cm branches with 2-3 nodes as cuttings. The upper internode of the cutting should not be left too long; cut it flat, and cut the lower end into a slanted opening. The blade should be sharp when cutting the seedlings; never crush or split the cut end. Keep the leaves on the first upper node and remove the leaves from other nodes, then insert the cuttings immediately. For cuttings that cannot be inserted in time, dip the roots in wood ash and yellow mud slurry and heel them in in a cool, shady place.
② Cutting season: Generally, it is best around the time of spring rain, when the temperature has risen and rainfall is gradually increasing, making it easy for the cuttings to survive after insertion.
③ Cutting method: Open furrows at a row spacing of 15-20 cm, then place the cuttings neatly and flatly in the furrows at a plant spacing of 1-2 cm, slanting them. After insertion, cover with yellow heart soil or disinfected fine soil, with the cuttings slightly exposed above the ground. Generally, roots can form 20 days after insertion, with a survival rate of over 80%. To promote rooting, the cuttings can be treated with growth hormones.
2. Root Tuber Propagation
① Selection and cutting of root tubers: Select root tubers that are plump and uniform, with unbroken root bark and free of pests and diseases as seed stock, and cut them into small sections 10-15 cm long. Alternatively, when harvesting Morinda officinalis, select from small root tubers that cannot be used as commercial medicinal material.
② Root tuber seedling method: On the prepared seedbed, open furrows at a row spacing of 15-20 cm, then place the root tubers neatly and flatly in the furrows at a plant spacing of 5 cm, slanting them, cover with soil and press firm, allowing the root tubers to be slightly exposed about 1 cm above the soil surface.
3. Seed Propagation
Select robust plants free of pests and diseases as seed-bearing mother plants, strengthen management, and ensure abundant flowering and fruiting. Since seeds are not suitable for long storage, it is best to sow them as soon as they are collected, preferably in October-November. Seeds that have undergone stratification storage are best sown in March-April of the following year.
Sow at a plant-row spacing of 3 cm×3 cm; the broadcast sowing density should not be too high. After sowing, cover with about 1 cm of sifted yellow heart soil or burnt soil. After 1-2 months, the seeds will germinate, and the seedling survival rate can reach about 90%.
Cultivation Techniques of Morinda officinalis
1. Site Selection and Land Preparation
It is advisable to choose sparsely forested areas with a certain slope or sunny hilly land in the middle and lower parts covered by trees, with deep, loose sandy loam soil of moderate fertility. If the woodland is overgrown with shrubs, in winter, clear the trees and weeds, burn them into charcoal for fertilizer, and a portion of the trees may also be retained for shade. If there are tree roots containing volatile substances such as Litsea cubeba or camphor trees, which seriously harm the growth of Morinda officinalis, they must be removed thoroughly by deep plowing. In winter, clear the land and plow the soil; in spring, build beds across the slope, making beds 1 m wide and 20 cm high, and apply 1000-1500 kg of burnt soil per mu as base fertilizer.
2. Field Management
① Shading: After cutting insertion, set up shade sheds or insert fern for shading, with a canopy density of up to 70%-80% or more. As the seedlings root, survive, and grow, the light transmittance should be gradually increased, and in the later stage of seedling cultivation, the canopy density should be controlled at about 30%.
② Cultivation and weeding: In the first 2 years after planting, weed twice each year, that is, once each in May and October. Because the root system of Morinda officinalis is shallow and brittle, using a hoe easily damages the roots and causes the plant to die. Weeds around the base of the plant stems should be pulled by hand, and hilling should be carried out along with weeding, so as not to let the roots be exposed above the soil surface.
③ Fertilization: When the seedlings grow 1-2 pairs of new leaves, fertilization can begin, mainly with organic fertilizers, such as a mixed fertilizer of farmyard manure, burnt soil, decomposed superphosphate, wood ash, etc., at 1000-2000 kg per mu. Avoid applying ammonium sulfate, ammonium chloride, pig urine, and cow urine. If the planting site is quite acidic, lime may be appropriately applied at 50-60 kg per mu.
④ Vine pruning: Morinda officinalis spreads along the ground, and the vines often grow too long. Especially for three-year-old plants, overly long stems and leaves can affect root growth and material accumulation. In winter, the overlong portions of the already aged green stems and vines can be cut off, retaining the young tender red-purple stems and vines to promote plant growth and concentrate nutrients in the roots.
Pest and Disease Control of Morinda officinalis
1. Stem Base Rot
Stem base rot begins to damage the stem base in late October. Control methods:
① Strengthen field management to enhance disease resistance.
② Do not apply ammonium-type chemical fertilizers, which cause the tissues of Morinda officinalis to become soft and increase soil acidity.
③ Adjust soil pH to reduce disease occurrence.
④ After disease occurrence, dig out the diseased plants together with roots and soil, and apply lime in the pit to sterilize and prevent the spread of the disease. Lime and wood ash at 1:3 can be applied to the roots, or Bordeaux mixture at 1:2:100 can be sprayed, once every 7-10 days, for 2-3 consecutive times.
2. Ring Spot Disease
Ring spot disease mainly damages the leaves. The control method is to spray Bordeaux mixture at 1:2:100, once every 7-10 days, for 2-3 consecutive times.
3. Sooty Mold Disease
Sooty mold disease occurs after damage by pests such as aphids, scale insects, and whiteflies, causing dark brown mold spots to form on the surface of damaged stems, leaves, and fruits. Control methods:
① Controlling pests can achieve the effect of disease prevention.
② Spray with 50% Tuzet at 800 times dilution, once every 7-10 days, for 2-3 consecutive times.
③ Biological control with Trichoderma preparations can also be used.
4. Aphids
They damage Morinda officinalis in spring and autumn when new buds and new leaves sprout. Control methods:
① Dilute 40% dimethoate emulsifiable concentrate 1500 times.
② Prepare tobacco-lime water with 0.5 kg of tobacco and spray.
5. Scale Insects
Adults and nymphs suck sap from stems and leaves and can cause sooty mold disease. The control method is to spray and kill in the young stage with 0.5 kg of 40% dimethoate emulsifiable concentrate, 50-100 g of kerosene, and 750 kg of water.
6. Red Spider Mites
Adults and nymphs gather on the underside of leaves or tender buds. The control method is to spray and kill with 50% tetradifon at 1500-2000 times dilution, or 25% chlordimeform at 500-1000 times dilution.
7. Whiteflies
The larvae suck sap from leaves, and severely damaged leaves change from fresh green to yellow-brown or even wither. The control method is to spray and kill with dimethoate emulsifiable concentrate diluted 1500 times, or 18 Baumé rosin mixture diluted 20-25 times.
8. Leaf Miners
The larvae tunnel into the leaves and feed on the mesophyll, showing winding circular patterns. The control method is to spray and kill with 40% dimethoate emulsifiable concentrate diluted 1000-1500 times.
Harvesting and Processing of Morinda officinalis
Morinda officinalis can only be harvested after 5 years of planting. If harvested too early, the roots are not mature enough, contain much water, the flesh color is yellow-white, and the yield is low. Harvesting can be carried out throughout the year, but winter harvesting is best. After digging up, shake off the soil immediately. When digging out the fleshy roots, try to avoid breaking the roots and damaging the root bark. Remove the lateral roots and the rhizome head, and sun-dry until 60-70% dry. When the root texture becomes soft, pound it flat gently with a wooden mallet, but do not crush it or cause the bark and flesh to break apart. Cut into 10-12 cm short sections according to commercial requirements. After grading by thickness, sun-dry each grade until fully dry, and it becomes the commercial product. In old production areas, it is customary to blanch in boiling water or steam for about half an hour before sun-drying, which makes the color more purple, the texture softer, and the quality better.
Seed Retention Techniques for Morinda officinalis
Morinda officinalis flowers and fruits after 2 years of planting, generally maturing successively from September to October. Harvest when the fruits turn from green to yellow-brown or red and have a sweet taste. For the collected fruits, rub the fruit skin broken, rinse the juice clean, take out the seeds, and select red, plump seeds free of pests and diseases for sowing; or place the collected fruits in layers in a permeable basket, with one layer of sand, one layer of wood ash, and one layer of fruits, maintaining moisture regularly.