How to Build a Loach Breeding Pond? A Detailed Guide to the Method
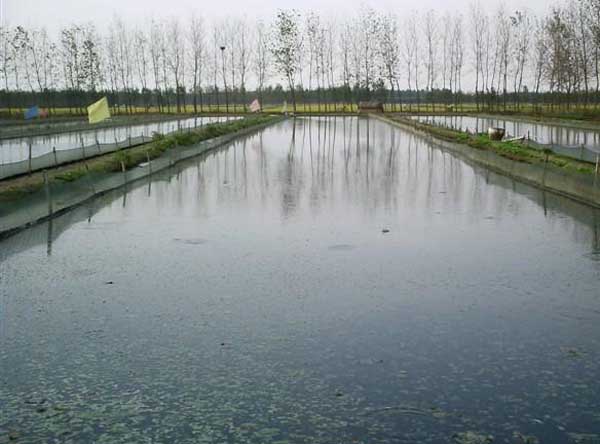
To raise loaches well, choosing a suitable location is very important. First, choose a place with abundant water and good water quality. Because the loach is also a kind of fish, and fish cannot live without water, so there must be a clean, pollution-free water source to breed loaches. Second, choose a place with convenient transportation, because the breeding process requires transporting feed and transporting loaches, so a place with convenient transportation must be chosen. Choosing a good site alone is not enough; when building the breeding farm, you must consider everything thoroughly.
Site Selection for the Loach Pond
1. Transportation: Transportation plays a relatively important role in loach breeding. In a place with convenient transportation, buying fry, purchasing feed, and selling loaches are all very convenient and are not affected by the season or weather.
2. Electricity: The loach pond should generally be chosen in a place with relatively stable voltage, which plays a crucial role in how quickly the water can be changed during breeding. Most rural areas across our country have already carried out rural power grid renovation, but there are still some areas where, due to reasons such as small transformer capacity and aging lines, water pumps cannot be started to draw water during peak electricity usage. This can easily bring safety hazards to loach breeding, so friends raising loaches for the first time must pay attention to this when choosing a breeding site.
3. Water source: Whether the water source is sufficient determines the level of loach breeding density, so loach ponds are generally built in places relatively close to rivers and lakes, but the water source must not be seriously polluted (it must be suitable for fish survival). If your area has relatively abundant groundwater, you can also use well water for breeding, and the effect is almost the same.
4. Soil quality: Soil such as black soil and loess, which is relatively clayey, is better. Sandy soil has poor water retention performance and is best not used.
5. Terrain: The terrain should be slightly high, with convenient drainage, and it must not be submerged during the summer flood season.
Construction of the Loach Pond
1. Timing: In northern regions, building a loach pond is generally more suitable in winter. A loach pond built in winter, after being frozen through the next winter, gradually has its soil loosened, which has a relatively large effect on water retention during the breeding process the following year. Of course, other seasons are also acceptable, but you must pay attention to the problem of seepage.
2. Excavation: For paddy fields whose ridges are relatively low, or for newly built loach breeding ponds on flat land, if conditions permit, a small bulldozer or excavator can be used to excavate the pond. Before excavation, it is best to use a rotary tiller to harrow the ground once, and then excavate. In this way, the soil is soft, which is likewise beneficial for water retention. For paddy field ridges that are already relatively firm, you can also simply use manual labor to appropriately raise and widen the ridges.
3. Pond depth: The depth of the completed loach pond generally only needs to be maintained at about 1 m. There is no need for it to be too deep; if it is too deep, the excavation cost is also relatively high.
4. Ridge (dam) width and anti-seepage treatment: Generally, maintaining 1-2 m is sufficient (specifically determined according to the local soil quality), as long as it can store water at about 70 cm and seepage is relatively slow. Some paddy fields have wild crayfish burrowing holes, which easily cause the ridges to leak. The soil in some areas contains a lot of sand, and the anti-seepage effect is poor. For such paddy fields, geotextile membrane can be covered along the edges to prevent pond water seepage. Generally, the price of geotextile membrane with a specification of 130 grams per sq m is about 3 yuan, and treating one 100 m long ridge costs about 600 yuan, but it can generally be used for 3 years. If conditions permit, it is of course even better to treat the ridges with bricks or concrete for anti-seepage, but the one-time investment for this will be relatively larger.-
5. Pond size: Loach breeding ponds are generally suitable at 70~120 m long, 8~15 m wide, and 1~3 mu in area. If the width is too wide, management such as feeding is not very convenient; if the length is too long, it is very difficult to achieve relatively thorough water exchange. Of course, the pond should not be too small either, as that also makes management somewhat troublesome.
Preparation of Related Materials
1. Bamboo poles and iron wire: Generally, buying bamboo poles about 6 m long is sufficient. Each bamboo pole is cut into 4 sections, each 1.5 m. The topmost section, because it is relatively thin, cannot be used, and the remaining 3 sections can be used. In the loach breeding pond, one section of bamboo pole is needed every 3?5 m, so the purchase quantity of bamboo poles can be calculated. Cement rods can also be used to support the mesh fabric, generally one cement rod every 6?10 m. Cement rods can be ordered from a prefabricated component factory, with a length of about 1.5 m (the kind many grape growers use for trellises). In addition, an appropriate amount of thin steel wire rope or iron wire should be prepared, with a length sufficient to go around the paddy field once, used to connect each bamboo pole or cement rod so as to fix one side of the mesh fabric.
2. Mesh fabric: Mesh fabric is mainly used to prevent loaches from burrowing holes around the ridges and escaping. In order to ensure the service life of the mesh fabric and ensure that the loaches do not escape, when buying mesh fabric you must choose relatively good-quality polyethylene mesh fabric. The mesh size should be determined according to the loach fry being stocked (generally 10~20 mesh mesh fabric is acceptable). Relatively good-quality mesh fabric can be used for more than 3 years in open-air sites exposed to sun and rain, but some poor-quality mesh fabric ages and becomes brittle in less than 1 year, easily causing the bred loaches to escape. The width (height) of the mesh fabric is preferably about 1.5 m. Since the pond water depth may be about 70 cm, plus about 50 cm must be buried under the mud, mesh fabric with a width of only 1.2 m must never be used as a substitute. The length of the mesh fabric depends on the perimeter of the loach pond. Under normal circumstances, if the perimeter of the loach pond is 100 m, it is best to buy a few extra meters when purchasing the mesh fabric, because the mesh fabric may not be completely straightened when being buried, which may increase the amount of mesh fabric used.
Installation of Related Facilities
1. Burying the mesh: One month before stocking the fry, the mesh must be buried in the pond. Burying the mesh is a very key step and is directly related to the success or failure of loach breeding. It can be said that it is just as important as loach breeding itself. If it is buried poorly, it will cause a large number of loaches to escape. The following aspects should be noted when burying the mesh.
① Before burying the mesh, there must be no water in the pond. If there is water, the mesh cannot be buried firmly, but it also must not be too dry. If it is too dry, hard clods of soil can easily pierce the mesh fabric when backfilling.
② The mesh-burying trench must be dug manually, and the excavated soil must not be placed on the pond ridge; it should be placed in the pond to facilitate backfilling when burying the mesh. The mesh-burying trench should be dug at a place about 20 cm from the bottom of the pond ridge. If it is too close to the pond ridge, during the breeding process, due to rainwater erosion, soil on the ridge will inevitably collapse, and this collapsed soil can easily crush the enclosing mud and cause the loaches to escape. The depth of the mesh-burying trench is generally preferably 30 cm. This is mainly designed according to the restless nature of loaches. If buried too shallow, the loaches can easily sweep away the soil burying the mesh, causing the loaches to escape from under the mesh; if buried too deep, it is difficult to guarantee the anti-escape height above. When digging to the four corners of the pond, the trench should be dug in an arc shape rather than following the pond ridge into a right angle, so as to avoid wrinkles when burying the mesh at the four corners.
③ After the mesh-burying trench is dug, the mesh should be buried immediately, so as to avoid the soil becoming dry and unfavorable for backfilling. The mesh fabric and the pond bottom form a “"” shape, which can effectively prevent the loaches from escaping. When burying the mesh, be sure to pull the mesh tight and straight. Never let the mesh wrinkle or form pockets; otherwise, during the breeding process, loaches can easily gather at the wrinkles, and over time can easily “arch” through the mesh.
2. Driving stakes: After the mesh is buried, stakes should be driven on the side of the mesh fabric near the pond ridge (bamboo poles, miscellaneous wooden sticks, or cement rods may all be used). If bamboo poles or wooden sticks are used, one end can be sharpened and then driven into the mud with a hammer (the length driven into the mud is about 30 cm), with 1 stake every 3~5 m; if cement rods are used as support, a pit can be dug with a shovel or hoe every 6~10 m outside the mesh (the pit depth is about 30 cm), then the cement rod is placed in and backfilled and tamped firm. No matter which material is used for driving stakes, every effort should be made to ensure that each stake is upright, so as to ensure that the mesh fabric can be stretched straight.
3. Pulling wire and stretching the mesh: After the stakes are driven, iron wire or thin steel wire rope (the diameter of the iron wire or thin steel wire rope only needs to be about 3~5 mm) should be used to connect each stake from the upper-middle part of the stakes. The height of the iron wire or steel wire rope is preferably slightly higher than the mesh fabric. After the connecting line is pulled and fixed to each stake, one side of the mesh fabric should be tied to the pull line with thin iron wire or nylon thread (tie it about every 50 cm). When tying, note: in some places the distance between the edge of the mesh fabric and the iron wire is somewhat large, and it is enough to tighten it slightly; do not forcibly pull the mesh fabric onto the pull line, in order to prevent tearing the mesh fabric. After the mesh fabric is tied, the main work of enclosing the pond with mesh is basically completed.
4. Installing inlet and drainage pipes: The drainage pipe of a loach pond generally consists of 1 elbow and 2 sections of drainage pipe. The drainage pipe is generally 100~160 mm in size. The length of one section of drainage pipe is about the width of the pond ridge. Dig open the pond ridge and bury it at a position slightly lower than the bottom of the pond. On the end inside the pond where the pipe is buried, fit an elbow of the same specification and fix it with glue, so that the elbow opening faces upward. Then insert another section of pipe of the same specification with a length of about 70 cm into the elbow opening (no need to apply glue). In this way, the drainage pipe of the loach pond is considered installed. Later in breeding, if the pond needs to be drained, just pull out the section of pipe on the elbow inside the pond. When it rains or water is added to the pond, if the pond water level is higher than the pipe inside the pond, the pond water can flow out through the drainage pipe, and there is completely no need to worry about the pond water becoming full and overflowing the pond and causing the loaches to escape. In order to increase the safety factor of the pond enclosure mesh and prevent loaches from escaping in case the mesh fabric breaks, a small piece of mesh fabric can also be used at the drainage pipe for enclosure, so that even if one or two loaches escape the enclosure mesh by luck, they cannot escape outside the pond. During routine management, if the breeder finds loaches that have escaped outside the enclosure mesh, a dip net or the like can be used to scoop them up and put them back inside the enclosure mesh. Since loaches like to jump around near the water inlet, when installing the pond inlet pipe, we should let the water rush to a position more than 1 m away from the pond-side enclosure mesh, so as to avoid the loaches gathering and jumping at the edge of the mesh fabric and causing head abrasions. Some breeders place a small wooden board under the outlet pipe, causing the water to splash when pumped into the pond, which not only increases the dissolved oxygen in the pond water but also effectively prevents the loaches from gathering excessively when water is being pumped. This practice is worth learning from.
5. Other auxiliary facilities
① Digging a well: If there is no reliable water source near the loach pond, then digging a well beside the pond should be considered. In plain areas, groundwater is generally relatively abundant. Driving a cement pipe with a diameter of about 40 cm down several meters can yield a relatively abundant water source, and a water pump can be placed in it to pump water continuously, with the cost generally only a few hundred yuan. For mountainous and hilly areas, if well water is to be relied upon, a well should be dug first and then the pond built, so as to avoid the situation where the pond is built but the well has little output, making loach breeding impossible to carry out normally.
② Building a fish shed: The main purpose of the fish shed is to provide lodging for the watchman and to store breeding feed and other items and breeding tools. Generally, a simple shed of a few sq m is enough. Since the investment in loach breeding is relatively large, building a fish shed beside the pond and assigning a conscientious and responsible person to keep watch day and night is also very necessary.
③ Leveling the pond ridge: Since carrying out loach breeding management requires frequently walking on the pond ridge, for newly made pond ridges or newly raised pond ridges, it is best to level them slightly to make it convenient for management personnel to walk.
After the above facilities are prepared, the pond for enclosure-mesh loach breeding is also completed. Fill the pond with water (the pond water depth is 50^60 cm), soak for more than 7 days (mainly to let the mesh fabric soften and allow plankton to grow on it, making it smooth and avoiding abrasions to the loach bodies), and then loaches can be stocked into the pond to begin breeding.