How to Grow Yacon? A Detailed Explanation of Planting Methods and Key Technical Points
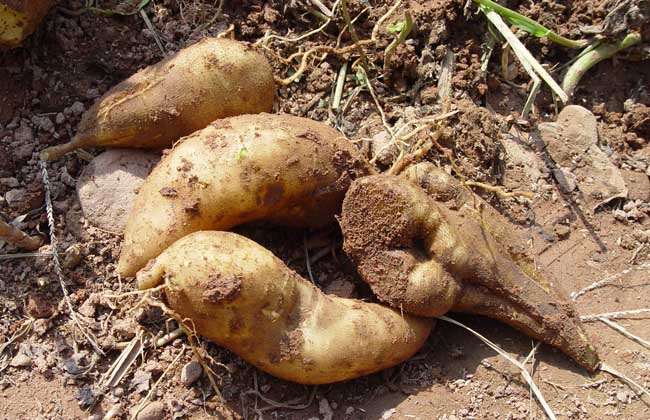
Yacon is a perennial herbaceous plant of the genus Smallanthus in the Asteraceae family, native to the Andes Mountains of South America. It is a traditional root food of the local Indigenous peoples, and the inhabitants of the Andes have cultivated this plant as a root vegetable to eat, as well as a fruit. It was introduced to China in 2008, and cultivation first began in Yunnan Province, China. Let us take a look below at how to grow yacon!
Yacon Growing Conditions
Yacon has been successfully introduced and cultivated in Yunnan, Fujian, Hainan, Guizhou, Hunan, Hubei, Shandong, Henan, and Hebei, and is particularly suited to growing on sandy soils at altitudes between 1000 and 2300 m. It likes sunlight and moist soil, and requires terraced land, terraced fields, or gentle slopes that have irrigation water but are not subject to flooding. The growing period is about 200-plus days, and the optimum growing temperature is 20-30degC. Growth stalls below 15degC, it is not cold-tolerant, and the stems die when exposed to frost.
Yacon Seedling Raising Techniques
1. Seed selection: When planting yacon, good seed tubers or seedlings should be selected. The seed tubers should have plump, intact buds and a reddish color, and the seedlings should be glossy green and robust, free of disease and damage.
2. Planting time: Yacon is best planted after the seed tubers are cut, leaving 3-4 buds on each cut tuber. Direct sowing should be done before April 15. Sowing with plastic film mulch is best done at the end of March, and if conditions allow the building of small arched sheds, the time can be advanced further. Seedling raising in nutrient pots should be carried out in early to mid-March, and after the frost period ends, the seedlings should be transplanted to the field and watered promptly. The earlier the planting, the higher the yield; yacon planted in May to June shows a clear decline in yield.
3. Land preparation and ridging: Choose sandy loam with convenient drainage and irrigation; low-lying sandy loam should not be chosen. Open furrows at a row spacing of 0.8-1 m, and evenly apply 2000 kg of fully decomposed human, livestock, and poultry manure and 20 kg of compound fertilizer per mu at one time. Then form ridges (also called forming beds), and later during cultivation, earth up again to raise them, with the aim of increasing the soil's diurnal temperature difference and promoting fruit expansion.
Yacon Planting Techniques
1. Seedling raising and transplanting: In late February, after the root buds sprout, cut the root buds apart, with 1-2 buds per piece, coat the wounds with plant ash, and place them in bags to raise seedlings. Water thoroughly and cover with film, then remove the film once roots have grown and seedlings have emerged. Do not water too much during the seedling stage; just keep the soil moist. In late March to early April, when the seedlings have grown to about 10 cm tall, they can be transplanted, and at transplanting, water thoroughly to settle the roots. Direct sowing in the field can also be used.
2. Planting density: 1000-1200 plants per mu, with a plant spacing of 0.6 m and a row spacing of 1 m, planting in a staggered pattern between rows. You can first plow and then form ridges and plant according to the specifications, or dig planting pits for planting. The planting pits should measure 50 cm × 50 cm and be 40 cm deep. After backfilling 30 cm of soil, apply 3-5 kg of decomposed farm manure per hole and 0.15 kg of high-quality compound fertilizer per hole, mix evenly with the upper layer of soil, and then plant the seedlings in the pits.
3. Mid-season management: After transplanting yacon, water promptly to ensure the survival rate. Once the rainy season begins, dig drainage ditches well and do not let the plants be submerged or waterlogged. Carry out cultivation and weeding, and earth up and form ridges while weeding. In principle, no chemical fertilizers or pesticides are applied throughout the growing period; weak seedlings can be watered with clear manure water or biogas slurry. In July and August, the plants enter the vigorous growth period, branches grow wildly, and for those with too many branches, pruning and branch removal should be combined with earthing up. Remove overly dense branches, prune deeply early on, and only pinch the tips later, to control excessive aboveground growth and retain about 10-12 vigorous branches.
4. Late-stage management: Yacon enters the flowering period in September, with each branch bearing five yellow sunflower-like flowers. After the flowers fade, it enters the maturity period, and once the flowers on all branches have faded, the tubers can be harvested successively.
5. Timely digging: The sign that the underground tubers of yacon are mature is the withering of the small clustered yellow flowers at the stem tips around October, at which point they can be dug. They should be dug before the ground freezes and stored indoors or in cellars. They can be stored like sweet potatoes, and the stems can be used as high-quality feed. The leaves and flowers, like the tubers, have high nutritional value and can be dried for tea or sold. About 1000 plants are planted per mu, generally yielding about 3 kg per plant, with the highest single-plant yield reaching 10 kg.
6. Seed-saving technique: After digging yacon, cut off the seed portion at the upper part of the tubers, dry the wounds, soak them in a 75% potassium permanganate solution for 2 minutes, remove them, place them with the bud eyes facing upward, and store them in moist sand in a cool place for temporary planting. When the seed buds have grown to about 4 cm after the sand is uncovered in February of the following year, they can be planted out (the timing should be determined locally according to local temperatures).