The five-color pepper bears red, yellow, purple and white fruits on a single plant, and is a charming sight as a potted ornamental.
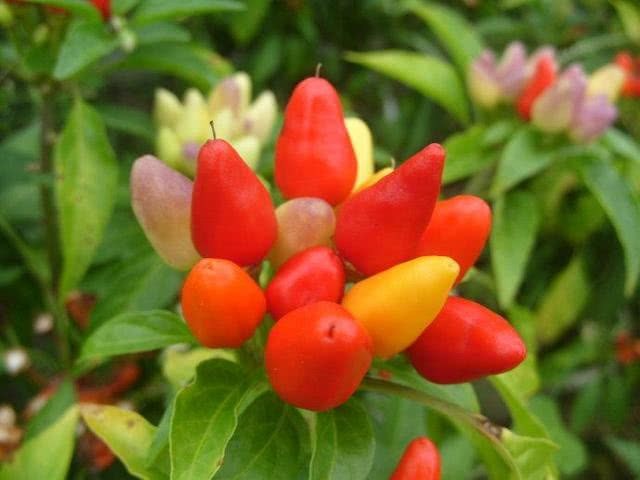
Five-color pepper
Five-color pepper, also known as facing-heaven pepper or five-color chili, is a variety of chili pepper with an astringent taste. It belongs to the Solanaceae family as a perennial semi-woody plant, often grown as an annual; quite a few flower growers in the Shuyang area of Jiangsu cultivate it. Its plant height is 30 cm-60 cm, with many branches and erect stems, and alternate simple leaves; the flowers are white, blooming from early May to the end of July, and the fruits cluster at the tips of the branches. The fruits on the same plant come in red, yellow, purple, white and other colors, with a glossy sheen; it is very charming as a potted ornamental, and the fruits are also edible, with a flavor similar to green bell pepper. The chili fruits are brightly colored, dotting the green leaves and looking dainty and lovely. A single plant can be grown in a small pot, or several plants together in a slightly larger pot, placed in the living room, bedroom or kitchen, for a very good decorative effect. The whole plant is used medicinally; the rhizome is warm in nature and sweet in taste, can dispel wind and disperse cold, relax muscles and stimulate blood circulation, and also has insecticidal and anti-itching effects. The plant has a certain ability to absorb and resist toxic gases in the air such as sulfur dioxide and sulfur trioxide.
Morphological characteristics
Perennial herb, often grown as an annual. Plant height 40-60 cm. The stem is semi-woody or subshrub-like, erect, with many branches; it is a variety of the hot pepper. Simple leaves alternate, ovate-lanceolate or oblong, resembling the edible chili pepper. Flowers small, white, solitary in leaf axils or clustered at the tips of branches, with pedicels. The calyx is short and swells when fruiting. The flowering period is from July to frost. The berries are erect, small and pointed, finger-shaped, conical or spherical; during ripening they change from green to white, yellow, orange, red, purple and other colors, with a glossy sheen. The fruit ripening period is August-October. Natural hybridization often produces new variations.
Growing environment
The five-color pepper is by nature not cold-tolerant and prefers a warm, dry environment with plenty of sunshine. The optimum growing temperature is 20-30°C; below 15°C or above 35°C it grows poorly and sets fruit with difficulty. It is suitable for cultivation in well-drained, loose and fertile loam and sandy loam.
Main value
1. As an ornamental. The five-color pepper has relatively few pests and diseases, generally leaf spot disease (which can be controlled by spraying a 500-fold dilution of 50% thiophanate-methyl wettable powder) and aphid damage (which can be controlled by spraying a 1500-fold dilution of 50% fenitrothion emulsifiable concentrate). Therefore, five-color peppers with bright, richly colored fruits (yellow, green, bright red, pink, orange) and varied fruit shapes (lantern-shaped, eggplant-shaped, pointed, heart-shaped) are often planted in flower beds and flower borders, and are especially popular as potted plants.
2. As a food ingredient. The fruits of the five-color pepper are edible and can be used as a seasoning. Its nutritional value is quite high, rich in vitamin A, vitamin B, vitamin C and vitamin D; it is one of the vegetables containing more vitamins among vegetarian dishes.
3. As an insecticide. It can kill armyworms, caterpillars, red spiders and so on. Take 50 g of fresh or sun-dried five-color peppers, add 500 g of water and boil for half an hour, then spray the affected plants with the liquid.
Propagation methods
Seed propagation
Sowing is often carried out in summer: sterilize the substrate for sowing. The best method is to put it in a pot and heat it by stir-frying; any pests or diseases will be killed by the heat.
1. Pre-sprouting: soak the seeds in warm hot water (about the same temperature as face-washing water) for 3-10 hours, until the seeds absorb water and swell. For very common seeds that germinate easily, this step can be skipped.
2. Sowing: for tiny seeds that are hard to pick up with hands or other tools, moisten one end of a toothpick with water and stick the seeds one by one onto the surface of the substrate, then cover with substrate 1 cm thick, then place the sowing pot into water with a depth of 1/2-2/3 of the pot's height, letting the water slowly soak up (this method is called the "pot soaking method");
For larger seeds that can be picked up with hands or other tools, place the seeds directly into the substrate and sow them in spots at a spacing of 3×3 cm. After sowing, cover with substrate to a thickness 2-3 times that of the seeds. After sowing, use a sprayer or a fine-holed watering can to moisten the sowing substrate; later, when the pot soil is slightly dry, water again, still taking care not to water too forcefully, so as not to wash the seeds up.
3. Management after sowing
After sowing, once the seedlings emerge, remove the film promptly, and let the seedlings receive sunlight before 9:30 every morning, or after 3:30 in the afternoon, otherwise the seedlings will grow very weak; after most of the seeds have emerged, appropriate thinning is needed: pull out the diseased and unhealthy seedlings so that the remaining seedlings have a certain space between each other; when most of the seedlings have grown 3 or more leaves, they can be transplanted into pots.
Cutting propagation
The cutting substrate is the nutrient soil, river sand, peat soil or other materials used for cuttings. For home cuttings, it is difficult to obtain an ideal cutting substrate due to limited conditions; it is recommended to use a ready-mixed and sterilized cutting substrate; medium-coarse river sand can also be used, but it must be rinsed several times with clean water before use. Do not use sea sand or river sand from saline-alkali areas; they are not suitable for the growth of flowering plants.
Selection of cutting branches: the branches used for cuttings are called cuttings (cutting shoots). Usually, in combination with pinching work, the thick, pest-free top shoots that are pinched off are used as cuttings, and the top shoots can be used directly for cuttings.
Management after cutting:
Temperature: the optimum temperature for cutting rooting is 18°C-25°C; below 18°C, the cuttings root with difficulty and slowly; above 25°C, the cut ends of the cuttings are easily infected by pathogens and rot, and the higher the temperature, the greater the proportion of rot. When low temperatures are encountered after cutting, the main measure for keeping warm is to wrap the pot or container used for cuttings with film; when the temperature is too high after cutting, the main measure for cooling is to shade the cuttings, blocking out 50-80% of the sunlight, and at the same time spray the cuttings 3-5 times a day; on sunny days with higher temperatures, spray more often, while on cloudy and rainy days with lower temperatures and higher humidity, spray less often or not at all.
Humidity: after cutting, the relative air humidity must be maintained at 75-85%. Humidity can be increased by spraying the cuttings 1-3 times a day; on sunny days with higher temperatures, spray more often, while on cloudy and rainy days with lower temperatures, spray less often or not at all. However, excessive spraying makes the cuttings susceptible to infection by pathogens and rot, because many kinds of pathogens exist in water.
Light: cutting propagation cannot do without sunlight, but the stronger the light, the higher the temperature inside the cuttings, the more vigorous the transpiration of the cuttings, and the more water they consume, which is not conducive to the survival of the cuttings. Therefore, after cutting, 50-80% of the sunlight must be blocked out; after the root system has grown, gradually remove the shade net: on sunny days, remove the shade net at 4:00 every afternoon, and cover it again before 9:00 the next morning.
Potting or transplanting: when potting young seedlings, first place coarse-grained substrate or expanded clay 2-2 cm thick at the bottom of the pot as a drainage layer, then sprinkle a layer of fully decomposed organic fertilizer as base fertilizer, about 1-2 cm thick, then cover with a layer of substrate about 1-2 cm thick, and then place the plant in, so as to separate the fertilizer from the root system and avoid burning the roots.
The substrate for potting can be chosen from one of the following. Kitchen garden soil: cinder = 3:1; or garden soil: medium-coarse river sand: sawdust (mushroom residue) = 4:1:2; or one of paddy soil, pond mud, and leaf mold. Or peat + perlite + expanded clay = 2 parts + 2 parts + 1 part; kitchen garden soil + cinder = 3 parts + 1 part; peat + cinder + expanded clay = 2 parts + 2 parts + 1 part; sawdust + vermiculite + medium-coarse river sand = 2 parts + 2 parts + 1 part. After potting, water thoroughly once, and place in a slightly shaded environment for a week of care.
When transplanting young seedlings, first dig the planting holes, sprinkle a layer of organic fertilizer at the bottom of the planting hole as bottom fertilizer (base fertilizer), about 4-6 cm thick, then cover with a layer of soil and place the seedling in, so as to separate the fertilizer from the root system and avoid burning the roots. After placing the seedling in, backfill the soil to cover the root system, firm the soil with your foot, and water thoroughly once.
Pinching: before flowering, generally pinch twice to encourage more flowering branches to sprout: one to two weeks after potting, or when the seedlings are 6-10 cm tall and have six or more leaves, pinch off the top shoots, keeping the lower 3-4 leaves, to encourage branching. Three to five weeks after the first pinching, or when the side branches have grown to 6-8 cm long, carry out the second pinching, that is, pinch off the top shoots of the side branches, keeping the lower 4 leaves of the side branches. After two pinchings, the plant shape will be more ideal and the number of flowers will be greater.
Humidity management: it prefers a relatively dry relative air humidity, fears rain, and needs to keep the leaves dry at night. The optimum relative air humidity is 50-65%.
Temperature management: heat-tolerant, not tolerant of frost and cold.
Light management: prefers plenty of sunshine, slightly tolerant of semi-shade.
Fertilizer and water management: like other herbaceous flowers, it has relatively high requirements for fertilizer and water, but the fertilization (and watering) principle of "light fertilizer applied frequently, small amounts and many times, complete nutrition" should be followed, and after fertilizing, the leaves and flowers should be kept dry at night:
Spring, summer and autumn: these are its peak growing seasons, and fertilizer and water management follows the cycle of "Hua Bao" - "Hua Bao" - clear water - "Hua Bao" - "Hua Bao" - clear water (at the very least, ensure two applications of "Hua Bao" per week). After entering the flowering period, appropriately reduce fertilizer to help the seeds mature.
Cultivation techniques
Raising seedlings
The suitable germination temperature is above 25°C. If a plastic film shed is used for insulation, it can be cultivated in all four seasons. Sowing is best done in a seedbed or pot, and the soil should be fertile, loose and well-drained; the soil must be sieved and sterilized. Simple sterilization methods are sun exposure, fumigation and high-temperature treatment; the purpose is to kill bacteria or insect eggs in the soil that harm the young pepper seedlings. Before sowing, spray the seedbed with plenty of water; after the water has seeped in, scatter the seeds evenly, then cover with fine soil 1 cm thick, and finally spray water to moisten the bed. If the temperature is low, build an arched film covering; if the temperature is too high, remove the film to avoid burning the young sprouts. After the young sprouts emerge, appropriately water 1-2 times with human urine or a 0.1% urea solution; after watering, immediately use a fine watering can to sprinkle clean water to wash off the fertilizer solution on the leaves, so as not to burn the young leaves. When the seedlings have grown to 5-6 true leaves, they can be transplanted.
Pot cultivation
Flower pots with a diameter of 15-25 cm should hold one plant each; larger pots can hold 2-3 plants. The soil used should be mainly farmyard manure, supplemented with phosphate fertilizer, urea and compound fertilizer; the soil in the pot should be loose and well-drained, and kept in sufficient sunlight. If the indoor temperature is suitable in winter and care is proper, it can continue to bloom, and the fruit-viewing period of potted plants can often be extended to the New Year.
Field cultivation
For open-field cultivation, sowing is required from March to May each year. Before transplanting, sufficient base fertilizer must be applied to the field, with more than 1,000 kg of human and livestock manure per mu, and 50 kg of phosphate fertilizer or compound fertilizer being suitable. The transplanting density requires a row spacing of 40-50 cm and a plant spacing of 30 cm, with sufficient water to retain moisture and thorough weed removal. At the start of the flowering period, apply 10 kg of urea per mu, and if conditions permit, apply plant vitality agents such as Yemianbao and Fengchanling.
Pests and diseases
Common diseases include phytophthora blight, which can infect both seedlings and adult plants. When seedlings are affected, the stem base shows dark green water-soaked soft rot and damping-off. Promptly spray or drench with an 800-fold dilution of 50% metalaxyl wettable powder, or a 500-fold dilution of 64% oxadixyl wettable powder for control. Cottony leak, which can occur in both seedlings and adult plants; when seedlings are affected, the stem base rots, constricts and they die. In the early stage of the disease, spray with a 400-fold dilution of 72.2% propamocarb aqueous solution, or a 450-fold dilution of 15% hymexazol (tu jun xiao) for control.
Harvesting
The fruits of open-field five-color peppers generally begin to ripen successively in mid-to-late August, and should be picked and cut promptly for use to improve economic returns. The cut ripe peppers can be sold on the market or strung up to dry in a ventilated, dry place to make dried peppers, to be kept for eating or sold as commercial peppers.
Home management
Sow in early April-May; when the seedlings are 5-10 cm tall, begin transplanting and setting out, either in the field or in pots. Potted plants need careful management, otherwise it is easy to cause poor conditions such as weak plants, few, small and dull-colored fruits, affecting the ornamental value.
First, sufficient base fertilizer must be applied before setting out. You can use homemade compost, decomposed manure, pen manure and other farmyard manures mixed with the substrate, or compound fertilizer mixed with the substrate as base fertilizer. After setting out, use a watering can to spray water, in small amounts and many times, slowly watering the substrate thoroughly (it is not advisable to use the pot-soaking method, as it easily causes loss of fertilizer and water). When the seedlings have grown to 15-20 cm tall, some management measures (such as pinching) are needed to avoid excessive vegetative growth and encourage more branching and more fruiting. During this period, attention must be paid to water and light management. Since the peak growing season of the five-color pepper is during the height of summer, its water requirement is quite large. Leaf spraying can be done once each in the morning, noon and evening, and at night the substrate also needs to be replenished with water. The water that can be used includes rainwater, river water and tap water (which needs to be left to settle for several days before use).
The five-color pepper likes a sunny environment. It can be placed on a windowsill or rooftop; apart from needing to be taken back to a shaded spot during the midday sun in summer, at other times it can enjoy the sunlight to the fullest, but the pot needs to be turned frequently to avoid uneven overall growth of the plant, which would affect the ornamental value. In the early flowering stage of the five-color pepper (mid-May to mid-June), some solid or liquid fertilizer containing P and K must be appropriately top-dressed, to lay a good foundation for good flowering and more flowers, and at the same time it can also increase the five-color pepper's ability to resist pests and diseases.
When the flowering season arrives in June-July, special attention must be paid to water management; at this time, watering should not be done by leaf spraying, so as to avoid causing flower and bud drop. During this period, fertilize less or not at all. After the flowers drop, leaf spraying can be done as usual, applying P and K fertilizer in small amounts many times, and increasing the light duration. In the fruiting period, leaf spraying can be done as usual, and a little P and K fertilizer can also be added to the sprayed water for foliar feeding, making the fruits brighter and the colors more vivid. During this period, never let the plant wilt from the sun or let the substrate become severely short of water, otherwise it will very easily cause a large amount of fruit drop. Therefore, the fruiting five-color pepper can be placed in a spot with sunlight for most of the day, so that the berries keep their bright color for a long time and the ornamental period is extended.
Types
Facing-heaven type
The fruits point upward, round, round-heart-shaped or conical, solitary in the leaf axils. The fruit color changes from white to red, or from white and yellow to blue-purple and then to red. There are also single-colored types, and types that change from green or white to yellow or red.
Clustered type
Also called Buddha's-hand pepper; the fruits are mostly long heart-shaped to conical. Most are clustered at the tips of the branches; the fruit color is mostly green turning red, or white turning red.
Drooping type
The fruits are borne in the leaf axils. Drooping, mostly irregularly conical. Depending on the variety, the sizes vary; the fruit color changes from green to red, and there are also types that turn yellow.
Lantern type
The fruits droop, truncated-cone-shaped, round-square or multi-ridged, with smooth angles, and there are distinctions of long and short, tall and short; the fruits are borne in the leaf axils, and the fruit color changes from green to red, white, yellow, black-purple and so on.
In addition, there are distinctions of tall, medium and short plant types; the tall ones can reach 1 m, while the short ones are only 10 cm.