What grafting methods are there for fruit trees? A detailed explanation of common grafting techniques
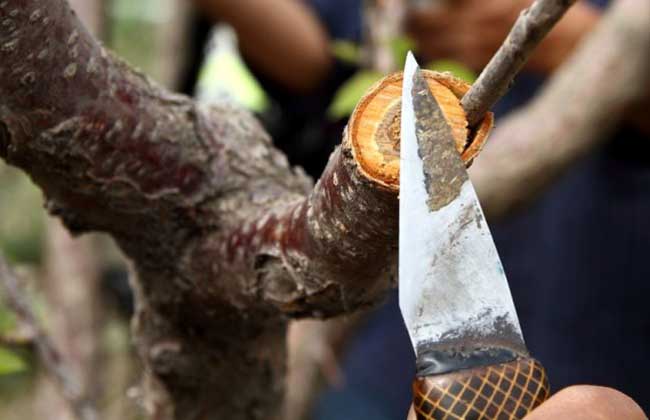
Fruit tree grafting is one of the methods of asexual propagation of fruit trees, that is, taking a branch or bud from a plant of a superior variety and joining it to a suitable part of another plant so that the two combine to form a new plant. New plants propagated by grafting can both maintain the superior traits of the mother plant and make use of the favorable characteristics of the rootstock (stress resistance, adaptability, early fruiting, etc.). Let us take a look below at what grafting methods there are for fruit trees!
Bark-removed patch grafting
1. Technical characteristics: Bark-removed patch grafting is a method in which a strip of bark is cut away from the rootstock and the scion is attached to the debarked cut. It is usually used when the rootstock interface is large and 2 or more scions are grafted at the same time. This grafting method is slower, but the fit is tight and the survival rate is high. The grafting period also needs to be arranged for when the bark of the rootstock can be slipped.
2. Rootstock cutting: Saw off the rootstock at a straight, knot-free place, then use a knife to smooth the wound. Then cut away a piece of bark from the rootstock equal in size to the scion wound, about 4 cm long, exposing the xylem and cambium. The number of cuts on the rootstock can be determined by the thickness of the rootstock. A medium rootstock can have 2 cuts, and a larger rootstock can have 3 to 4 or more than 4. Each cut takes 1 scion.
3. Scion cutting: Keep 2 to 3 buds on the scion, and cut a slanted surface at the lower end, about 4 cm long. When starting the cut, go deep into the xylem, then cut straight downward and flat, removing about 1/2, without sharpening the front end.
4. Rootstock-scion joining: Press the cut surface of the scion tightly against the debarked cut on the rootstock and leave 0.5 cm of the scion wound exposed above.
5. Binding and management: First tie tightly with plastic strips, then smear mud on the cut (or not), then put on a plastic bag to keep warm and moist. After sprouting, first cut a small hole in the bag for ventilation, and later remove the plastic bag to allow the new shoot to grow.
Cleft grafting
1. Technical characteristics: Cleft grafting is a method in which a small opening is split in the rootstock and the scion is inserted into the split. It is an old but main method of branch grafting carried out in spring. Because it is not necessary to graft when the bark of the rootstock is slipping, the grafting period can be advanced. During cleft grafting, the rootstock interface tightly clamps the scion, so after the graft survives, the scion is not easily broken by wind. A medium-thick rootstock is suitable; if the rootstock is too thick, it is not easy to split, and the clamping force of the split is too great, easily damaging the scion; if the rootstock is too thin, the interface does not clamp tightly, and the scion is also not conducive to survival. However, cleft grafting is more complicated to perform than bark insertion grafting, requires more tools, and some old trees such as jujube have xylem grain that is not straight, making it difficult to split out a straight cleft, so this method is not suitable for them.
2. Rootstock cutting: Saw off the rootstock at a place where the bark is straight and free of knots, and use force to smooth the wound. Then in the middle of the rootstock, use a wooden mallet or wooden stick to slowly knock the splitting knife downward to form a cleft. For green twig cleft grafting, only a budding knife is needed to split the opening from the middle of the branch.
3. Scion cutting: The scion should first be wax-sealed, leaving 2 to 3 buds, and one cut should be made on each of the opposite lower sides to form a wedge shape. If the rootstock is relatively thin, when cutting the scion, the outer side should be made slightly thicker than the inner side. The outer side of the wedge-shaped scion wound connects with the rootstock cambium, while the inner side does not. If the rootstock is relatively thick, the left and right sides of the wedge should be equally thick, so as to avoid damaging the outer joining surface due to excessive clamping force. Green twig cleft grafting requires the scion and rootstock to be equal in thickness so that both left and right sides connect. The length of the scion cut surface is generally 4 to 5 cm. The cut surface should be long and flat, and the angle should be appropriate, so that at the interface both the upper and lower parts of the rootstock can connect with the scion.
4. Rootstock-scion joining: Pry open the cleft in the rootstock, then insert the scion into one side of the cleft. The key at this time is to align the cambium of both sides. It is best if the cambium on both the left and right outer sides of the scion can align with the cambium on both sides of the rootstock cleft. If alignment on both sides is not possible, then aligning one side and placing the other side outward against the rootstock phloem is also acceptable. Green twig cleft grafting requires the scion and rootstock to be equally thick so that the cambium on the front, back, left and right sides of the scion and rootstock basically connect. When joining, do not insert the entire wounded part of the scion into the cleft; instead leave more than 0.5 cm exposed, which is beneficial for healing. If the entire scion wound is inserted into the cleft, then on one hand the upper and lower cambium will not align accurately, and on the other hand the healing surface will form a lump below the saw cut, causing poor healing later and affecting lifespan.
5. Binding and management: For a medium or relatively thin rootstock, insert 1 scion into its cleft, and use a plastic strip with a width 1.5 times the rootstock diameter and a length of 40 to 50 cm for binding. The cleft, wound and exposed part must all be tightly covered and tied. If the rootstock cut is relatively thick, then 2 scions can be inserted on either side of the cleft. After insertion, first smear mud to seal the cleft, then put on a plastic bag and tie it tightly. After the scion buds sprout, first cut a small hole in the bag for ventilation, and after the buds grow, remove the plastic bag. For green twig cleft grafting, such as grape grafting, after cleft grafting use a 1.5 cm wide plastic strip to tie the interface tightly, then seal the scion, leaving only the petiole and buds exposed, to reduce water evaporation from the scion.
Cut-and-patch grafting
1. Technical characteristics: Cut-and-patch grafting is a grafting method with the characteristics of both cut grafting and patch grafting. It is suitable for spring branch grafting of small rootstocks in nurseries and has the characteristics of fast grafting speed and a high survival rate.
2. Rootstock cutting: Cut off the rootstock at about 5 cm above the ground, then use a knife to make a deep inward and downward cut about 3 cm from the cut surface, about 1 cm long. Then cut vertically downward at the cut surface, with the width of the two cuts basically equal to the diameter of the scion, so that the two cuts meet, and remove the two pieces of rootstock to expose the cut surface.
3. Scion cutting: The scion is wax-sealed in advance. When cutting, leave 2 to 3 buds on the upper part, cut a large slanted surface at the lower end, 4 to 5 cm long, then cut two small slanted surfaces on the back side, about 1 cm long.