Detailed Explanation of Key Betel Nut Cultivation Techniques and Management Methods
China has a 1500-year history of cultivating betel nut. It has a unique cultural value, serving not only as a token of love but also as a fruit that brings prosperity. It has strong resistance, wide adaptability, and relatively high economic value. In addition, betel nut also has medicinal value, as it is one of China's four major southern medicinal plants. The betel nut tree has an upright and tall posture, making it an excellent landscape tree species. In some regions, people also enjoy chewing fresh betel nuts, and there are many processed betel nut snack foods. Betel nut is cultivated in China's Hainan, Guangdong, Guangxi, Yunnan, Fujian, Taiwan, China and other provinces. In this episode, we will introduce to our audience the morphological characteristics, growth habits, adaptive environment, seedling cultivation techniques, young tree management, first-fruiting tree management, and high-yield tree management of betel nut. We hope that by watching this episode, our farmer friends can understand betel nut, learn practical techniques, and benefit from them.
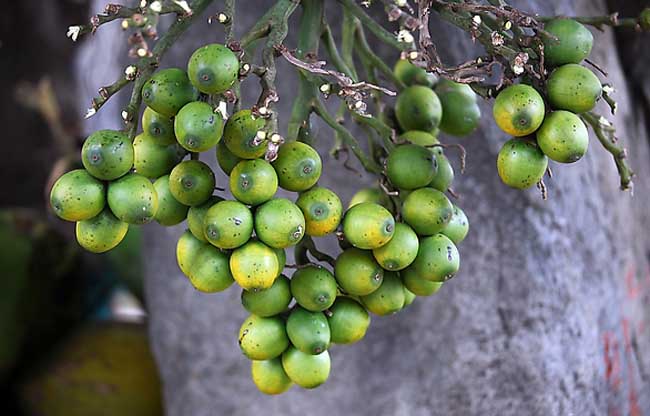
Betel Nut Propagation Techniques
Betel nut is mainly propagated through seed seedling cultivation.
1. Seed selection before seedling cultivation: According to published reports, there are currently 36 known betel nut varieties in the world, but only one cultivated type can be used medicinally. From betel nuts grown in Hainan, there are various fruit shapes: round, elliptical, ovate, obovate, heart-shaped, and oblong. Surveys on the relationship between different fruit shapes and yield in betel nut show that fruit shape has a great influence on yield, so seed selection is very important.
① Tree selection: Seed-bearing mother trees should be 20-30 years old, with normal fruiting, stable yield, disease-free plants, no fewer than 300 fruits per tree, no fewer than 3 fruit stalks, more than 8 leaves that are dark green and drooping, and a trunk that is uniform in size from top to bottom, preferably with denser internodes on the upper nodes.
② Stalk selection (fruit stalk): Betel nut generally begins to bear fruit 7-8 years after planting, but only after 10 years do fruit stalks number more than 3, sometimes 5, and occasionally as many as 7. Because the first stalk of fruit matures early and unevenly, the fruits are mostly oblong and small, with thin and underdeveloped kernels, so they cannot be used as seed. Therefore, it is advisable to select fruits from the second and third stalks as seed; these fruit stalks generally mature in May to June.
③ Individual fruit selection: According to the experience of medicinal growers, ovate and elliptical seeds are preferred. Select large, plump ones with no disease spots, no cracks or inconspicuous cracks, and when fully mature, fruits with golden-yellow skin are best for harvesting and selection.
2. Seed germination acceleration: To increase the seed germination rate and avoid irregularity and management difficulties caused by uneven germination times, after the fruits are harvested, they should be spread in the sun for 1-2 days to let the seeds evaporate some moisture and the fruit skin shrink. They can also absorb a certain amount of heat, which is beneficial for seed maturation and differentiation. Then germination acceleration treatment can be carried out. There are two methods as follows:
① Pile germination method: Spread the betel nut fruits under a large tree near a water source that can provide shade. Spread a layer of river sand about 2 cm thick on the ground, pile the seeds to a height of no more than 20 cm, with unrestricted length, but it should be convenient for watering. Cover with rice straw, not thatch (because thatch easily induces termites after absorbing moisture), with a thickness that preferably hides the fruits, and water once a day. After about 7-10 days, the outer fruit skin begins to ferment and rot. Then take them out, wash them clean with water, and sun-dry them again for 1-2 days. During drying, be sure to turn them so the temperature is even. Then continue piling, cover again with rice straw, and water. After about 20 days, the fruit stalk should be peeled open for inspection. Fruits with small white bud points should be promptly taken out for sowing and seedling cultivation. If the bud point (radicle) has grown too long, it is easily broken during sowing, affecting the seedling emergence rate. Therefore, sow only as many as have germinated. This method takes about 25 days from piling to completion of sowing. Medicinal growers in production areas are accustomed to using this method.
② Basket germination method: If there are not many seeds, place the fruits in a basket, cover the basket opening with rice straw, and keep it indoors warm and watered. After the fruit skin ferments and rots, place the basket together with the fruits in a river ditch and wash them clean. Then follow the above method and place them indoors. When white bud points appear, they can be sown.
3. Betel Nut Seedling Cultivation
The nursery site should be chosen on sloping land near a water source, with some tree shade, facing the sun, and sheltered from wind, with fertile, loose, well-drained sandy loam or loam. After deep plowing and fine harrowing, make beds 1 m wide and 30 cm high. Then open small holes at a spacing of 30×30 cm, apply a certain amount of base fertilizer, sow one germinated seed showing white per hole, cover with 2-3 cm of soil, press slightly, water until moist, and cover with grass. After about one month, the seedlings will successively emerge from the soil surface. After 1-2 years of cultivation, when the seedlings are 50-60 cm tall and have more than 6 leaves, they can be transplanted to the field. Generally, 3500-4000 seedlings can be raised per mu. At present, nutrient bag seedling cultivation is mostly used in production, that is, placing the germinated seeds showing white into plastic bags filled with nutrient soil, one seed per bag. The nutrient bags have a diameter of 25 cm and a height of 30 cm, and 2-3 holes should be punched in the bottom of the bag to facilitate ventilation and drainage. Nutrient bag seedling cultivation has many advantages: it facilitates transplanting, reduces root damage, and can increase the survival rate.
The nutrient soil is prepared by mixing surface soil and decomposed pig and cattle pen manure at a 1:1 ratio, then piling and composting. When raising seedlings, first fill 3/5 of the nutrient soil, then place the germinated seed showing white flat, one per bag, cover with about 1 cm of soil, and then place small pieces of pond mud on top to prevent crusting.