Plants too hard to grow? Then make plants out of paper
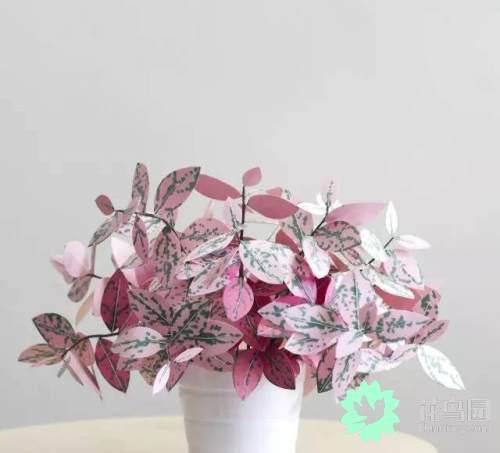
Corrie Beth Hogg loves being in nature and is a devoted environmentalist. She wanted her dark living room to have a touch of life in it too, but she did not know how to care for plants. Fortunately, she is clever with her hands and can create all kinds of greenery she likes out of paper. First, take a look at the pictures:
Pilea peperomioides
Watermelon peperomia
Begonia leaves in progress
African mask, isn't it unique enough
Philodendron with heart-shaped leaves
Plants with polka-dot patterns
Angel wing begonia
Fiddle-leaf fig tree
Dracaena godseffiana
Purple shamrock
Marcgravia (silver stripe grass)
The green plant family, all made from paper
Seeing Corrie Beth's work will leave you stunned. It is so fresh and lush that it can completely pass for the real thing. She often goes to parks to admire the beautiful trees and find inspiration to apply to her handmade creations, which is why she can make them so lifelike while also full of beauty.
I do not know if everyone feels intimidated after seeing this, but actually, with just a few simple steps, you can also create such beautiful greenery. Corrie Beth generously uploads her work online to share with everyone. Follow the steps below, and in no time you can make a beautiful Pilea peperomioides too.
You will need: green cardstock, green tissue paper, scissors, a flower pot, a green gel pen, a glue stick, cotton swabs, a craft knife, needle-nose pliers, a hot glue gun, twigs, sponge, 22-gauge (0.71mm diameter) metal wire wrapped in green, 18-gauge (1.22mm diameter) metal wire, gravel, brown tape.
1. Fill the pot with sponge to about 1 inch (2.54cm) from the top of the pot. Make sure the sponge is firmly packed and will not move around. If there are still gaps, seal them with tape.
2. Cover the sponge with gravel. Buying the kind used in fish tanks at a pet store is a good choice, because those stones are smaller and come in many colors to choose from. But actually, anything will work. Sand, shredded paper, moss, or larger stones, just choose whichever you like.
3. Cut some circles and ovals out of the cardstock to serve as leaves. You can fold the paper several times so you can cut many leaves at once. There is no need to be too fussy about perfect leaf shapes. Cut several sizes, that is what makes it fun.
4. Next, make one cut in each leaf, dip a cotton swab in glue, and let one cut edge of the leaf overlap the other to create a shallow bowl shape. Press on the glued area for a few extra seconds so the glue holds firmly. If the final shape looks a little odd, wait for the glue to dry and trim it a bit with scissors.
5. Use a bright green gel pen to add small dots to the center of each leaf. Wait for the ink to dry before touching them.
6. Use needle-nose pliers to twist a small loop in the 22-gauge green metal wire. After twisting it, bend the loop so it is perpendicular to the wire. This will be used as the stem. Each stem should be about 4-5 inches long.
7. Use the glue gun to put a small dot of glue (even smaller than a pea) on the back of each leaf, then quickly attach the stem (metal wire).
8. This next step is optional, but it makes the back of each leaf look more perfect. Just cut small circles out of green tissue paper, apply a layer of glue, and cover the spot where the glue gun attached the metal wire to the leaf earlier. If you are aiming for perfection, you can also trim any excess after attaching it.
9. Then, as shown in the picture, use the 18-gauge metal wire as the main stem and tie these finished branches to the main stem. Keeping them all facing one direction will make it easier when you use brown tape to tie them.
10. You can decide how sparse or dense it is according to your own preference. Once you have finished all the branches, you can gently shape the plant. Try to make the branches lean to the same side, bend them into an S shape, or let them cascade down one side of the pot like a waterfall. All are excellent.
11. Once you have set the plant's shape, insert the main stem into the sponge base in the pot. You can add a few small leaves in the pot to create a bit of a propagating effect and make the potted plant look more realistic. Finally, since it is all done, give it a name. What name would you choose?
After reading this, do you find it is not as hard as you imagined? Why not try it with your children and add a touch of green to your home. If you want to see more of Corrie Beth's work, you can visit her website: theappleofmydiy.com