How to Build a Rural Biogas Digester: Methods and Steps Explained
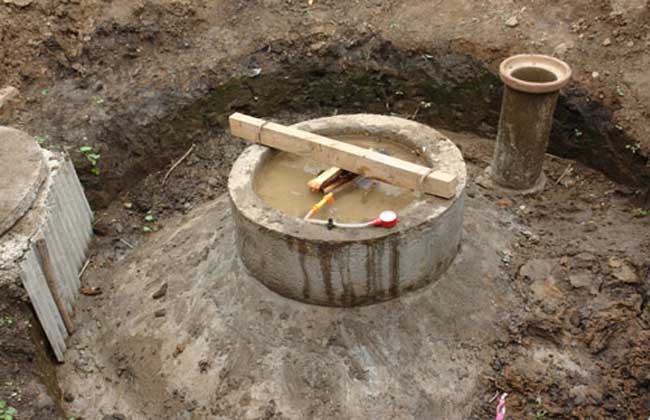
Rural biogas is a project that benefits the people, being green and environmentally friendly, energy-saving and highly efficient. Using biogas engineering technology to treat human and livestock waste can effectively solve the rural domestic energy problem, while also obtaining organic fertilizer needed for agricultural production and improving the rural living environment. It delivers good economic, ecological and social benefits. Let's take a look below at how to build a rural biogas digester!
Basic Requirements
A rural household biogas digester is a device for producing and storing biogas. Whether its quality is good or bad and whether its structure and layout are reasonable directly determines whether biogas can be produced well, used well and managed well. Therefore, building a biogas digester requires reasonable design, simple construction, convenient building, sturdiness and durability, and low cost. In some places, due to lack of experience, insufficient attention is paid to the quality of the digester, so that after completion it leaks gas and water and cannot be used normally, becoming a “sick digester”. Some biogas digesters have too large a volume and are too deep, with low effective utilization and inconvenient discharging. Years of practical experience have proven that the structure of a biogas digester should be “round” (a circular digester), “small” (small volume) and “shallow” (shallow digester depth). As for the layout of the biogas digester, the south mostly adopts the “three-in-one” (toilet, pigsty, biogas digester), while the north mostly adopts the “four-in-one” (toilet, pigsty, biogas digester, solar greenhouse).
Material Preparation
To build an 8-cubic-meter biogas digester requires 1 ton of cement, 2 cubic meters of sand, 0.6 cubic meters of crushed stone (specification 1-3 cm), 600 red bricks, 1-2 ceramic pipes (diameter 20-30 cm), and 1.2 m of steel rebar (diameter 14 mm). If building a 10-cubic-meter biogas digester, the cement, bricks and sand are increased by another 10%; if building a 6-cubic-meter biogas digester, the amounts of cement, bricks and sand are reduced by 10% compared with an 8-cubic-meter biogas digester.
Laying Out Lines and Digging the Pit
Laying out lines and digging the pit is the first hurdle in ensuring the quality of the digester, and construction must follow the specified dimensions. Key points for laying out lines: 1. Mark out the overall plan. 2. Mark out the area of the greenhouse and the pig house, with the pig house on the east or west side. 3. Mark out the center line of the “model” width. 4. Taking O as the starting point, find the center point O of the digester on the inner side of the pig house, draw a circle with O as the center and the digester radius plus 6 cm as the radius, and determine the position of the digester. 5. Determine the positions of the inlet and outlet. On the center line of the “model” width, determine the center point of the inlet and the center point of the outlet located inside the solar greenhouse, and mark them with white lime.
Excavating the Pit
1. Biogas digesters built within the “model” all adopt the underground buried type, and the earthwork for the biogas digester adopts the construction technique of large-scale excavation. First, the height of the positive and negative zero should be determined. The pit depth is determined according to the design drawing, that is, the top of the biogas digester and the outlet are kept on the same horizontal plane, and 10 cm above the pig house floor. The inlet is 2 cm above the ground. If dug too deep so that the biogas digester is below ground level, it will affect the supporting use; if dug too shallow so that the biogas digester protrudes above the ground, it will cause difficulties for pig raising and fertilizing the solar greenhouse.
2. In order to facilitate the placement of the digester-building mold or the use of brick molds to pour the digester body, and to reduce material loss, the pit should be rounded and vertical from top to bottom. For areas with good soil quality, the pit walls can be dug straight. When removing soil, excavate from the middle toward the surroundings, leaving a certain margin when reaching the pit wall, then find the center point according to the positioning stakes and drive in a fixed wooden stake. Fix one end of a rope to the wooden stake at the center point, and tie a small hoe to the other end of the rope, so that the length from the hoe blade to the center point equals the digester radius plus the wall thickness of 6 cm to draw a circle. Scrape away the sand and soil obstructing the passage, and excavate while trimming the pit until the designed depth is reached.
3. After the pit is dug, immediately shape the pit bottom into a pot-bottom shape, and dig a U-shaped shallow groove from the center of the pot bottom to the bottom of the hydraulic chamber, with a downward slope of 5%. For places with loose soil, soil should be taken with sloping from 80 cm below the ground; the degree of slope depends on how loose the soil is, with the principle that the pit walls do not collapse. At the same time, dig the inlet and outlet pits well. If groundwater appears, a water collection pit should be dug at the bottom of the digester to facilitate drainage.
4. When encountering groundwater during digester construction, the methods of “avoiding, guiding and blocking” can be used to solve it.
1. Avoid: “Avoid” means avoiding groundwater, trying not to construct during the rainy season, choosing a place with a lower groundwater level and higher terrain to build the digester. In water-network areas, a spherical digester can be built or the digester body raised, building a semi-underground digester.
2. Guide: “Guide” means guiding groundwater away. Before construction, dig drainage ditches to guide the water away as much as possible. If the pit wall seeps water, insert bamboo pipes into the seepage points or chisel star-shaped (“Y”-shaped) small grooves in the pit wall, so that the water gathers and flows through the grooves to the bottom of the pit. For seepage at the pit bottom, cross-shaped or ring-shaped grooves can be used to collect water, and a relatively deep small well can be dug in the center of the pit bottom to let the water flow into the well and be bailed out. After the project reaches a stage where no seepage is discharged, fill in this well.
3. Block: “Block” means blocking groundwater. For individual small springs inside the pit, bricks or small stones can be used to plug them tightly.
Note: If there is large-area seepage, a water-glass liquid anti-seepage agent can be mixed into cement for plastering, which sets quickly and blocks effectively. At the same time, when building a digester in places with poor soil quality and high groundwater level, a sand and pebble cushion layer must also be set below the pit bottom. For the construction of this cushion layer, pebbles can first be laid, then sand can be forced into the gaps between the pebbles by the water-settling method, playing a role in ensuring the quality of the digester. If there is indeed no groundwater at the digester construction site, no cushion layer or drainage measures are needed below the pit bottom.