Illustrated guide to the bowl lotus planting process, detailed steps you'll understand at a glance
Now I'll explain the bowl lotus planting process
First, you need to learn to tell the two ends of a bowl lotus seed apart.
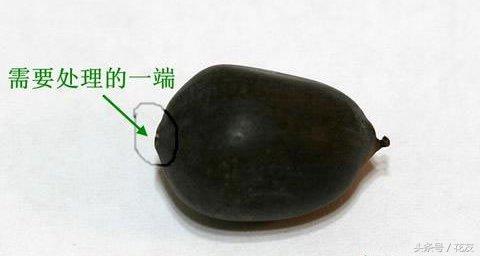
The two ends of a bowl lotus seed are actually quite easy to distinguish
The seed coat of the lotus seed is very thick. For smoother germination, simple treatment is needed. First, please distinguish the two ends of the bowl lotus seed: one end has a small bump, and the other end has a small concave dot. The end you need to treat is the one with the concave dot. Then comes the slightly more difficult step. There are several ways to treat the end with the concave dot. The usual methods are generally:
1. Grind off the seed coat on a cement surface;
2. Crack it open with pliers;
3. Cut off a small piece of the seed coat with a sharp knife. You can also first drill a small hole at the concave spot with an awl, soak it in water for a while, and then use scissors to cut off a small piece of the seed coat! Be careful not to drill too deep, and do not drill into the kernel inside!
Bowl lotus: The three main reasons bowl lotus does not bloom
Below is a lotus seed that has already been drilled with an awl:
Bowl lotus seed with a drilled hole
Use a small box, a plate, or whatever container you like to soak the treated seeds in water. Notes:
1. If the temperature is low, you can use a thermos with 30°C warm water. If the temperature is above 20°C, you can soak them indoors or outdoors.
2. Change the water twice a day. I usually change it once in the morning and once in the evening;
3. The water only needs to cover the seeds;
4. The higher the temperature, the faster the germination. Generally above 20°C, germination takes 3 days to a week.
Soak in water
After soaking for 1 or 2 water changes, the hard coat of the lotus seed can be easily peeled off by hand. Peeling off no more than 1/3 of the seed coat helps the seed sprout sooner.
Peel the skin
After peeling, continue soaking in water. On the fifth day, a green sprout tip is visible.
Continue soaking
Starting from the seventh day, put it in the sun every day. In addition, I also prepared the pot for planting the lotus, filled it with soil, added water, and let it soak well. After 9 days, the first floating leaf is about to unfold and the second leaf has also appeared. On the tenth day, the first floating leaf unfolds, and the lotus seed begins to grow roots.
Bowl lotus: Eight key points of bowl lotus cultivation techniques
Bowl lotus with roots
After the lotus seed grows roots, it can be planted. Lotus seeds planted after rooting have a high survival rate and are not easy to rot. As for the soil, personally I feel that whatever soil you have on hand is fine, and there is no need to look for pond mud. I used ordinary garden soil plus well-rotted organic fertilizer. Friends without organic fertilizer can use chicken manure, but the chicken manure must be fully rotted, otherwise it will burn the lotus seeds! Two days before planting, soak the pot until the soil is completely wet through. Bury the lotus seed with the root pointing downward into the mud.
Transplant
As for the pot, a clay pot with a diameter of 30 cm and a height of 20 cm can grow 3-5 bowl lotuses. I brought back two water vats from my mom's house with a diameter of 50 cm and a height of 48 cm, placed the clay pot with the planted lotus seeds in the vat, and then added water. Look, this is how it looks on the 13th day.
Day 13
From May 31 (the 13th day) to June 21, after 22 days, the two bowl lotuses each grew an average of 5 floating leaves. Due to temperature and sunlight, the growth speed will vary. If you plant many in one pot, you will need to divide them into separate pots later! Generally, a pot with a diameter of 25 cm only needs one plant! If there are too many, they will compete with each other for sunlight!
Lotus leaf after lotus leaf
Notes for planting bowl lotus:
1. When planting or dividing lotus rhizomes, special care must be taken to protect the top buds of the seed rhizomes and not bruise them.
2. The container should be appropriately larger and deeper. Although it is called bowl lotus, if you grow it in a vegetable bowl, it is too small and too shallow. If the bowl is too shallow, it holds too little nutrient soil and cannot give the plant sufficient nutrients; if it is too small, it cannot accommodate the spreading fibrous roots, and it will not grow well.
3. Give it plenty of sunlight. Growers must not place the bowl lotus indoors all the time just to decorate the environment and admire it. Leaving it indoors for a long time prevents it from seeing sunlight, forgetting that it is a plant that loves ample sunlight. Only when the soil in the pot is warmed by the sun can it grow rapidly.
4. Control the water supply according to the different stages of plant growth. When the bowl lotus is first planted, there should not be too much water. Too much water will lower the temperature, which is unfavorable for the rooting and development of young seedlings, and it will also affect their breathing and air permeability, and may even cause root rot. When the plant's leaves grow larger, clean water needs to be gradually added to the bowl to meet its need for photosynthesis with leaves floating on the water surface. Otherwise, the leaf edges will become scorched, withered, and yellow.
Lotus flowers blooming one after another
5. Pay attention to applying an appropriate amount of fertilizer. Bowl lotus likes fertilizer. If it lacks fertilizer, rooting and leaf growth will be slow and it will lack vitality. Therefore, before planting, a small amount of rotted cake fertilizer liquid or bean meal or peanut meal should be mixed into the potting soil as a base fertilizer. However, although bowl lotus is a fertilizer-loving plant, it must not be over-fertilized. Especially because the bowl lotus container is small, the plant is small, and its fertilizer requirement is also small. If too much fertilizer is applied, it will grow only leaves and not bloom. In more serious cases, it can also cause the plant to wither and die. If you find that too much fertilizer has been applied, you must change the water frequently to rinse away part of the fertilizer liquid and dilute it.