Technical Regulations for Printed-Seeding Large Strong Seedling Machine-Transplanted Rice Raising
Technical Regulations for Printed-Seeding Large Strong Seedling Machine-Transplanted Rice Raising
Fund Project: Jiangsu Provincial Key R&D Program (Modern Agriculture) Key Project Sub-project (BE2015340-7); Jiangsu Provincial Agricultural Independent Innovation Fund Major Agricultural Issues Special Project (cx(15)1002).
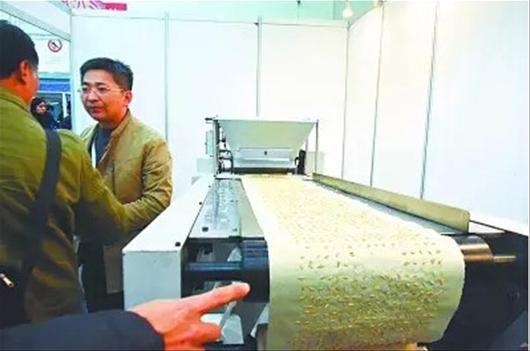
By using the glue dots of the printing seeder to fix the seeds, the seeds adhere to the paper at the required density and spacing. During sowing, sowing is completed by laying the seed-attached paper in the tray, thereby achieving precise quantitative positioning of seedling-raising sowing and solving the difficulties of uneven sowing at low sowing rates and high rates of missing transplants in conventional machinery. Using printed-seeding technology can both improve seedling quality and increase field machine-transplanting uniformity, and has an obvious seed-saving effect, offering clear advantages over conventional mechanical assembly-line sowing [Jishan Huayao].
Adopting the technical route of sufficient fertilizer for strong seedlings and fertilizer-promoted chemical control, a strong seedling cultivation technology supported by materialized technical products was developed. Through the supporting application of the self-developed "Yuyanglv" nutritional soil conditioner to prepare nutritional soil, the machine-transplanted "Yuyanglv" basal fertilizer for enhanced nutrient supply and element supplementation outside the tray, and a dedicated seed dressing agent for seed dressing to prevent disease and regulate growth, strong seedlings with a wide suitable transplanting period are cultivated. This changes the practice in blanket seedling raising of not applying fertilizer or applying little fertilizer for fear of over-age excessive growth, and reverses the situation in which machine-transplanted blanket seedlings generally have low seedling quality and are prone to seedling decline when over-age.
On this basis, by further strengthening nutrition and regulation, a "broom-shaped" plant-type seedling cultivation technology was developed. This technology prolongs the time for lower leaves to receive light and expands the suitable transplanting period of machine-transplanted seedlings, thereby favoring strong seedlings. Through innovative integration on this basis, the printed-seeding large strong seedling machine-transplanted rice raising technology was developed. Using this technology, sparse and uniform sowing in machine-transplanted blanket seedling raising is achieved, and rice seedling quality is significantly improved; it breaks through the seedling-age limitation of conventional blanket seedling raising, and seedlings with a seedling age of 20-30 d are all suitable for machine transplanting, while seedlings at 35 d of seedling age with good quality can still be machine transplanted. Therefore, seedling raising can be moved 25-30 d earlier with reference to the conventional transplanting time, enabling the sowing time of japonica rice after wheat stubble in Huaibei to be 7-10 d earlier than conventional blanket seedling raising, prolonging the rice growth period. The rice maturity period is more than 3 d earlier than conventional practice, and it can significantly increase the yield of machine-transplanted rice (generally increasing yield by 5%-30%), improve rice quality, and to a certain extent alleviate the rice-wheat stubble conflict caused by conventional blanket seedling machine transplanting. For this reason, this paper introduces the standards for large strong seedlings and strong seedlings of printed-seeding machine transplanting and the seedling-raising technical regulations, in order to provide reference for the large-scale promotion and application of this technology in production in the Huaibei region and to promote the progress of machine-transplanted rice blanket seedling raising technology.
Rice Printed Seeding
Rice seeds printed on special paper
Planting site
1 Standards for Large Strong Seedlings and Strong Seedlings of Machine Transplanting
For single-season rice blanket seedlings in the rice-wheat double-cropping area of Huaibei, the suitable seedling age is 25-30 d, and the leaf age is 4.0-5.0 leaves. The morphological and physiological indicators of standardized blanket-shaped large strong seedlings are: plant height 15-22 cm, single-plant stem base width above 0.28 cm, number of green leaves per plant >=3.5 leaves, well-developed white roots, more than 12 white roots per plant, and rooting capacity more than 6 roots; the seedling block forms a blanket when tray-bound and does not scatter when lifted. The seedlings are evenly distributed, with 1.2-1.5 seedlings/cm2; the aboveground dry weight of 100 plants is above 3.5 g, and the dry weight per unit seedling height is above 2.0 mg/cm. At the same time, differences among individuals in indicators such as plant height and stoutness are small, and seedling uniformity is high; the population grows vigorously, with no disease spots or insect traces.
2 Seedling Raising Technical Regulations
2.1 Preparation and Blending of Nutritional Soil
2.1.1 Nutritional soil preparation. Select fertile field surface soil, dry it in the sun, break up soil clods, remove debris, and sieve it with a 5 mm mesh sieve. Prepare sufficient sieved fine soil at 1 800 kg/hm2 in the field. Try to avoid choosing heavy clay soil or heavy sandy soil, and it is preferable to choose slightly acidic soil.
2.1.2 Nutritional soil blending. Just before sowing, blend the nutritional soil. Add the machine-transplanted Yuyanglv nutritional conditioner to the sieved fine soil at a ratio of conditioner:soil = 1:100-120, and mix thoroughly. Note that the Yuyanglv nutritional conditioner is different from general strong seedling agents and acid regulators. It does not need to be mixed with soil in advance and piled for fermentation; it only needs to be mixed with soil at the specified ratio and used immediately, and it will not burn seedlings. Generally, it can be mixed 2-3 d in advance, and when the quantity is large and preparation needs to be earlier, it should not exceed 7 d at most.
2.2 Seedbed Preparation and Construction
2.2.1 Seedbed site selection. Select a field with level terrain, fertile soil, convenient seedling transport, and convenient irrigation and drainage as the seedling-raising field. Reserve sufficient seedling field at a ratio of seedling field:field = 1:80. The seedling field must be plowed, sun-dried, and soil-broken appropriately in advance.
2.2.2 Seedling board construction. According to the degree of fineness of the field soil, rotary till the seedling field 1-2 times. Before sowing, carefully make the seedling boards. The width of the bed surface is about 1.4 m, the width of the seedling ditches on both sides is 25-30 cm, and the depth is 20 cm; the surrounding ditch width is 30-40 cm and the depth is about 30 cm. The seedbed board surface should achieve "solid, level, smooth, and straight," and surrounding ditches should be opened well around the perimeter, with a ditch depth of 30 cm, ensuring smooth irrigation and drainage. For micro-sprinkler irrigation, the bed surface width is 2.8-3.0 m.
The seedling board surface should be leveled and compacted, requiring the height difference of the entire field seedling board surface not to exceed 1.0 cm, and the height difference between the inside and outside of the seedling board not to exceed 0.5 cm. If the seedling field area is large, it is best to carry out water leveling more than 10 d in advance, verifying levelness through water leveling, settling the bed surface, and draining accumulated water.
2.2.3 Bed surface fertilization. After opening the ditches and beds and initially leveling, evenly spread about 100 g/m2 of Yuyanglv basal fertilizer on the bed surface, shallowly rake it into the soil, and then level and compact. For water-leveled seedbeds, after drainage, while the bed surface is moist, about 100 g/m2 of Yuyanglv basal fertilizer can also be evenly spread on the bed surface, using the moisture of the seedling board to dissolve the fertilizer into the soil.
2.3 Seed Preparation and Treatment
2.3.1 Variety selection and seed quality requirements. The variety should be selected from high-quality, high-yield medium japonica varieties with strong comprehensive resistance that have passed national or local approval and are suitable for machine transplanting in the Huaibei region. Seed quality requirements should reach above the national second-grade standard, with purity above 98%, germination rate above 95%, germination vigor above 85%, and moisture content below 15%. The rice seeds have already been mechanically treated, with awns removed and branches removed.
2.3.2 Seed treatment and seed dressing with special chemicals for large strong seedling raising. Before printing, sun the seeds outdoors for 2-3 d to increase seed germination rate (vigor) and emergence rate, and remove dust and impurities by winnowing.
Use the large strong seedling special 3.5% prochloraz·metalaxyl seed dressing powder at a ratio of chemical:seed = 1:80-100 for seed dressing. When dressing seeds, the seed dressing agent can first be added to water 5 times its weight, stirred into a uniform suspension, and poured into the seeds for dressing. Alternatively, the seeds can first be moistened with clean water at 5% of seed weight, and then the chemical can be added for seed dressing. Note that seed dressing must be uniform, with the standard being that the seeds generally and uniformly turn red.
For those printed and sown immediately, salt water with a specific gravity of 1.08-1.10 can be used for seed selection to improve seedling quality and uniformity. Where conditions permit, it is recommended to use ammonium sulfate to prepare the solution for seed selection, and then rinse slightly. If sodium chloride salt water is used for seed selection, it needs to be rinsed with clean water 1-2 times. After selection, dry the seeds slightly, and when the seed surface is moist but not yet dry, add the large strong seedling special seed dressing agent at 1% of seed weight and mix thoroughly. Dry in weak sunlight or a cool place and then immediately print and adhere the seeds. After dressing, do not expose to sunlight.
2.3.3 Printing seed-attached paper. Use a printing seeder, select hole plates with hole-row dot spacing of (0.7-0.9) cm x (0.9-0.7) cm matching different seedling tray widths and printing widths, print glue dots with special glue for printed seeding, print the seed-attached paper with seeds, and roll it up for later use. The requirement is that the empty dot rate on the glue dots after seeding be below 5%, and the multiple/double seed dot rate not higher than 20%. For a 28 cm x 58 cm seedling tray, the sowing rate per tray is about 3 000 grains; for a 23 cm x 58 cm seedling tray, the sowing rate per tray is about 2 500 grains.
2.4 Sowing
2.4.1 Sowing time. On the premise of ensuring safe full heading of rice and that grain filling and maturing are not harmed by low temperatures in autumn, the suitable sowing period is generally calculated according to the transplanting period, field stubble-vacating time, field tillage and settling time, etc., with a predetermined seedling age of 25-30 d. In the rice-wheat double-cropping area of Huaibei, most machine transplanting time is June 15-22, and the sowing period for printed-seeding large strong seedling machine-transplanted rice raising is May 18-25.
2.4.2 Tray placement and soil spreading. Stretch lines at the middle positions of both ends of the seedling board. Determine the tray placement method according to the width of the printed seed-attached strip on the seed-attached paper. If the width of the printed glue seed-attached strip on the seed-attached paper is close to or the same as the longitudinal width of the seedling tray, or if there are 2 end-direction widths with a blank in the middle dividing the printed seed-attached surface into two, place the long side of the seedling tray parallel to the stretched line, arranged in a long-direction straight line, head to head closely connected, and side to side closely adjacent, leaving no gaps. If the printed seed width is close to the tray width, the trays may be arranged longitudinally or transversely, but both require straight and tightly adjacent arrangement.
After arranging the trays, place the prepared nutritional soil into the seedling trays and spread it level, requiring a soil thickness of about 2.0 cm, not less than 1.8 cm. Place at a quantity of 450-525 trays/hm2 (28 cm x 58 cm) or 570-675 trays/hm2 (23 cm x 58 cm) for field use. In this step, a sowing assembly line can also be used to first fill and spread the nutritional soil and then place the trays, or a field soil-spreading seeder can be used, but the seams must be tightly connected and laid straight. Leave a seedling bed 2.8-3.0 m wide, and lay the trays in the form of 2 seedling boards with a blank in the middle, divided equally into 2 beds, with a central blank gap of about 40 cm. The distance from the outer tray edge of the bed to the outer edge of the bed is 10-15 cm. The middle is for laying micro-sprinkler tape.
2.4.3 Paper laying and sowing. With the seed side facing up, roll and lay the seed-attached paper roll along the long direction of the seedling board into the seedling tray, so that the seeds are evenly spread in the tray, and lightly press the edges and ends so that the edge areas adhere to the tray soil. Water can be sprayed while laying to avoid bridging at the edges and ends. Pay attention to adjustment during laying to prevent deviation. After laying the seed-attached paper, scatter and cover with 1 layer of nutritional soil about 0.5 cm thick, so that it is completely and tightly covered with no exposed seeds visible.
2.5 Emergence Management
2.5.1 Water supply after sowing. After covering the seeds, release water into the field. The water surface height should preferably be level with or slightly higher than the board surface, that is, below 1/3 of the seedling tray height, so that the soil in the seedling tray is thoroughly moistened through infiltration. Avoid the water surface being level with the soil surface in the tray, and it must not be higher than the tray soil. For individual high trays, manual irrigation can be carried out after enclosing them, so that water seeps up through the tray soil from below. Water intake should be gentle to prevent the water surface from rising sharply and floating or displacing the seed-attached paper. Especially at the water inlet, particular care should be taken to prevent large water flow from rushing onto the bed surface. After all tray surfaces have absorbed water and changed color, drain.
2.5.2 Film covering for moisture retention. After draining, place some thin bamboo poles or a little rice straw on the tray surface to prevent the film from sticking. Cover with agricultural film and compact the edges. Afterward, cover the film with 1 layer of rice straw or shade net to prevent high temperature from scalding the seedlings. To prevent weeds in the nutritional soil from sprouting, before covering the film, apply 42% butachlor-oxadiazon emulsifiable concentrate at 1 500-1 800 mL/hm2. After spraying, wait more than 30 min before covering the film, so that the relative humidity remains above 80%. In case of heavy rain, drain promptly. Before emergence, the seedbed tray surface must not accumulate water, and check promptly. If rainwater forms puddles on the film, guide it to flow down into the ditch in time.
2.5.3 Emergence management. During the emergence period, pay attention to timely inspection to prevent strong winds from blowing away the straw and causing local high temperature that scalds the seedlings. From 5-8 d after sowing, pay attention to inspection. When the seedlings emerge completely and the 1st leaf fully unfolds, remove the straw and film. It is preferable to remove the straw and film on a cloudy morning, on a sunny evening, or after rain. After removing the film, apply 1 round of water level with the tray. If micro-sprinkler irrigation is used, spray 1 full watering. If there are exposed seeds or upward-curling roots, promptly scatter soil to cover them and water to settle them.
2.6 Seedling Stage Management
During the seedling stage, pay attention to strengthening water management. Generally, irrigate once in the morning on sunny days to level with the bed surface, and drain after the surface soil of the seedling tray is moistened. To retain water and prevent the edges of the seedling tray from losing water too quickly, it is advisable to surround the outer edges of the seedling tray with soil to retain moisture. During the seedling raising period for machine-transplanted large strong seedlings, when the surface soil in the tray turns white, irrigate or spray water promptly. Before the three-leaf stage, do not wait until the leaves curl to water, so as to avoid the phenomenon of drought-induced leaf curling and withered tips forming stiff seedlings. When the leaf color of the seedlings in the tray fades, fertilizer can be appropriately supplemented. It is advocated to use "Yuyanglv seedbed basal fertilizer," generally calculating the fertilizer amount at 5-8 g/tray. Before spreading, first add water level with the tray, or with the water surface slightly higher than the tray surface. After retaining water for more than 12 h, restore normal water management. For micro-sprinkler seedling raising, fertilizer can be scattered first and then water sprayed, or the fertilizer can be dissolved and applied mixed with water during spraying. 2-3 d before transplanting, apply ammonium phosphate at 8-10 g/tray as send-off fertilizer to promote strong seedlings and early growth. 1 d before transplanting, cut off water according to the actual situation. Before transplanting, spray high-efficiency low-toxicity insecticide and carry the chemical to the field to reduce the pest and disease base.