How to Transplant Chengong Baozhu Pear? A Detailed Guide to Practical Techniques
Transplanting Techniques for Chengong Baozhu Pear
Chengong Baozhu Pear has a cultivation history of more than 900 years. Legend has it that in the Song Dynasty, the eminent monk Baozhu came to Shanchan (present-day Kunming) to preach, bringing with him snow pear scions from Dali, which he grafted onto superior local pear trees in Chenggong County and carefully cultivated. In memory of Monk Baozhu, Chenggong fruit growers named it Baozhu Pear. According to the Chenggong County Annals, it was once a tribute item during the Yuan Dynasty, and was as famous throughout China as Fujian-Guangdong lychee and Wu-Yue bayberry, praised as the Jade Maiden, the Star Groom, and the King of Pears. A poem praises it: "Fujian's Jade Maiden holds ice and snow, Wu Commandery's Star Groom rides fiery clouds, and Yunnan has the King of Pears." The emperor bestowed the name "Chenggong" upon the place of origin of the Baozhu Pear, and Chenggong County got its name from this. The Baozhu Pear carries the historical connotations and cultural heritage of Chenggong and has become a local specialty fruit of Chenggong District. Due to the advancement of Chenggong New District construction in recent years, land has been continuously requisitioned, and the planting area has been shrinking. To protect this local specialty fruit, selecting a site for transplanting is an important way to ensure the continuation of this local specialty. To ensure the smooth implementation of transplanting work and to effectively protect the Chengong Baozhu Pear, the following transplanting technical regulations are hereby established.
1 Selection of Transplanting Site
Hilly gentle slope areas at an altitude between 1,950 and 2,200 m with good ventilation, sun exposure, and light transmittance, requiring deep soil layers and red soil plots rich in organic matter, with a soil pH of 5.5 to 6.5.
2 Transplanting Time
Transplanting is carried out from after leaf fall in autumn to before bud break in spring. In Chenggong, this is generally from mid-November to early February of the following year. During this period, fruit trees have a peak of root growth. Transplanting at this time, when tree nutrients have already returned, is conducive to the healing of broken roots and can also produce some new roots, improving the transplanting survival rate and laying the foundation for the tree's vigor to strengthen the following year.
3 Preparations Before Digging
3.1 Cultivating and Promoting New Roots Before Digging
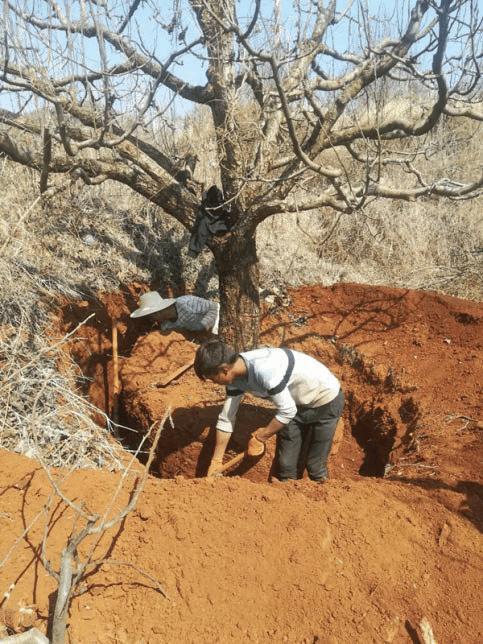
Most of the framework roots of mature Baozhu Pear trees have poor absorption capacity. To promote new root growth and improve the transplanting survival rate, in the spring of the year before transplanting, dig a root-cutting trench 30 to 35 cm wide, 70 to 75 cm deep, and sloping inward at a distance of 60 to 70 cm from the root crown (Figure 1), then apply decomposed farmyard manure to promote new root growth.
Figure 1 Digging a root-cutting trench
3.2 Planning and Measuring Planting Pits for Transplanting
15 to 20 days before transplanting, according to a 5 m x 6 m spacing between plants and rows, with the row direction consistent with the prevailing wind direction, plan and mark out the planting points, then dig planting pits at the planting points to a depth of 1 m and a width of 1.5 to 2 m (Figure 2). The topsoil and subsoil dug out should be piled separately. For each pit, apply 50 to 100 kg of decomposed farmyard manure, 3 kg of potassium sulfate, 5 kg of calcium superphosphate, and 300 g of borax, mix evenly with topsoil and return to the pit, then backfill 20 to 30 cm of topsoil and it is ready for use, to ensure timely planting when the transplanted tree body arrives.
Figure 2 Digging a planting pit
4 Digging Out the Tree Body
4.1 Digging a Conical Soil Ball Around the Trunk
Half a month before digging, water thoroughly once. At 60 to 70 cm around the trunk, dig a ring-shaped trench 60 to 70 cm deep. When reaching 60 cm deep, dig inward at a slant to cut off lateral roots, forming a conical soil ball with relatively complete roots and a diameter of 60 to 70 cm.
4.2 Treatment of Roots in the Soil Ball
When roots are encountered while digging the soil ball, they must be cut off. Those with a diameter of less than 3 cm should be cut clean with pruning shears, and those over 3 cm should be cut clean with a saw (Figure 3). The saw cuts should be whittled smooth with a relatively sharp knife, then disinfected and sterilized with 100-fold carbendazim, spraying all roots once. After treatment, evenly apply varnish or petroleum jelly to seal the wounds, to reduce water evaporation from the roots.
Figure 3 Treatment of roots in the soil ball
4.3 Wrapping the Soil Ball
After digging out the soil ball, wrap it well and tie it tightly with straw rope. The straw rope should be tied up to below the main branches of the trunk to avoid damaging the bark. After wrapping, wet the tightly tied straw rope with water, which both retains moisture and prevents the soil ball from loosening (Figure 4).
Figure 4 Wrapping the soil ball
5 Transporting the Tree Body
Use a crane to lift the dug-out tree body onto the transport vehicle and secure it. When lifting, raise and lower gently, do not knock apart the soil ball at the roots, and even more so do not bruise the trunk (Figure 5). Place the wrapped trunk on a wooden rack and tie it tightly and secure it with soft rope. The canopy should also be appropriately bound together with soft rope to prevent large canopies from colliding with each other. At the same time, water retention measures should be taken during transport and wind protection should be provided.
Figure 5 Loading and transporting the tree body
6 Planting
When planting, spray and disinfect the soil required for planting with 100-fold carbendazim solution. First backfill 20 cm of disinfected soil, then lift and place the transplanted tree body into the planting pit, cut open the straw rope wrapped around the soil ball with pruning shears, backfill 20 cm of disinfected soil, gently shake the trunk left and right and back and forth, then firm the soil. Backfill another 20 cm of soil, shake the trunk again, firm the soil, and finally backfill 20 cm of soil, level and firm it, and build the returned soil into a tree basin 20 cm above the ground and 1.5 m in diameter, to facilitate watering and film mulching. Use Fuyuan Huang Pear or Haidong Pear planted at a ratio of 4:1 as pollinator trees, that is, 4 rows of Chengong Baozhu Pear to 1 row of Fuyuan Huang Pear or Haidong Pear.
7 Tying Fixing Supports
After the tree body is planted, use wooden poles 6 to 8 cm in diameter and 4 m long for each tree, with the first layer of main branches as the support point, to tie into a triangular support, and fix with iron wire, to prevent the trunk from swaying and affecting survival. Only after the tree body's root system has recovered well may the fixing supports be removed.
8 Shaping and Pruning After Transplanting
After the tree body is transplanted, many roots are damaged and the absorption function recovers slowly. To ensure a relative balance of water between the canopy and root system, the canopy must be shaped and pruned. Generally, 5 to 6 main branches are retained, and the remaining main branches are appropriately thinned out. All crossing branches and diseased and pest-damaged branches are removed. For larger tree bodies, the extension branches of large and medium branches can be treated with the heading-back method. When the flower bud quantity on framework branches is high, 2/3 can be cut off; when the flower bud quantity on auxiliary nurturing branches is high, 1/3 can be cut off, using a pruning method combining long, medium, and short cuts. Retrench large, medium, and small auxiliary nurturing branches, leave fewer flower buds on large branches, compress the flower bud quantity as much as possible, and reduce fruiting. The yield after planting must not exceed 1/4 of that before planting. After pruning, the pruning and saw cuts on branches and trunk should be promptly coated with paint or petroleum jelly, to reduce water evaporation and resist pathogen invasion.
9 Watering and Film Mulching
After planting, water thoroughly within the tree basin (Figure 6), water thoroughly again after 10 days, sprinkle 1 cm of dry soil on top, then cover the tree basin with plastic film, to reduce water evaporation, increase soil temperature, and promote new root growth. Remove it when the rainy season comes, to prevent excessive soil moisture.
Figure 6 Watering thoroughly within the tree basin
10 Management and Care After Planting
10.1 Fertilization
Fertilization helps restore tree vigor. In the early stage after transplanting, the root system has low fertilizer absorption capacity, so foliar topdressing is advisable, generally sprayed once about every half a month. Topdressing can be applied as foliar spray: for nitrogen fertilizer, use 0.3% to 0.5% (mass fraction, hereinafter the same) urea, 0.1% to 0.3% ammonium nitrate and ammonium sulfate; for phosphorus fertilizer, use 1% to 3% calcium superphosphate, 0.2% to 0.3% potassium dihydrogen phosphate; for potassium fertilizer, use 3% potassium chloride, 0.5% to 1% potassium sulfate. After new shoots grow, soil fertilization can be carried out, requiring light fertilizer applied frequently, and careful prevention of root damage.
10.2 Bud Removal and Shoot Control
The tree body itself has relatively sufficient stored nutrients, and after heavy pruning the sprouting ability increases, so timely bud removal and shoot control must be carried out to reduce the consumption of nutrients and water [Jishan Huayao].
10.3 Pest and Disease Control
After pests and diseases are discovered, control them promptly to protect the leaves and trunk.
10.3.1 Physical Control Manually remove the cocoon shells of slug moths, wipe and crush aphids and scale insect mothers, and hang insect-killing lamps to trap and kill adult insects of various pests.
10.3.2 Biological Control Protect natural enemies of pests, such as predatory beneficial insects (hoverflies, ladybugs, etc.) and parasitic insects (ichneumon wasps, braconid wasps, etc. of the order Hymenoptera); release chickens, ducks, and geese in the pear orchard to prey on pests; apply sex pheromone biological pesticides to trap and kill pests.
10.3.3 Chemical Control After pruning, boil and spray 5 degrees Baumé lime sulfur mixture, and use the residue for whitewashing the trunk and main branches to kill overwintering pathogens and insect eggs. Spray for protection at the early stage of pest and disease occurrence. For example, for scab, use 10% (mass fraction, hereinafter the same) difenoconazole 6,000-fold solution, 40% flusilazole 8,000-fold solution, or 80% mancozeb 800-fold solution; for brown rot and Phytophthora rot, use 50% carbendazim 800-fold solution or 50% iprodione 1,000-fold solution; for pear psyllids and aphids, use 10% imidacloprid 1,500-fold solution, 20% acetamiprid 4,000-fold solution, or 25% thiamethoxam 8,000-fold solution; for mites, use 1.8% abamectin 1,500-fold solution.