How to create a cascade branch in bonsai? A detailed explanation of the styling method
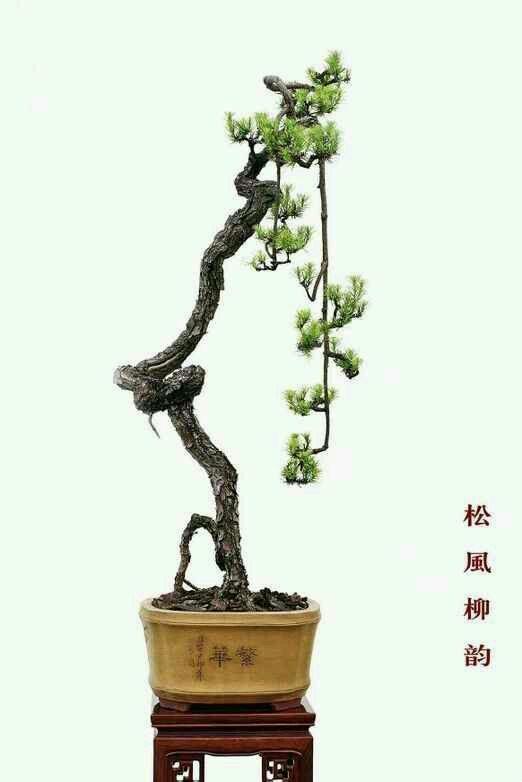
In bonsai styling, we sometimes see a type of branch technique, namely the "cascade branch." The cascade branch is often used for raw material with a tall trunk base and an empty lower section, and it can play a role of "turning the rotten into the magical." The cascade branch technique is not used easily in bonsai styling. This is because this branch technique changes the growth pattern of the plant, and creating it takes time, often requiring more than ten years to complete.
In nature, cascade branches are often formed by strong winds breaking and twisting them, heavy snow pressing them down, or people and animals breaking them. The so-called "cascade branch" refers to a branch that suddenly bends and cascades downward, with strong and distinct changes, often giving people an unexpected impact. According to the changes in the curvature of the trunk and branches, there are often two kinds of cascade branches in appearance. As shown in the figure
1. The base of the branch support bends downward into a long-span soft arc. This type of cascade branch styling is relatively simple; wiring and pulling are used to gradually make the branch droop. The base of the branch support forms a soft arc with a smooth, rounded transition. However, it lacks the charm of cascading and has no strong, distinct contrast. This type of branch is also sometimes classified under weeping branches.
2. Hard-angle short-span cascade branch.
The base of the branch support forms a hard angle and cascades downward over a short span, as if suddenly broken and drooping, falling yet not fallen. In particular, there is a section in the downward-cascading branch that is a hard, straight trunk, while the tip is again crooked and turns upward, and the branch line changes strongly and distinctly, with a powerful impact. This kind of cascade branch is highly difficult to style and takes a long time to shape, but the effect is obvious and often gives people a strong, shocking impact.
In cultivating a cascade branch, the first step is to determine the branch emergence position and height of the cascade branch. Then, through pruning, cultivate lower buds. As shown in the figure
Part 1 is the lower bud left from the initial pruning growing downward; the angle of the secondary branch emergence is acute, wanting to go down yet first going up, with obvious changes. The bearing is abrupt and steep.
Part 2 is the third section, serving as the transition between 1 and 3. It is cultivated by using the bud that sprouts after short pruning of the second section; the branch line retracts, accumulates strength, first retracting then extending.
Part 3 is the fourth section of the cascade branch. It is cultivated by using the leftward bud that sprouts after short pruning of the third section. At this time, the branch line springs out as a long-span straight line, forming a strong contrast with the branch lines of 1 and 2.
Part 4 is a short-span sharp bend. It is cultivated by the method of short pruning, seeking variation in the branch line.
The branch line of part 5 runs leftward, with an upward-turning trend and a rebounding force.
During the cultivation of the downward-cascading branch, it is necessary to suppress the apical dominance of the tree stump. Wrap and prune the top of the tree, build a rack and invert the stump, and so on.
▲ (Building a rack and inverting it, using apical dominance) Building a rack and inverting it means that when the lower buds under the branches sprouted by short pruning begin to sprout, a rack is built and the plant is inverted to change the apical dominance of the plant. Strengthen water and fertilizer management, make the tree vigor strong, and, just like making a cascade, turn the downward growth of the branch into upward growth to cultivate the cascade branch.