Practical experience in rejuvenating old pear orchards: achieving both stable yield and improved quality
Practical rejuvenation of old pear orchards for stable yield and improved quality
1 Orchard renovation methods
1.1 Tree framework renovation
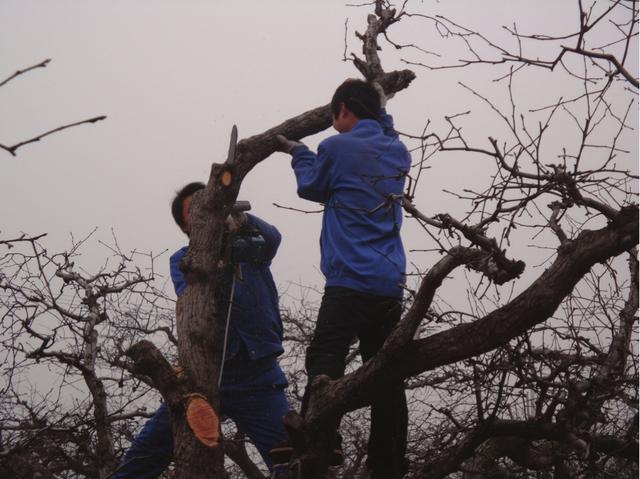
Adjusting the tree structure: fix 5-6 scaffold limbs, with 3-4 on the first tier and 2-3 on the second tier, the upper canopy spread less than 1/3 of the lower canopy spread, clear out auxiliary nurturing branches between tiers, control tree height at around 4 m, double-layer open-center form (Figure 1, Figure 2).
Figure 1 Dropping the top and opening the center of a pear tree
Figure 2 Aerial view of the renovated pear orchard
1.1.1 Raising the trunk Remove branches that drag on the ground and drooping branches, raising the trunk to 0.8-1 m.
1.1.2 Thinning and shortening the upper tier When the upper tier has more than 4 scaffold limbs and they exceed the length of the lower tier scaffold limbs by more than 1/3, carry out major thinning and heading-back within 2 years. Gradually fix the upper tier at 2-3 scaffold limbs, with length less than 1/3 of the lower tier scaffold limbs, opening up the light path to the upper tier.
1.1.3 Inter-tier renovation Where there are too many auxiliary nurturing branches between tiers, remove some; for overly long auxiliary nurturing branches, head them back so that the inter-tier spacing is not less than 1.5 m. Light-blocking auxiliary nurturing branches and stub remnants are thoroughly thinned out.
1.1.4 Renovation of fruiting branch groups Change fruiting branch groups from multi-axis extension to single-axis extension. Smoothing: lightly prune the extension leader of the branch group and smooth it out. After 2-3 years, when the extension leader weakens, head it back to a vigorous upward-slanting branch or strong bud with a relatively consistent orientation as the new extension leader, smoothing the nutrient transport channel and always keeping the branch group vigorous. Thinning: that is, thinning out thin and weak branches or overly dense branches. Use a combination of thinning cuts, heavy pruning and fruit spur breaking cuts to stimulate the sprouting of buds at the cut, so as to form flower buds or short fruiting branches for the next year. Bringing close: heading back is the main method, with the goal of bringing branches close to the fruiting axis, so as to shorten the nutrient transport route, improve the effective utilization rate of nutrients, and reduce damage to fruit from strong winds.
Lowering the upward-facing branches: for large, straight branch groups facing upward, following the principle of lowering the upward-facing ones, promoting the two sides and enlarging the back, change upright branch groups to slanting ones or thin them out, improving light conditions in the inner canopy.
Through year-by-year adjustment, the front and back of scaffold limbs are mainly slanted medium and small branch groups, while the middle is mainly medium and large branch groups, increasing the tapering of the main trunk and limbs. At the same time, gradually clear out the weak and small branch groups on the underside of scaffold limbs.
After adjustment, the pear trees in the orchard have basically formed a tree structure with ventilation tier by tier, light reaching every branch, and overall ventilation and light penetration.
1.2 Renovation of temporary trees
Distinguish permanent trees from temporary trees, gradually control the temporary trees until they are removed. Improve the overall light conditions of the pear orchard.
1.3 Inter-row renovation
Head back scaffold limbs. Where scaffold limbs in the inter-row and inter-tree spaces have already met, select and retain good extension leaders and head them back, ensuring a 1.5-2 m light path between rows.
1.4 Precautions for pear orchard renovation
Carry out over several years, with moderate intensity, and pay attention to summer pruning management.
2 Fine management of flowers and fruit
2.1 Pollination
Select Yali pear, Huangguan pear, Matihuang pear and others as pollinizer cultivars for Dangshan Suli pear. The suitable temperature for pollen treatment is 20-25°C, with relative humidity 70%-80%. Once the Suli pear flowers are 30% open, artificial pollination can be carried out. For early and mid-season pear cultivars such as Huangguan, in order to resist adverse weather and improve fruit quality, artificial supplementary pollination should also be strengthened.
2.2 Fruit thinning
Begin fruit thinning 15 days after petal fall. The amount of fruit retained can be determined according to cultivar, management level and tree vigor combined with production experience; generally retain fruit for a yield of 2 000-2 500 kg per mu, mainly single fruit.
2.3 Bagging
Choose high-quality yellow single-layer bags or outer-yellow double-layer bags, etc. (Figure 3). Before bagging, spray once with pesticides mainly to control pear psylla, yellow aphid, Kondo mealybug, black spot disease and others. At the same time, note to add high-quality and efficient calcium fertilizer.
Figure 3 Fruit bagging
2.4 Other
Do a good job in frost protection during the flowering period, re-pruning before flowering, flower thinning and other work. Through renovation and fine management, the trees are strong and vigorous, laden with fruit (Figure 4).
Figure 4 Fruiting state of the renovated pear orchard
3 Green prevention and control of pests and diseases
3.1 Agricultural and ecological regulation techniques
Remove diseased and insect-damaged fruit in time; strengthen pear orchard management, enhance tree vigor, improve ventilation and light penetration conditions in the orchard; clean ditches and drain water in time.
3.2 Trapping and killing techniques
Hang oriental fruit moth traps (Figure 5), oriental fruit moth mating disruption twist ties (Figure 6), insect-killing lamps (Figure 7) and yellow sticky insect boards in the pear orchard, and wrap yellow adhesive tape around the trunk to trap and kill oriental fruit moth, pear psylla adults and others.
Figure 5 Oriental fruit moth trap
Figure 6 Oriental fruit moth mating disruption twist tie
Figure 7 Fan-suction solar insect-killing lamp
3.3 Biological control techniques
Promote biological agents and protect and utilize natural enemies.
3.4 Plant-induced disease resistance techniques
Spray brassinolide, amino acid water-soluble fertilizer, amino-oligosaccharin and others to improve the stress resistance of pear trees.
3.5 Chemical control techniques
Rotate pesticides to delay the development of resistance in pear tree pests and diseases. Spraying is strictly prohibited during the pre-harvest interval.
3.5.1 Targets of control The main targets for pear trees are anthracnose, ring rot, oriental fruit moth, pear psylla, two-spotted spider mite, yellow aphid, Kondo mealybug and others.
3.5.2 Timing of control Depending on weather changes and the occurrence of pests and diseases, carry out pesticide control at the appropriate time.
3.5.3 Control agents For fungicides, choose fully complexed mancozeb, captan, thiophanate-methyl, pyraclostrobin, difenoconazole, tebuconazole and others; for insecticides, choose spirotetramat, emamectin benzoate, matrine, methoxyfenozide, chlorantraniliprole, hexaflumuron, lambda-cyhalothrin, Bacillus thuringiensis, thiamethoxam and others; for acaricides, choose cyflumetofen, spirodiclofen and others (Figure 8).
Figure 8 Mechanized pesticide spraying in the renovated pear orchard
4 Under-tree management of the pear orchard
4.1 Soil improvement
Adopt the method of planting grass or natural grass growing (Figure 9) [Jishan Huayao], mow twice a year, turn under once every 1-2 years, with a turning depth of 20-30 cm; make full use of rapeseed stalks, wheat straw, corn stalks, wheat bran, weed stalks and orchard grass to mulch the tree, with a thickness of 15-20 cm. After mulching with grass, press a small amount of soil on top of the grass to prevent it from being blown away and from burning.
Figure 9 Grass growing in the pear orchard
4.2 Soil testing and formula fertilization
According to the growth characteristics of pear and the soil nutrient test results, reasonably design and use pear formula fertilizer for production. Apply more formula base fertilizer, applying 400 kg of formula base fertilizer per mu, applied in autumn. Topdressing: once a year, applied in mid-to-late June. Use the multi-point hole application method, with holes 20 cm deep, applying about 40 kg of formula topdressing per mu.
4.3 Water management
Under normal circumstances, irrigate before bud break, during the fruit expansion period and before freezing. But when pear leaves wilt during the growing season, irrigation is required. Methods can include furrow irrigation, border irrigation and micro-sprinkler irrigation (Figure 10). Set up a drainage system in the pear orchard and drain water in time during the rainy season.
Figure 10 Micro-sprinkler irrigation in the pear orchard