4 fruits like strawberries and figs you can grow on your balcony, no need to buy them yourself
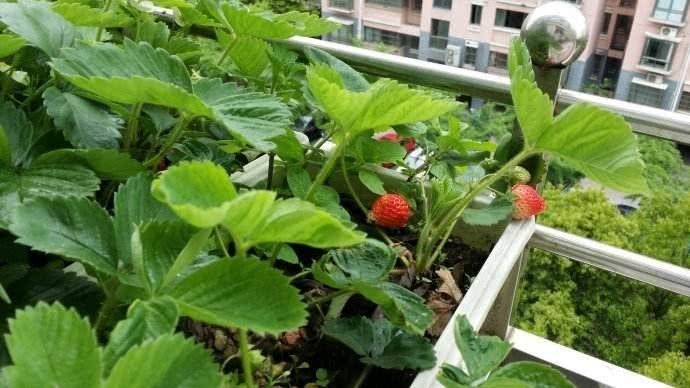
Growing strawberries on the balcony
Strawberries are the fruit best suited to growing on a balcony right now. They are small, so they fit perfectly in a flowerpot, and what's more, strawberries grown at home are healthy and free of pollution, sweeter and more fragrant than the artificially ripened ones sold outside.
Sowing strawberry seedsStep 1
If you buy seeds, it is best to choose foreign seeds, as the germination rate is guaranteed, and there are many varieties, some with white flowers and some with red flowers. The most popular should be the variety that flowers and fruits in all four seasons. Plant it now and you can eat strawberries all year round.
Step 2
Prepare a flowerpot or a large container and fill it with growing medium. The growing medium can be mixed in a ratio of peat soil : perlite : vermiculite = 3:1:1. After filling, sprinkle water on the soil to soak it.
Step 3
Smooth the surface of the soil, and use a small stick or chopstick to poke several small holes 5-6 mm deep in the surface, with a spacing of more than 10-15 cm between each small hole.
Step 4
Use tweezers to hold the strawberry seeds and place them in the holes. Gently cover the holes with soil. Do not press too much soil, and do not press too hard, otherwise it will be very difficult for the seeds to sprout.
Step 5
Seal the mouth of the flowerpot with plastic wrap and place the flowerpot in a place with bright, indirect light and good ventilation. Open the plastic wrap every day to ventilate and spray a little water. Do not let the soil dry out. After spraying, cover it again with the plastic wrap.
Step 6
After the seeds germinate, you can uncover the plastic wrap, but you must always be careful not to let the soil get too dry and keep it slightly moist at all times. If the germination rate is relatively high, then pinch off the weak seedlings in each hole and keep only the strongest one.
Propagating strawberries from runners
After strawberries grow up, they will produce some runners. These runners can be propagated into a new strawberry seedling. This is the most commonly used method of propagating strawberries.
Growing dragon fruit on the balcony
If you want to grow dragon fruit on a balcony that can actually bear fruit, you still need to grow it by the method of stem cutting. Do not even consider sowing seeds.
Step 1
Use a sharp knife to cut a 5-6 cm cutting from the mother dragon fruit plant. Cut the base of the cutting at an angle to expose the xylem, about 1 cm in length.
Step 2
Soak the cutting in a carbendazim solution for 10 minutes to disinfect it (if you do not have carbendazim, it is fine not to soak it). Then take it out and leave it in a cool, ventilated place to dry for 5 days.
Step 3
Prepare nutrient soil in a ratio of peat soil : vermiculite = 3:1, put it into a flowerpot, water it to soak it, and insert the dried dragon fruit cutting into the flowerpot.
Step 4
After planting, place the stem in a place with bright, indirect light and good ventilation for care. Within one month, it must not be exposed to rain and must not be watered.
Step 5
After the cutting takes root, let the dragon fruit get plenty of sun. The temperature must not be lower than 10 degrees, and then flowering and fruiting can be achieved. Look at this gardening friend's dragon fruit, does it make you envious?
Growing figs on the balcony
Growing figs at home not only satisfies your appetite, but more importantly, the broad leaves of the fig can also decorate the home, achieving two things at once. The best time for fig cuttings: early March to early May, and now is exactly the right time.
Step 1
For fig cuttings, choose strong branches without pests or diseases from a mature tree. Each branch section should be about 15-20 cm long, retaining 2 buds.
Step 2
Soak the branches in clean water for 2-3 hours and clean off the dirt on the surface. After that, soak the lower end of the branches in a rooting hormone solution for 5-10 minutes.
Step 3
The cutting soil can be river sand or nutrient soil, but before use, it is best to spray it with potassium permanganate or expose it to the sun to disinfect it.
Step 4
Prepare a plastic bottle, cut off the upper half of the plastic bottle, and keep only the lower half. Fill it with river sand or nutrient soil and water it thoroughly.
Step 5
Use a wooden stick to poke several small holes in the surface of the river sand, gently insert the branches into the small holes, then press the soil firm, place it in a place with bright, indirect light and good ventilation, and quietly wait for roots to grow.
Step 6
After a few weeks, the branches will take root. Through the transparent plastic bottle, we can see that the root system has already filled the entire bottle.
Step 7
Transplant the rooted fig branches, together with the original soil ball, into a flowerpot. Note that it must not lack water.
When you see the leaves slightly wilting, water them promptly. Of course, do not water too much either, and be sure to ensure sufficient light.
Growing pineapple on the balcony
Step 1
Buy a few pineapples from the market. Choose large ones with relatively fresh, emerald green leaves.
Step 2
Use your big kitchen knife to cut off the crown of the pineapple.
Step 3
Wash and trim the pineapple flesh and excess leaves at the lower part of the crown. After cleaning it thoroughly, place the crown in a place with bright, indirect light and good ventilation to dry for 2 days.
Step 4
Prepare a hydroponic bottle or plastic bottle, pour in some water, but do not fill it to the top. Place the crown at the mouth of the bottle, and note that there should be a gap of 1-2 cm between the bottom of the crown and the water to ensure air circulation and make it easy to induce roots.
Step 5
After a few weeks, the pineapple crown will grow small roots. During this period, if the water level gets low, keep adding water, always maintaining a gap of 1-2 cm between the bottom of the crown and the water level.
Step 6
The rooted crown can be planted directly into a flowerpot. The soil mix can be prepared in a ratio of leaf mold : garden soil = 2:1.
Step 7
Pineapple is a tropical plant, so it must be placed in a warm south-facing balcony with sufficient light for care, and watered only when the soil is dry. You need to be patient during the care process. Although it will not necessarily bear fruit 100 percent of the time, there is no problem with it surviving.