What Is Orchid Stem Rot? A Complete Guide to This Disease
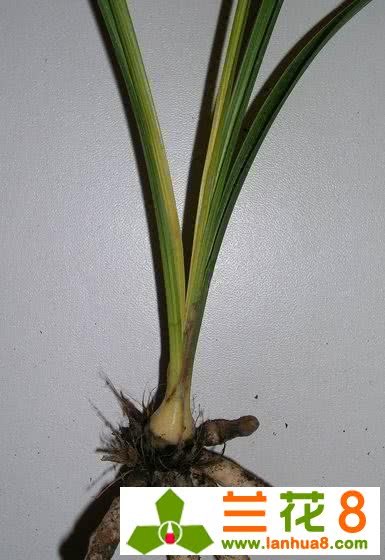
In recent days, with continuous high temperatures and high humidity, I have been receiving calls from orchid friends one after another, telling me that their beloved orchids have fallen ill, especially with stem rot running rampant and causing heavy losses. Whenever this happens, I always sadly tell them: the key to stem rot is prevention; once the disease breaks out, treatment is very ineffective. So, at the request of orchid friends, I have organized the stem rot materials and pictures I have collected in recent years, so that orchid friends can recognize stem rot and prevent it.
I. Understanding Stem Rot
Stem rot, also known as wilt disease and blight, is an orchid disease with a high incidence rate and severe losses in recent years. The peak of onset is from May to September each year, and the earliest cases can appear in February; high temperature and high humidity environments are even more conducive to the rapid development of the disease. The typical symptom is that the old pseudobulbs begin to turn yellow and wither (this differs from soft rot, which starts rotting from the new shoots), showing as follows: the core leaf of the old pseudobulb begins to yellow from the base, then rapidly spreads from bottom to top and from inside to outside, and one old pseudobulb withers and dies within 1-2 days. If touched by hand, the entire pseudobulb will break off at the ring of the leaf base. Inexperienced orchid friends often think the old pseudobulbs are simply naturally fading; but by the time the disease continues to develop and more strong pseudobulbs collapse, it is often already incurable.
Picture 1: A diseased shoot with the core leaf beginning to yellow from the base (early stage of onset)
Picture 2: A completely withered and yellowed diseased pseudobulb (middle stage of onset)
At this point, if you take the plant out of the pot, you may find that the root system of the diseased shoot is still intact, and may even have crystal root tips, and the new shoots produced that year are also intact. But if you cut open the pseudobulb of the diseased shoot, you will find that the inside of the pseudobulb has already turned brown, or even rotted. Cutting further downward will also reveal that those shoots with green leaves that look intact have pseudobulbs already infected and discolored inside, and it is only a matter of time before they collapse from the disease. It can be seen that the spread of this disease is extremely hidden.
Picture 3: A diseased shoot with new shoots
Picture 4: Cutting open the adjacent pseudobulb further reveals that it has already been infected.
As for the pathogen of stem rot, many documents describe it as Fusarium oxysporum of the Deuteromycotina subdivision. I temporarily agree with this judgment and do not want to continue verifying it. Because I once had this idea and took diseased shoots to an agricultural research department, but was told that to determine what the pathogen is, I would first need to pay 50,000 yuan, so I stopped the idea of getting to the bottom of it.
From the phenomenon of stem rot onset, it indeed resembles the characteristics of Fusarium infecting plants. Its main feature is that it infects the vascular bundles of the plant and, after multiplying in large numbers, blocks the plant's water transport channels, causing dehydration and death from lack of nutrients. All orchids with stem rot wither and yellow from the base, gradually moving upward, with the whole plant dehydrating, until it turns from yellow to brown, and then dies. I have observed that diseased plants under direct sunlight develop very quickly, turning from green to withered yellow in 2-3 hours. This is actually light evaporation accelerating the process. Orchid friends also often report this phenomenon, saying it is very strange: they did not go to look at it for just one afternoon, and when they came back in the evening it had already withered, which makes stem rot feel frightening and mysterious. In fact, for a withered orchid, it had already been diseased before that; they just had not noticed it.
For orchids with stem rot, curing them is very difficult. At most, with early detection, dividing and planting separately, you can save the front-growth shoots that have not been infected by the pathogen and keep them as seed stock. And the prerequisite is that you must have the ability to prevent and identify stem rot.
II. Preventing Stem Rot
Is there any sign before stem rot breaks out? Through the practice of orchid friends, it has been found that stem rot, including soft rot, has a common characteristic in the early stage of occurrence: new shoot growth stalls. Especially in May and June, once new shoots stop growing, special attention should be paid to changes in the whole pot of orchid plants, especially observing the decline of old pseudobulbs. Once symptoms are found, you should take the plant out of the pot and divide it for separate planting without hesitation. To prevent accidental damage, you can also place the orchid pot under direct sunlight for half a day and then observe its changes. Healthy orchids will not dehydrate and wither because of half a day of exposure.
However, looking at new shoots every day is very tiring. How can you easily observe the growth of new shoots? Here I introduce a simple method to everyone: the growth line method. That is, use a water-based white marker to draw a horizontal line at the base of the new shoot. Because the leaves grow at different rates (the inner ones faster), the trace of growth can be clearly seen the next day. It is both simple and interesting. See the picture below:
Stem rot is a soil-borne disease. Truly thorough prevention still requires work in the following aspects:
1. Prevent wounds on orchid plants. The wounds caused by frequent division of orchids are the greatest harm, so you should try to treat the wounds well. It is best to apply a wound healing agent immediately after division (finished products are sold on the market); to prevent insects in the soil from biting the pseudobulbs and causing infection, you can apply insecticide to the soil. Carbofuran is recommended;
2. Handle diseased shoots promptly and thoroughly. The planting medium and pots used by diseased shoots should all be discarded, and the farther away they are thrown, the better;
3. Do not use the soaking-pot method when watering orchids, to prevent cross-infection;
4. Keep the orchid-growing environment clean, with no standing water and no flying dust;
5. Persist in chemical prevention. During the peak period of onset, use chemicals to drench the pot once every fifteen days. 30% Duofu wettable powder is recommended. Through the practice of orchid friends, it has a special effect on preventing stem rot. I publish orchid knowledge and pictures every day, taking you to understand orchids in depth and teaching you to grow orchids easily. If there is anything about orchids you do not understand, you can ask me at any time or leave a message below. If my knowledge has helped you, I hope you can give me a like or forward it to help more people!