How to Arrange Dragon Stone? An Essential Tips Guide for Beginners
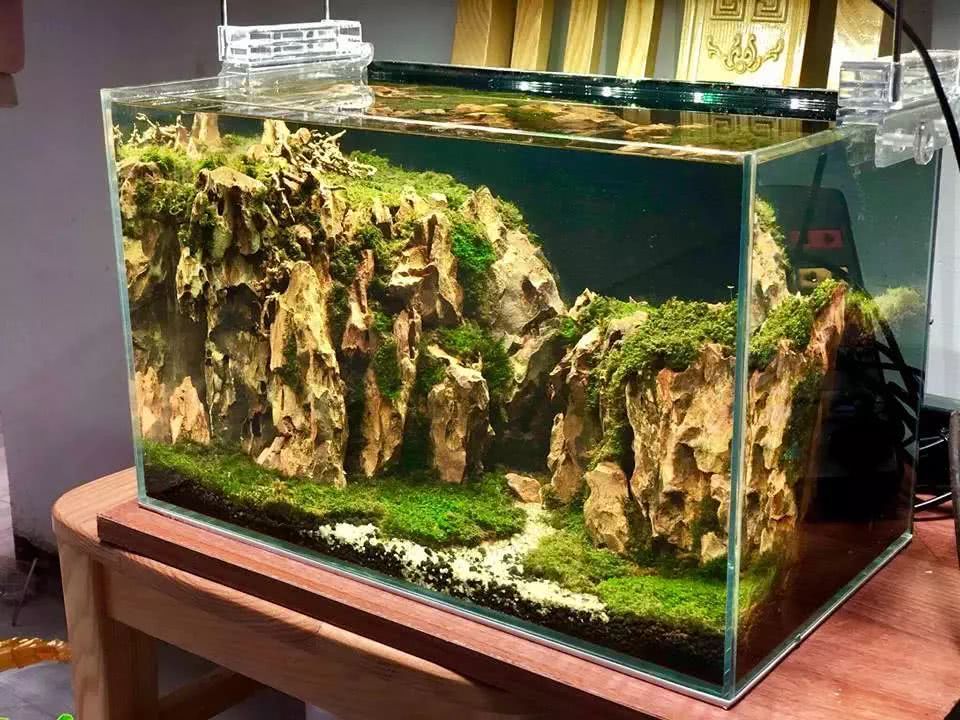
To create beautiful rock landscapes and mountain scenes, the best teacher is still nature itself, but mastering some techniques and understanding how to grasp nature's patterns is still helpful for aquascaping.
The examples used here are basically all self-cut dragon stone with vertical grain. Those who like dragon stone can also view this as a case study of arranging dragon stone with vertical grain.
I. Cut Dragon Stone
Personally, I think that if you want to create a premium rock landscape, you need to process the stones to some extent, generally mainly cutting, using a marble cutter (an ordinary electric saw + diamond blade). Reasons and benefits:
1. It can stabilize the base, so you don't have to worry about the stones toppling, thus achieving a stable and attractive formation
2. Stone arrangement often emphasizes height layering. Due to limited materials, sometimes there are no stones of the height and shape you need, and cutting can help solve this
3. Stones have grain. Cutting helps with positioning, so the stone's grain won't deviate during arrangement
Of course, cutting stones has certain limitations. Few people have the conditions to cut stones, but by understanding the principles, they can also serve as the principles and basis for selecting and assessing stones when arranging them.
The image below shows stones after cutting;
Things to note:
1. Consistency of grain, all vertical grain
2. Differences in size, mainly referring to height. Generally speaking, a group of stones, or a mountain body, should have at least three height levels, namely what is commonly called the main peak, low mountains and slope foothills. Such a stone group or mountain body looks more layered. This is true for one group of stones, and the same rule applies to combinations of multiple groups.
II. Independent Mountain Bodies (Stone Groups)
Complex mountain bodies can also be composed of individual stone groups. The image below shows stone group modules
The image above shows stone groups after gluing. Generally, marble glue is used for gluing stones
Stone groups can be large or small, complex or simple. Stone groups express different landscapes under different scale environments. For example, the same stone group can be understood as a mountain range in a distant view, or as a slope foothill or reef in a close view. Combined with different plants, they can also be stone groups in different environments.
Many people always feel that these stones can't be used for planting. I've briefly summarized:
1. It's related to whether the stone group leaves a mud slope
2. It's related to whether there's a mud slope between stone groups
I will elaborate in detail below.
In a rock landscape, the amount of plant area
A: It's also related to the landform being expressed: there are several types of mountains in nature
1. Rocky mountain/slope
2. Alternating soil and rock mountain/slope
3. Earthen mountain/slope
B: Even for rocky mountains, it's related to the distance being expressed
1. Close view, alternating soil and rock, generally cannot express a mountain scene, only a slope or rock landscape (even closer views become an exception again)
2. Medium view, alternating soil and rock, the soil area noticeably decreases, can express near mountains
3. Distant view, only rock. Generally mountain tops, distant mountains, and the upper-middle parts of mountain bodies are all stone grain, and no green can be seen.
Therefore, in mountain landscapes, seamless close fitting of stones is often needed to express the mountain's momentum. It's not as some people understand, that landscape bonsai is less natural than aquascaping, or that it's hard to plant.
The theme, or concept, fundamentally determines the proportional relationship between plants and stones. It also determines the amount and types of plants.
Comparing this landscape photo with the stone group photo, you can get a rough understanding
Now looking at the stone group again, let's observe the mud in the stone group:
As shown in the image above, the stone group can reserve space for laying mud. Besides laying mud in stone crevices, the bottom of the stone group can also match the mountain's momentum and add terrain.
Obviously, the use of stone groups can make the details of the entire landscape very clear.
Of course, stone groups can also be supplemented with appropriately proportioned azalea roots, small driftwood, branches, etc.
III. Layout of Stone Groups
With stone groups, the significance lies in changing stone arrangement from the original arrangement between individual stones to combinations between stone groups. The benefits are:
1. The angle of stone groups can be adjusted freely to match the posture of a tall main peak or main stone, making rock landscapes and mountain scenes that were previously difficult to master simple and easy to execute
2. Previously, moving one stone affected everything. If you were slightly dissatisfied, all stones large and small needed to be completely redone. With stone groups, the workload is greatly reduced
3. Because of the details of stone groups, many techniques that were previously impossible to master become easy, such as fixing slopes, distinguishing different plant areas, etc.
The combination principles between stone groups follow the same principles as stone arrangement, nothing more than the relationships of up-down, right side, and front-back. You can refer to my previous posts. Here I'll give some examples for illustration, and won't go into the methods of arrangement again
1. Coordination of a single stone group with the main stone
With stone groups, you can easily arrange them into mountain bodies;
Combination of multiple stone groups with the main stone
Combination of multiple stone groups (the image above consists of 4 stone groups and two main stones)
Combination of stone groups with azalea roots or driftwood
Combination of large stone groups
Large combination (the image above consists of 12 stone groups and 8 main stones of various sizes)
Combination for tank placement
When placing in the tank, with the coordination of mud, you can more easily increase the height of stone groups, thus increasing the front-back and top-bottom layering. Generally, you can proceed by adding mud layer by layer and stone groups layer by layer, from front to back and from bottom to top.
Space can be left between the main stone and stone groups for piling mud and planting
The height coordination between stone groups and mud makes it easy to build up height without lacking detail.
Note: The same stone group method also applies to Qinglong stone (Seiryu stone)
Closing remarks:
1. Not everyone has the conditions to saw and glue stones, but stone groups do have incomparable advantages in the tank setup process;
2. Understanding the composition of stone groups is helpful for appreciating other aquascaping works and photographic works, and for grasping the patterns
3. The modular operation of stone groups is not the ultimate arrangement method. Its drawback is the lack of unified overall design. To create beautiful landscapes, you must still flexibly apply various techniques; systematically design the entire tank to achieve a suitable ratio between plants and stones.
The subtleties involved are hard to fully explain. You can experience them through the practice of stone arrangement. Everyone is welcome to discuss and offer corrections.
-End-