Detailed Introduction to the Basics of Penjing Styling
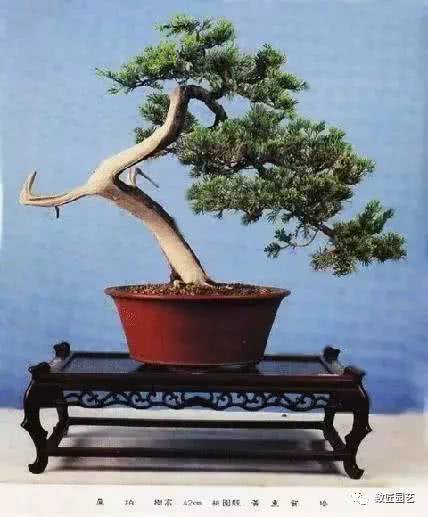
This article is based on my own experience and insights. I wrote it to help newcomers learn to style their own trees instead of asking others for help all day long, but I hope even more that you can create beautiful penjing yourselves. My abilities are limited, so please forgive any shortcomings. Masters, please just treat it as a joke.
I will explain things to everyone in a plain and easy-to-understand way.
First, let me talk about the roots. The roots of a tree stump are the foundation of penjing and are also very important. After a stump is collected from the mountain, you should first cut the roots, then cut the trunk. Cutting the roots means, while ensuring survival, cutting the thick roots as short as possible, which is conducive to producing more roots and more buds, and also helps with potting. The cuts must be flat and smooth. I personally really like exposed roots. Friends can expose them or not, but either way, you must ensure that roots can be seen on the surface of the pot.
Second, let me talk about the trunk. For the trunk of a penjing, S-shaped trunks must be strictly avoided. Whether it looks good or not, do not do it. Remember this firmly. After a stump is collected from the mountain and the roots are cut well, the trunk should be shortened to about 50 cm. If it is a double-trunk tree, shorten the longer one to 50 cm and the shorter one to about 30 cm. If you want to make a short and stout tree, shorten it to about 10 cm, depending on the situation, and use it flexibly. The trunk should be thick at the bottom and thin at the top. Trunks that are equally thick or equally thin are also acceptable. Those that are thin at the bottom and thick at the top must be thrown away. Branches on the trunk that need to be removed should be cut off flush against the bark.
Third, let me talk about the branches. The cultivation of a tree's branches is very important. Everyone, remember this: the primary branches of the tree should be about 18 cm from the root, depending on the situation. The branches that grow on the stump are all primary branches. After the branches become woody, keep the ones that can be used for styling and cut off the useless ones. Note: cut them off flush against the bark.
After the branches become woody, set a rough direction for the branches, but do not shorten them. Use pulling and bending as much as possible, and use aluminum wire wrapping sparingly, because this helps the branches thicken. At least let them grow for one year before cutting. During this period, no matter how long they grow, do not bother with them. If the stump grows weakly, then it must be two years, no less. After one year, if you are an ordinary hobbyist, you can shorten the primary branches and grow secondary branches. Of course, if you are a professional hobbyist, you can ignore this. After all, I am mainly writing this for the majority of non-professional hobbyists. Penjing cultivated this way are also very beautiful. It is unrealistic to expect an ordinary person to spend more than 10 years cultivating one penjing.
The shortened length of primary branches should be controlled flexibly, with beauty as the standard. I will discuss this below. Do not look at Baidu or books. Those are standard procedures for growing penjing, and non-professionals should not learn from them.
After the primary branches take shape, the secondary and tertiary branches can be pruned freely. Remember these principles: always wait until they become woody before cutting. I personally do not approve of cutting them into steamed-bun tops or steamed-bun slices; cutting them into clusters is fine. The tips should taper and point downward. Of course, if you like, you can do whatever you want. Branches should have overlapping branches and crossing branches removed. Symmetrical branches within a pad can be kept, but it should not be too dense; it should be a bit sparse. When pruning secondary and tertiary branches, keep two buds and cut off the rest.
Fourth, let me talk about the leaves. Small leaves are the first choice for penjing plants, but there are also many fine specimens with large leaves, so do not blindly pursue small leaves. I have found that holly makes a penjing that is quite impressive. Friends can give it a try.
Fifth, this is the key point: overall styling. Forum friends have sent me many of their own stumps asking me to style them. Actually, styling is very simple: it is just triangles and mechanics.
Triangles means that the branches and trunk of a penjing should form a triangle. Why? Because of the principle of triangular stability, which can give people a sense of steadiness and beauty. But note: it only needs to resemble one; just a hint is enough. Do not copy it rigidly. Any triangle is fine: equilateral, scalene... In short, it is about artistic conception. Do not make it too stiff.
Mechanics is the beauty of force. A good penjing should achieve this: left low and right high, front low and back high. When wiring and bending, proceed from bottom to top and from left to right in order. The expression of mechanics in penjing is left open and right closed. This is not easy to explain clearly; over time you will gradually understand it.
Penjing styling is like a simple sketch: use the simplest branches to create the most beautiful natural beauty. When many friends show me their penjing, they are bulky and awkward. The key lies in one word: sparseness. After I guide them to thin-prune, they become very beautiful. So do not make them too dense and lush; simple is good. You must be able to bring yourself to cut. Without breaking, there is no building. Do not hesitate; be calm and decisive. I do not advocate drawing a design in advance. I advocate styling while growing and guiding according to the tree's tendency. I do not want to see everyone blindly imitating; you must make your own thing. This is the essence and charm of penjing.
Sixth, let me talk about soil. Using soil plus perlite, or soil plus coal cinder, is fine. If conditions allow, you can add something else. If not, this is enough.
Seventh, watering. Many penjing are drowned by water. The books say "see dry, see wet," "do not water if not dry," and "if you water, water thoroughly," which has confused many people. I will tell you: when the soil turns white and the surface soil is dry, then you water, until water comes out from the bottom. Otherwise, do not water even a little.
Eighth, fertilizing. Use sesame cake, bean cake... soak in water to ferment, then mix with clean water to water the flowers. That is a cure-all, and the effect is quite good. Sesame cake can be bought at an oil mill.
I am tired after saying so much. I hope everyone can make their own penjing. I have a penjing guidance thread. If you are unsure, you can ask me for advice, and you can also look at my guidance to forum friends so you can learn.
This article is intended to help newcomers. My level is limited, so please forgive me. I feel a lot of pressure doing this. If I say something wrong or give improper guidance, please forgive me!
Masters, just treat it as entertainment. I am showing my poor skills... I will say more later when I think of something.
This article is reposted from the internet. If there is any infringement, contact the author.
Wonderful content