Illustrated guide to the whole process of making a multi-trunk old privet stump bonsai
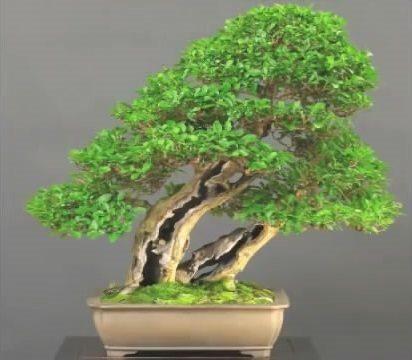
Today we continue the story of Graham and his stump bonsai. Today's star is a multi-trunk privet. This kind of privet is very common in England, usually planted around houses as hedges, so this kind of stump is very plentiful. 20 years ago, Graham started making bonsai from this kind of stump material; the one below is a work of his from that time, and it won an award. So he knows this species very well, and knows that carving and pruning it are no problem, and that it will not easily be killed.
What we are working on today is the stump in the picture below, also dug out of a family's hedge, and it has been grown in this pot for four or five years, during which it went through many prunings before reaching its current state. The characteristic of this stump is that it is one base with many trunks, with 6 thick trunks dividing from the base, so it is very suitable for bonsai shaping by carving. But because there are too many trunks, some have to be chosen and some discarded.
When you get a piece of stump material, the first thing to do is assess the stump and work according to the material, making maximum use of the stump's strong points. Graham chooses to start from this side. He sawed off the front three trunks; when leaving stumps, pay attention to height levels, so that in the end the carved result has a layered effect of high and low.
After removing the front three trunks, the trunks behind are exposed, and the three thick trunks at the back also need height adjustment. The trunk pointed to by the arrow in the picture below has relatively large spacing between branches and is too straight, so if left too long it will not look good. And the two thick trunks on the right are joined together. So he chooses to shorten the tall trunk on the left.
After shortening, many artificial saw cuts are left, and these cannot remain, so carving is needed. First coarse, then fine, and finally the wire-carving technique is used to make those fine textures; this imitates the wood fibers left in nature after dead wood has endured years of wind, sun and rain erosion.
This effect really looks very ancient and full of age. Then the work is washing and brushing with lime sulfur, and wire wrapping and bending, which will not be introduced again here.
Compare the effect. This is before making
After making.
Look at the details again: inside the holes, a blowtorch is used for carbonization treatment, which is also common in nature; many hollow old trees already have carbonized inner surfaces.
After another one to two years of care and 4-5 prunings, this tree's leaves will become denser and more shapely.
(The video material is also uploaded at the same time.)