Several major bonsai shaping techniques, suitable for beginners
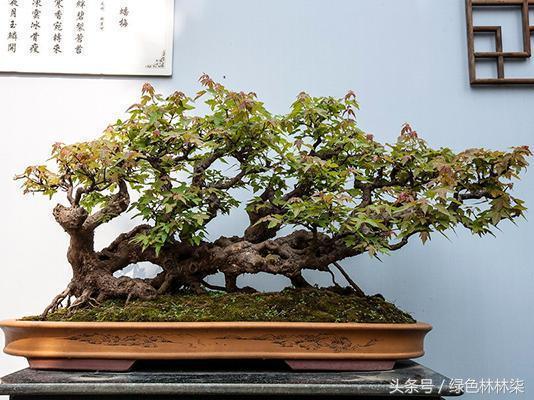
To create a beautiful bonsai, pruning and trimming are essential.
It is just like how people need regular haircuts and styling, the same principle applies.
Bonsai pruning is all about changing the bending form of branches and trunks, making the tree's shape more elegant.
This is also to protect and maintain the tree landscape that has already taken shape.
Pruning Timing
1. Deciduous tree bonsai can be pruned all year round; pines and cypresses are best pruned during the dormant season.
2. During the plum rain season there is plenty of rain, and trees grow more luxuriantly, so prune less, or avoid heavy pruning. This is because a large amount of branches and leaves being cut will affect the tree's normal growth.
3. Near the end of autumn, do not heavy-prune or hard-prune; after heavy or hard pruning, new buds will sprout one after another, and when a cold snap arrives, the tender buds will freeze to death.
4. Generally speaking, trees with strong vigor and vigorous growth can be pruned more, while those growing weakly should be pruned less. According to the needs of tree shaping, it is usually necessary to cut off messy crossing branches, overlapping branches, parallel branches, whorled branches, opposite branches, weak branches, diseased branches, etc.
Pruning Methods
1. Structural pruning
Structural pruning, also called positioning pruning, refers to the first pruning of bonsai shaping, determining which branches at different positions to keep and cutting off the excess branches. After positioning pruning, the number of branches, their positions and the mutual distances between branches are determined, which directly affects the beauty of the tree bonsai's form. Therefore, before pruning, one must carefully conceive the design, considering the form of the tree's shape; as the saying goes, "conceive the idea before the brush moves," and at the same time one must have a well-thought-out plan before making the cut.
2. Reduction pruning
Reduction pruning is a pruning method that shortens branches, and it is also an important measure for shaping trees and maintaining the tree landscape. In terms of shaping, reduction pruning dwarfs the tree, makes the branches full, gives a controlled taper from top to bottom, and creates variation in the bends.
3. Thinning pruning
Thinning pruning maintains the tree landscape and can increase ventilation and light penetration, reduce the occurrence of pests and diseases, concentrate nutrients, and promote lush branches and leaves with abundant flowers and fruit.
The timing of thinning pruning varies depending on whether it is heavy or light pruning. During the growing season, when branches and leaves are lush, light pruning can be done at any time, but heavy pruning is not advisable. For tree species with strong sprouting ability, such as Japanese bush cherry (Prunus japonica) and elm, heavy pruning can be carried out while avoiding the plum rain season. After pruning, reduce watering, apply thin fertilizer frequently, and increase light exposure.
In addition, besides the techniques of wiring and pruning, pinching, etc., there are other shaping techniques for bonsai. The main commonly used ones are as follows:
1. Bark-prying method
This is done during the tree's peak growing season by inserting a sharp knife into the cambium layer of the trunk's bark, then gently prying a few times to temporarily separate the bark from the xylem. You can also insert appropriately sized stones into the pried-open bark, then wrap and bind it with hemp fiber or palm fiber. After the wound heals, that part of the trunk swells and bulges, presenting a venerable, aged appearance.
2. Tearing method
For branches that need thinning, instead of using scissors, use your hands to tear them off together with the bark and part of the xylem, exposing a wooden groove on the tree. After the wound heals, it looks as if naturally formed, giving an impression of antique elegance and aged ruggedness.
3. Stick-bending method
This uses sticks of appropriate thickness, such as wooden sticks, bamboo poles, iron rods, hard plastic pipes, iron pipes, etc., as supports. According to the shaping design, the young tree's trunk is wound around the support to bend it into shape. According to the trunk shape and bending degree required by the shaping design, one, two, or even three sticks can be cleverly combined and used. Since iron pipes conduct heat quickly, which is unfavorable for trunk growth, cloth pieces, hemp fiber, etc. can be wrapped around the surface of the iron pipe for heat insulation. Bonsai suitable for bending with this method are all 2-3 year old young trees; older trees with hard trunks are not suitable. After bending, bind firmly with rope, and during the maintenance period, prune and shape the branches and leaves. After 1-2 years of binding, remove the sticks, and with slight processing, it becomes a naturally curved, graceful osmanthus bonsai.
4. Knot method
For shaping with this method, generally young trees with soft branches and trunks are chosen. A knot is tied or a 360-degree circle is coiled at a point not high above the ground on the main trunk. After slight binding and several years of cultivation (along with raising the roots) and pruning and processing, it can become a bonsai of graceful and distinctive form.
5. Bark-peeling method
On the viewing side of the osmanthus bonsai, on the middle-lower part of the trunk, a piece of bark is removed vertically in an irregular shape, exposing the xylem. After the wound heals and forms a scar, the trunk appears aged and beautiful.
6. Trunk-splitting method
On the viewing side of the bonsai, on the middle-lower part of the trunk, first remove a piece of bark, then use a sharp knife or small chisel to remove about one third of the xylem. After scarring, a concave wooden area is exposed, to show the bonsai's ancient and peculiar character. However, the splitting must not be too deep; at deepest it must not exceed one half of the trunk diameter; nor should there be too many, generally 1-2 splits per bonsai is enough, otherwise it will affect the bonsai's growth and risk looking "riddled with holes."
7. Branch-breaking method
The branch-breaking method can be further divided into two types: breaking the branch and leaving a mark, and breaking but not severing.
(1) Breaking the branch and leaving a mark. First, at the point on the tree branch or trunk where you want it to break, saw a groove about half the depth of the branch diameter, then tear it off together with the bark and xylem. After the scar heals, it looks as if naturally grown, with a beautiful form.
(2) Breaking but not severing. First wrap the branch to be broken with metal wire, then break the branch halfway (broken but not severed, the branch still survives). The angle and position of the break depend on the shaping needs. Generally, only one or two branches per bonsai are broken. The broken branch curve is stiff and vigorous, opening up a fresh new look.
8. Vertical bark-splitting method
Some bonsai trunks are smooth and lack an aged appearance. In spring, you can make several vertical cuts on the trunk, deep enough to reach the xylem. After the wounds heal, the bark becomes rough and aged.
9. Trunk-cleaving method
This means splitting the trunk vertically. According to different shaping requirements, there are two operating methods: one is to split the roots and trunk into two, but not separate the canopy, that is, split below but not above, still remaining one plant; the other is to split the roots, trunk and canopy all into two, becoming two plants, which with careful maintenance can be made into two osmanthus bonsai.
For the trunk-cleaving method, choose plants with strong vitality, and carry it out before spring sprouting.